While we are working on a project, our main goal is to make it work as it supposed to and fulfill all the customer’s requirements.
But wouldn’t you agree that creating a project that works is not enough? Shouldn’t that project be maintainable and readable as well?
It turns out that we need to put a lot more attention to our projects to write them in a more readable and maintainable way. The main reason behind this statement is that probably we are not the only ones who will work on that project. Other people will most probably work on it once we are done with it.
So, what should we pay attention to?
In this post, we are going to write about what we consider to be the best practices while developing the .NET Core Web API project. How we can make it better and how to make it more maintainable.
We are going to go through the following sections:
- Startup Class and the Service Configuration
- Project Organization
- Environment Based Settings
- Data Access Layer
- Controllers
- Actions
- Handle Errors Globally
- Using ActionFilters to Remove Duplicated Code
- Using DTOs to Return Results and to Accept Inputs
- Routing
- Logging
- CryptoHelper and Data Protection
- Content Negotiation
- Security and Using JWT
- Conclusion
Startup Class and the Service Configuration
In the Startup class, there are two methods: the ConfigureServices method for registering the services and the Configure method for adding the middleware components to the application’s pipeline.
So, the best practice is to keep the ConfigureServices method clean and readable as much as possible. Of course, we need to write the code inside that method to register the services, but we can do that in a more readable and maintainable way by using the Extension methods.
For example, let’s look at the wrong way to register CORS:
Even though this way will work just fine, and will register CORS without any problem, imagine the size of this method after registering dozens of services.
That’s not readable at all.
The better way is to create an extension class with the static method:
And then just to call this extended method upon the
IServiceCollection type:To learn more about the .NET Core’s project configuration check out: .NET Core Project Configuration.
Project Organization
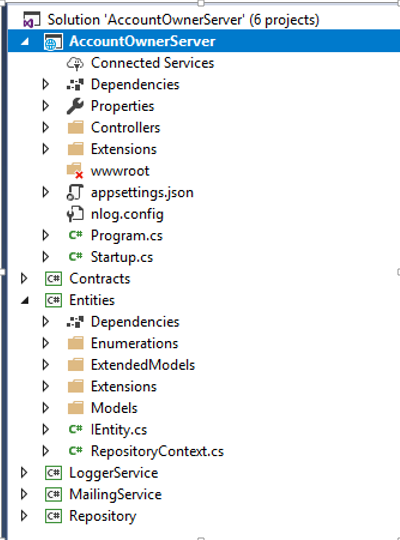
We should always try to split our application into smaller projects. That way we are getting the best project organization and separation of concerns (SoC). The business logic related to our entities, contracts, accessing the database, logging messages or sending an email message should always be in a separate .NET Core Class Library project.
Every small project inside our application should contain a number of folders to organize the business logic.
Here is just one simple example of how a completed project should look like:
Environment Based Settings
While we develop our application, that application is in the development environment. But as soon as we publish our application it is going to be in the production environment. Therefore having a separate configuration for each environment is always a good practice.
In .NET Core, this is very easy to accomplish.
As soon as we create the project, we are going to get the appsettings.json file and when we expand it we are going to see the appsetings.Development.json file:
![]()
All the settings inside this file are going to be used for the development environment.
We should add another file appsettings.Production.json, to use it in a production environment:
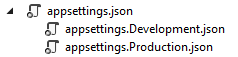
The production file is going to be placed right beneath the development one.
With this setup in place, we can store different settings in the different appsettings files, and depending on the environment our application is on, .NET Core will serve us the right settings. For more information about this topic, check out Multiple Environments in ASP.NET Core.
Data Access Layer
In many examples and different tutorials, we may see the DAL implemented inside the main project and instantiated in every controller. This is something we shouldn’t do.
When we work with DAL we should always create it as a separate service. This is very important in the .NET Core project because when we have DAL as a separate service we can register it inside the IOC (Inversion of Control) container. The IOC is the .NET Core’s built-in feature and by registering a DAL as a service inside the IOC we are able to use it in any controller by simple constructor injection:
The repository logic should always be based on interfaces and if you want, making it generic will allow you reusability as well. Check out this post: .Net Core series – Part 4 to see how we implement the Generic Repository Pattern inside the .NET Core’s project.
Controllers
The controllers should always be as clean as possible. We shouldn’t place any business logic inside it.
So, our controllers should be responsible for accepting the service instances through the constructor injection and for organizing HTTP action methods (GET, POST, PUT, DELETE, PATCH…):
Actions
Our actions should always be clean and simple. Their responsibilities include handling HTTP requests, validating models, catching errors and returning responses:
Our actions should have
IActionResult as a return type in most of the cases (sometimes we want to return a specific type or a JsonResult…). That way we can use all the methods inside .NET Core which returns results and the status codes as well.The most used methods are:
- OK => returns the 200 status code
- NotFound => returns the 404 status code
- BadRequest => returns the 400 status code
- NoContent => returns the 204 status code
- Created, CreatedAtRoute, CreatedAtAction => returns the 201 status code
- Unauthorized => returns the 401 status code
- Forbid => returns the 403 status code
- StatusCode => returns the status code we provide as input
Handling Errors Globally
In the example above, our action has its own try-catch block. This is very important because we need to handle all the errors (that in another way would be unhandled) in our action method. Many developers are using try-catch blocks in their actions and there is absolutely nothing wrong with that approach. But, we want our actions to be clean and simple, therefore, removing try-catch blocks from our actions and placing them in one centralized place would be an even better approach.
.NET Core gives us an opportunity to implement exception handling globally with a little effort by using built-in and ready to use middleware. All we have to do is to add that middleware in the Startup class by modifying the Configure method:
We can even write our own custom error handlers by creating custom middleware:
After that we need to register it and add it to applications pipeline:
To read in more detail about this topic, visit Global Error Handling in ASP.NET Core Web API.
Using ActionFilters to Remove Duplicated Code
Filters in ASP.NET Core allows us to run some code prior to or after the specific stage in a request pipeline. Therefore, we can use them to execute validation actions that we need to repeat in our action methods.
When we handle a PUT or POST request in our action methods, we need to validate our model object as we did in the Actions part of this article. As a result, that would cause the repetition of our validation code, and we want to avoid that (Basically we want to avoid any code repetition as much as we can).
We can do that by using ActionFilters. Instead of validation code in our action:
We can create our filter:
And register it in the
Startup class in the ConfigureServices method:Now, we can use that filter with our action methods.
To read in more detail about using Action Filters, visit our post: Action Filters in .NET Core.
Using DTOs to Return Results and to Accept Inputs
Even though we can use the same model class to return results or accept parameters from the client, that is not a good practice. A much better practice is to separate entities that communicate with the database from the entities that communicate with the client. Yes, the answer is to use DTOs.
The model class is a full representation of our database table and being like that, we are using it to fetch the data from the database. But once the data is fetched we should map the data to the DTO and return that result to the client. By doing so, if for some reason we have to change the database, we would have to change only the model class but not the DTO because the client may still want to have the same result. You can read more about the DTO’s usage in the fifth part of the .NET Core series.
We shouldn’t be using DTOs only for the GET requests. We should use them for other actions as well. For example, if we have a POST or PUT action, we should use the DTOs as well. To read more about this topic, you can read the sixth part of the .NET Core series.
Additionally, DTOs will prevent circular reference problems as well in our project.
Routing
In the .NET Core Web API projects, we should use Attribute Routing instead of Conventional Routing. That’s because Attribute Routing helps us match the route parameter names with the actual parameters inside the action methods. Another reason is the description of the route parameters. It is more readable when we see the parameter with the name “ownerId” than just “id”.
We can use the [Route] attribute on top of the controller and on top of the action itself:
There is another way to create routes for the controller and actions:
There are different opinions which way is better, but we would always recommend the second way, and this is something we always use in our projects.
When we talk about the routing we need to mention the route naming convention. We can use descriptive names for our actions, but for the routes/endpoints, we should use NOUNS and not VERBS.
The few wrong examples:
The good examples:
For the more detailed explanation of the Restful practices checkout: Top REST API Best Practices.
Logging
If we plan to publish our application to production, we should have a logging mechanism in place. Log messages are very helpful when figuring out how our software behaves in production.
.NET Core has its own logging implementation by using the ILoggerinterface. It is very easy to implement it by using Dependency Injection feature:
Then in our actions, we can utilize various logging levels by using the
_logger object..NET Core supports logging API that works with a variety of logging providers. Therefore, we may use different logging providers to implement our own logging logic inside our project.
The NLog is the great library to use for implementing our own custom logging logic. It is extensible, supports structured logging and very easy to configure. We can log our messages in the console window, files or even database.
To learn more about using this library inside the .NET Core check out: .NET Core series – Logging With NLog.
The Serilog is the great library as well. It fits in with the .NET Core built-in logging system.
CryptoHelper And Data Protection
We won’t talk about how we shouldn’t store the passwords in a database as a plain text and how we need to hash them due to security reasons. That’s out of the scope of this article. There are various hashing algorithms all over the internet, and there are many different and great ways to hash a password.
If we want to do it on our own, we can always use the IDataProtector interface which is quite easy to use and implement in the existing project.
To register it, all we have to do is to use the AddDataProtection method in the ConfigureServices method. Then it can be injected via Dependency Injection:
Finally, we can use it:
_protector.Protect("string to protect");You can read more about it in the Protecting Data with IDataProtector article.
But if need the library that provides support to the .NET Core’s application and that is easy to use, the CryptoHelper is quite a good library.
The CryptoHelper is a standalone password hasher for .NET Core that uses a PBKDF2 implementation. The passwords are hashed using the new Data Protection stack.
This library is available for installation through the NuGet and its usage is quite simple:
Content Negotiation
By default .NET Core Web API returns a JSON formatted result. In most cases, that’s all we need.
But what if the consumer of our Web API wants another response format, like XML for example?
For that, we need to create a server configuration to format our response in the desired way:
Sometimes the client may request a format that is not supported by our Web API and then the best practice is to respond with the status code 406 Not Acceptable. That can be configured inside our ConfigureServices method as well:
We can create our own custom format rules as well.
The content negotiation is a pretty big topic so if you want to learn more about it, check out: Content Negotiation in .NET Core.
Security and Using JWT
JSON Web Tokens (JWT) are becoming more popular by the day in web development. It is very easy to implement JWT Authentication due to the .NET Core’s built-in support. JWT is an open standard and it allows us to transmit the data between a client and a server as a JSON object in a secure way.
We can configure the JWT Authentication in the ConfigureServices method:
In order to use it inside the application, we need to invoke this code in the
Configure method:We may use JWT for the Authorization part as well, by simply adding the role claims to the JWT configuration.
To learn in more detail about JWT authentication and authorization in .NET Core, check out JWT with .NET Core and Angular Part 1 and Part 2 of the series.
ASP.NET Core Identity
Additionally, if you want to use some advanced security actions in your application like Password Reset, Email Verification, Third Party Authorization, etc, you can always refer to the ASP.NET Core Identity. ASP.NET Core Identity is the membership system for web applications that includes membership, login and user data. It contains a lot of functionalities to help us in the user management process. In our ASP.NET Core Identity series, you can learn a lot about those features and how to implement them in your ASP.NET Core project.
Using IdentityServer4 – OAuth2 and OpenID Connect
IdentityServer4 is an Authorization Server that can be used by multiple clients for Authentication actions. It has nothing to do with the user store management but it can be easily integrated with the ASP.NET Core Identity library to provide great security features to all the client applications. OAuth2 and OpenID Connect are protocols that allow us to build more secure applications. OAuth2 is more related to the authorization part where OpenID Connect (OIDC) is related to the Identity(Authentication) part. We can use different flows and endpoints to apply security and retrieve tokens from the Authorization Server. You can always read RFC 6749 online documentation to learn more about OAuth2.
Testing Our Applications
We should write tests for our applications as much as we can. We know, from our experience, there is no always time to do that, but it is very important for checking the quality of the software we are writing. We can discover potential bugs in the development phase and make sure that our app is working as expected prior to publishing it to the production. Of course, there are many additional reasons to write tests for our applications.
To learn more about testing in ASP.NET Core application (Web API, MVC or any other), you can read our ASP.NET Core Testing Series, where we explain the process in great detail.
Conclusion
In this article, our main goal was to familiarize you with the best practices when developing a Web API project in .NET Core. Some of those could be used in other frameworks as well, therefore, having them in mind is always helpful.
If you find that something is missing from the list, don’t hesitate to add it in a comment section.
Thank you for reading the article and we hope you found something useful in it.


No comments:
Post a Comment