Summary: Excellent article for deploying application to AKS. Steps explained are .
Deploy Kubernetes to Azure, using CLI:
az group create --name akshandsonlab --location <region> az aks create --resource-group akshandsonlab --name <unique-aks-cluster-name> --enable-addons monitoring --kubernetes-version $version --generate-ssh-keys --location <region>az acr create --resource-group akshandsonlab --name <unique-acr-name> --sku Standard --location <region>Authenticate with Azure Container Registry from Azure Kubernetes Serviceaz aks update -n $AKS_CLUSTER_NAME -g $AKS_RESOURCE_GROUP --attach-acr $ACR_NAME
Overview
Azure Kubernetes Service (AKS) is the quickest way to use Kubernetes on Azure. Azure Kubernetes Service (AKS) manages your hosted Kubernetes environment, making it quick and easy to deploy and manage containerized applications without container orchestration expertise. It also eliminates the burden of ongoing operations and maintenance by provisioning, upgrading, and scaling resources on demand, without taking your applications offline. Azure DevOps helps in creating Docker images for faster deployments and reliability using the continuous build option.
One of the biggest advantage to use AKS is that instead of creating resources in cloud you can create resources and infrastructure inside Azure Kubernetes Cluster through Deployments and Services manifest files.
Lab Scenario
This lab uses a Dockerized ASP.NET Core web application - MyHealthClinic (MHC) and is deployed to a Kubernetes cluster running on Azure Kubernetes Service (AKS) using Azure DevOps.
There is a mhc-aks.yaml manifest file which consists of definitions to spin up Deployments and Services such as Load Balancer in the front and Redis Cache in the backend. The MHC application will be running in the mhc-front pod along with the Load Balancer.
The following image will walk you through all the steps explained in this lab

If you are new to Kubernetes, click here for description of terminology used in this lab.
What’s covered in this lab
The following tasks will be performed:
Create an Azure Container Registry (ACR), AKS and Azure SQL server
Provision the Azure DevOps Team Project with a .NET Core application using the Azure DevOps Demo Generator tool.
Configure application and database deployment, using Continuous Deployment (CD) in the Azure DevOps
Initiate the build to automatically deploy the application
Before you begin
Refer the Getting Started page to know the prerequisites for this lab.
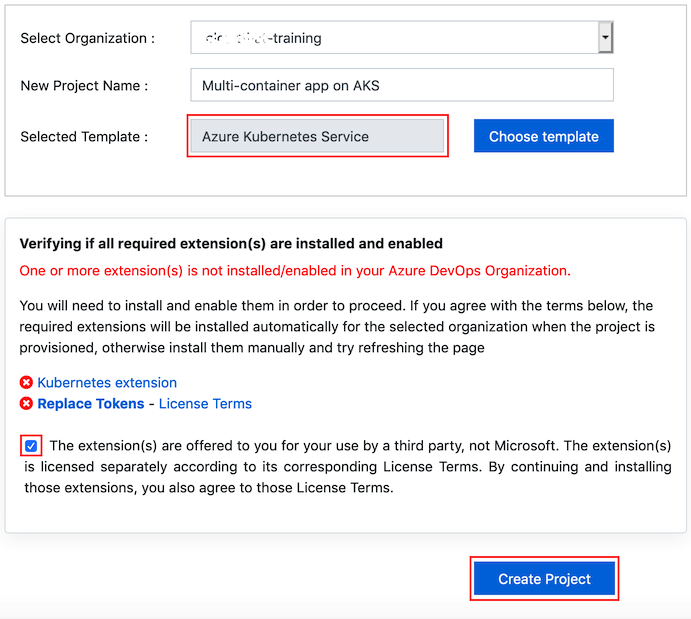
Click the Azure DevOps Demo Generator link and follow the instructions in Getting Started page to provision the project to your Azure DevOps.
For this lab the Azure Kubernetes Service template is used which is already selected when you click on the link above. There are some additional extensions required for this lab and can be automatically installed during the process.
Setting up the environment
The following azure resources need to be configured for this lab:
| Azure resources | Description |
|---|---|
 Azure Container Registry Azure Container Registry | Used to store the Docker images privately |
 AKS AKS | Docker images are deployed to Pods running inside AKS |
 Azure SQL Server Azure SQL Server | SQL Server on Azure to host database |
Launch the Azure Cloud Shell from the Azure portal and choose Bash.
Deploy Kubernetes to Azure, using CLI:
i. Get the latest available Kubernetes version in your preferred region into a bash variable. Replace
<region>with the region of your choosing, for example eastus.version=$(az aks get-versions -l <region> --query 'orchestrators[-1].orchestratorVersion' -o tsv)ii. Create a Resource Group
az group create --name akshandsonlab --location <region>iii. Create AKS using the latest version available
az aks create --resource-group akshandsonlab --name <unique-aks-cluster-name> --enable-addons monitoring --kubernetes-version $version --generate-ssh-keys --location <region>Deploy Azure Container Registry(ACR): Run the below command to create your own private container registry using Azure Container Registry (ACR).
az acr create --resource-group akshandsonlab --name <unique-acr-name> --sku Standard --location <region>Authenticate with Azure Container Registry from Azure Kubernetes Service : When you’re using Azure Container Registry (ACR) with Azure Kubernetes Service (AKS), an authentication mechanism needs to be established. You can set up the AKS to ACR integration in a few simple commands with the Azure CLI. This integration assigns the AcrPull role to the managed identity associated to the AKS Cluster. Replace the variables
$AKS_RESOURCE_GROUP, $AKS_CLUSTER_NAME, $ACR_NAMEwith appropriate values below and run the command.az aks update -n $AKS_CLUSTER_NAME -g $AKS_RESOURCE_GROUP --attach-acr $ACR_NAMEFor more information see document on how to Authenticate with Azure Container Registry from Azure Kubernetes Service
Create Azure SQL server and Database: Create an Azure SQL server.
az sql server create -l <region> -g akshandsonlab -n <unique-sqlserver-name> -u sqladmin -p P2ssw0rd1234Create a database
az sql db create -g akshandsonlab -s <unique-sqlserver-name> -n mhcdb --service-objective S0The following components - Container Registry, Kubernetes Service, SQL Server along with SQL Database are deployed. Access each of these components individually and make a note of the details which will be used in Exercise 1.
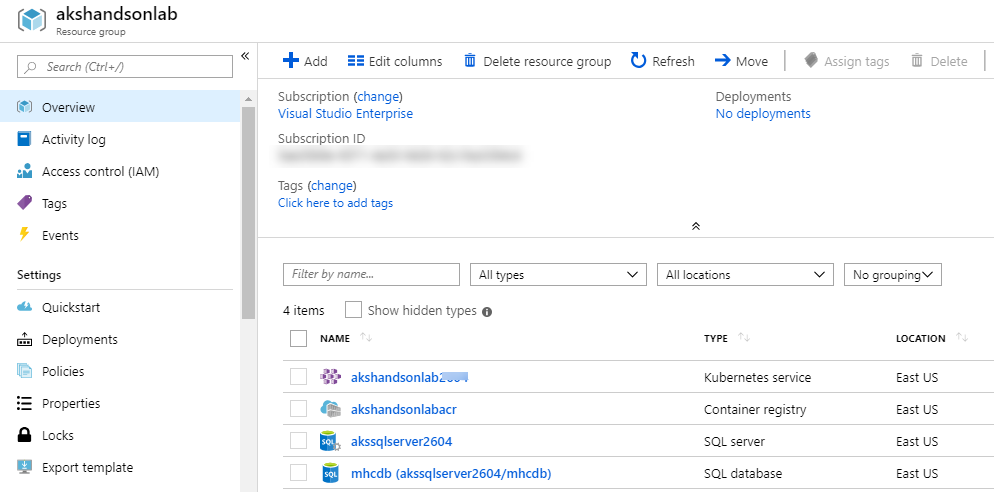
Select the mhcdb SQL database and make a note of the Server name.

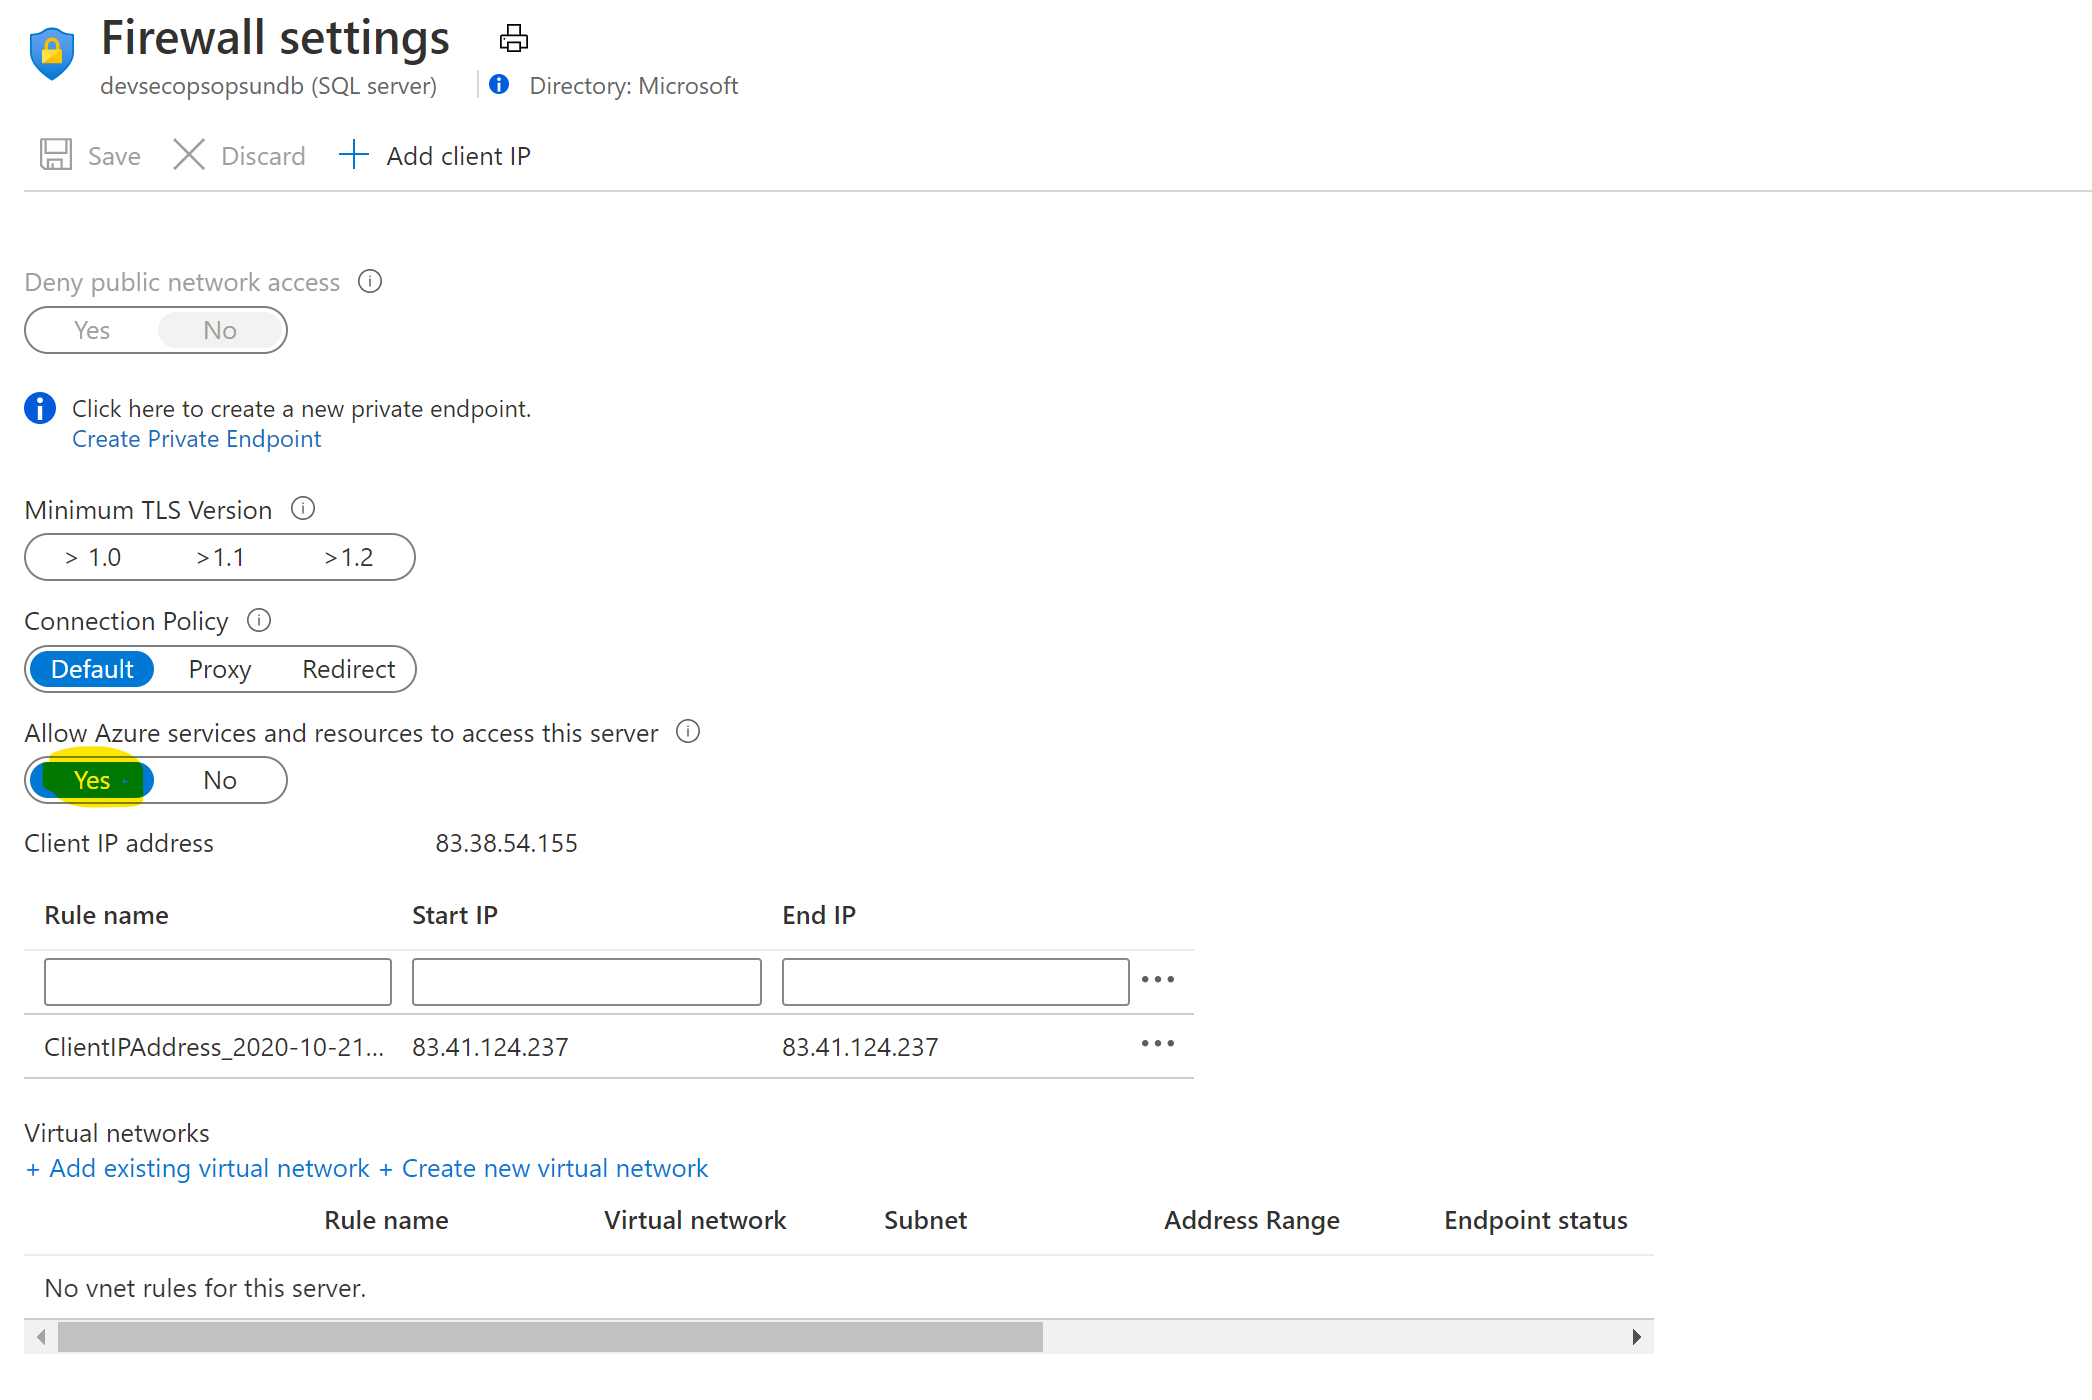
Click on “Set server Firewall” and enable “Allow Azure services …” option.
Navigate to the resource group, select the created container registry and make a note of the Login server name.

Now you have all the required azure components to follow this lab.
Exercise 1: Configure Build and Release pipeline
Make sure that you have created the AKS project in your Azure DevOps organization through Azure DevOps Demo Generator (as mentioned in pre-requisites). We will manually map Azure resources such as AKS and Azure Container Registry to the build and release definitions.
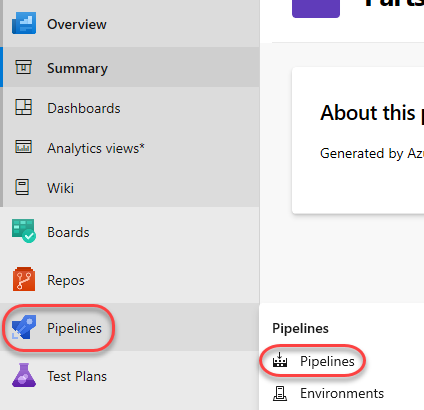
Navigate to Pipelines –> Pipelines.
Select MyHealth.AKS.Build pipeline and click Edit.

In Run services task, select your Azure subscription from Azure subscription dropdown. Click Authorize.
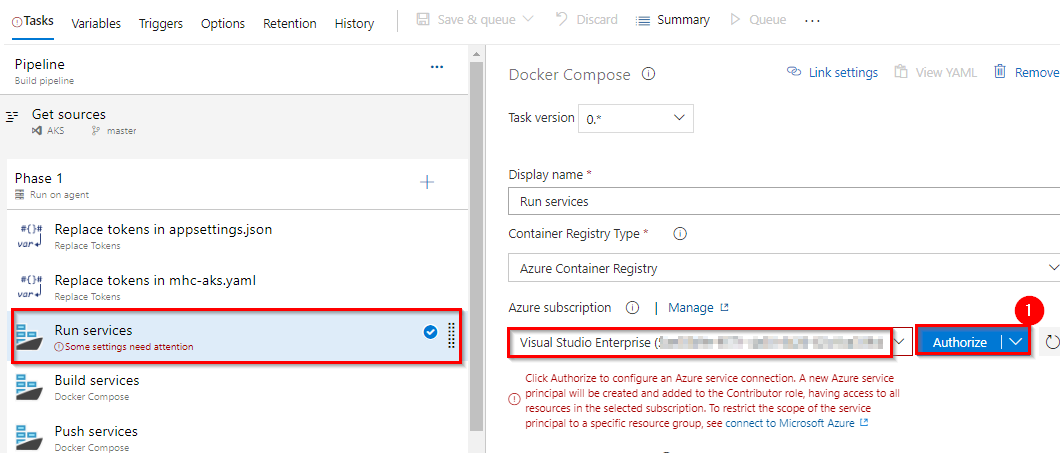
You will be prompted to authorize this connection with Azure credentials. Disable pop-up blocker in your browser if you see a blank screen after clicking the OK button, and please retry the step.
This creates an Azure Resource Manager Service Endpoint, which defines and secures a connection to a Microsoft Azure subscription, using Service Principal Authentication (SPA). This endpoint will be used to connect Azure DevOps and Azure.
Following the successful authentication, select appropriate values from the dropdown - Azure subscription and Azure Container Registry as shown.
Repeat this for the Build services, Push services and Lock services tasks in the pipeline.
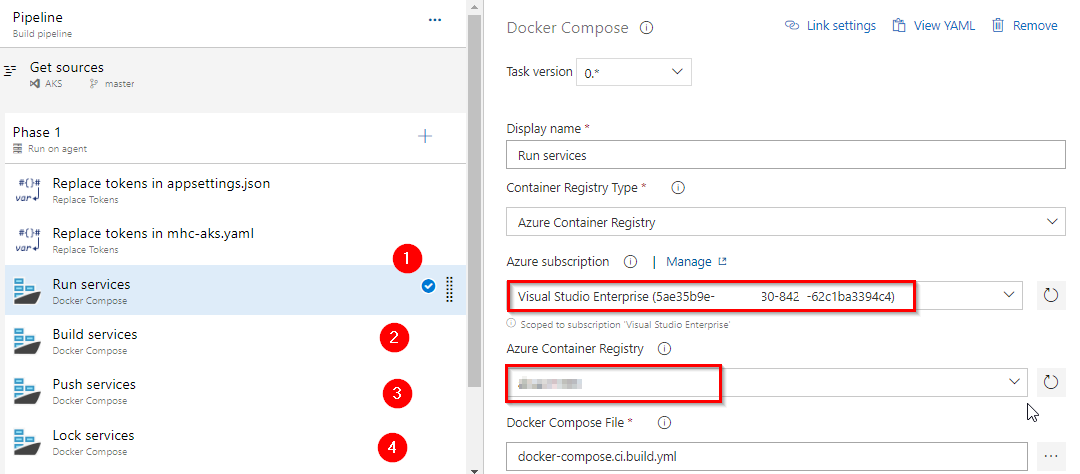
Tasks Usage Replace tokens replace ACR in mhc-aks.yaml and database connection string in appsettings.json  Run services
prepares suitable environment by pulling required image such as aspnetcore-build:1.0-2.0 and restoring packages mentioned in .csproj Build servicesbuilds the docker images specified in a docker-compose.yml file and tags images with $(Build.BuildId) and latest Push servicespushes the docker image myhealth.web to Azure Container Registry  Publish Build Artifacts
publishes mhc-aks.yaml & myhealth.dacpac files to artifact drop location in Azure DevOps so that they can be utilized in Release Definition applicationsettings.json file contains details of the database connection string used to connect to Azure database which was created in the beginning of this lab.
mhc-aks.yaml manifest file contains configuration details of deployments, services and pods which will be deployed in Azure Kubernetes Service. The manifest file will look like as below

For more information on the deployment manifest, see AKS Deployments and YAML manifests
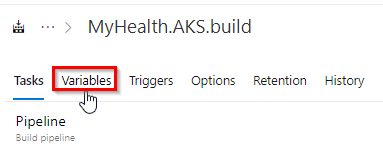
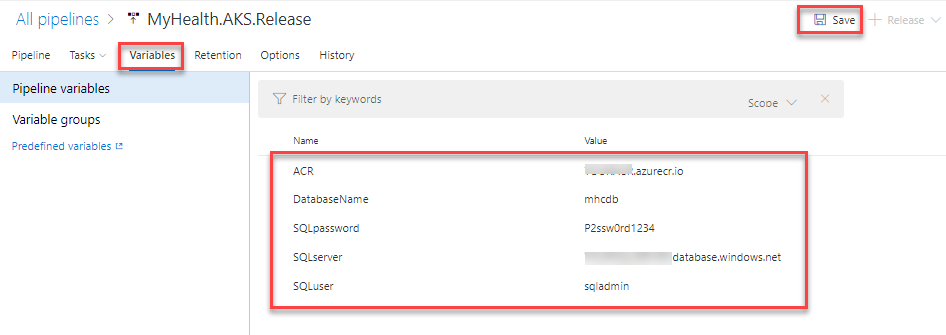
Click on the Variables tab.
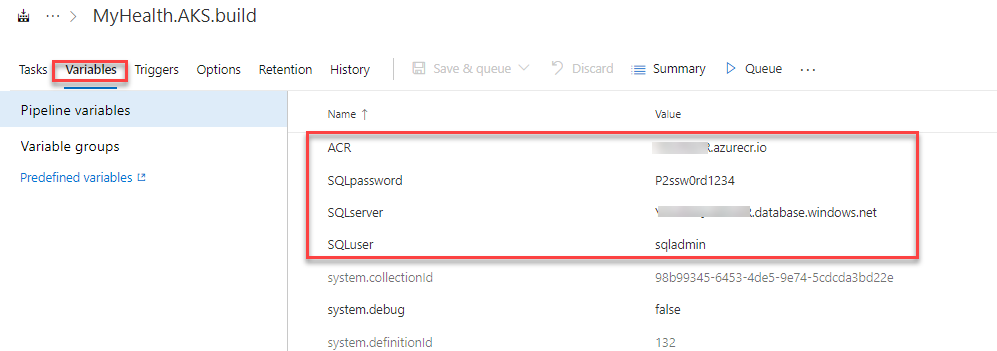
Update ACR and SQLserver values for Pipeline Variables with the details noted earlier while configuring the environment.
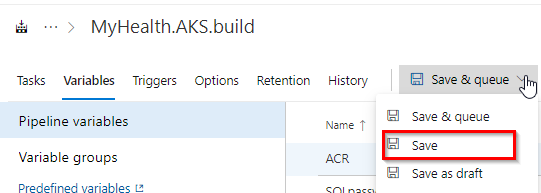
Save the changes.
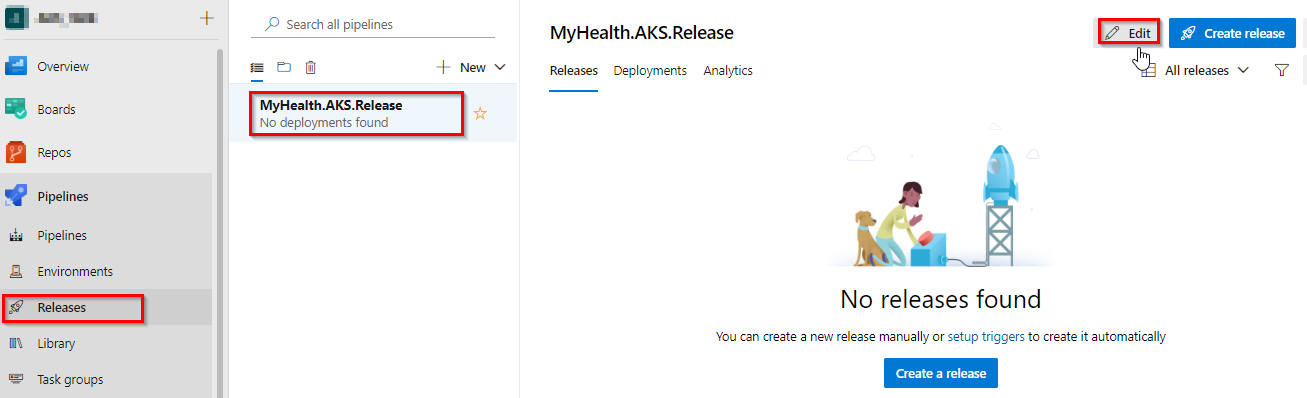
Navigate to Pipelines | Releases. Select MyHealth.AKS.Release pipeline and click Edit.
Select Dev stage and click View stage tasks to view the pipeline tasks.

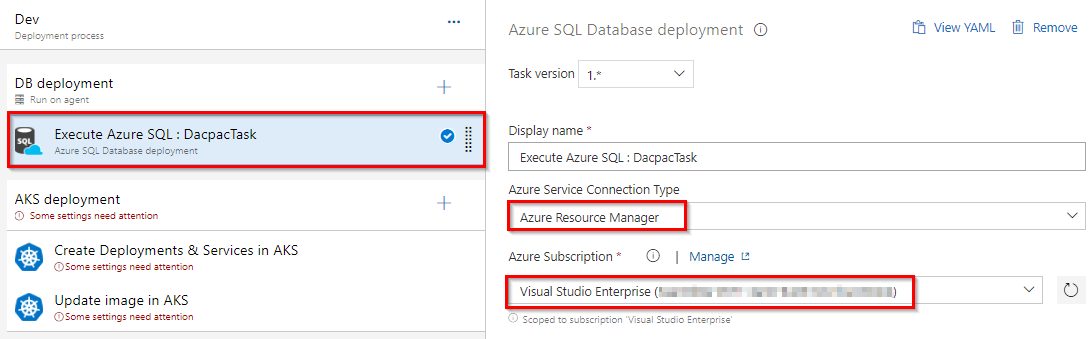
In the Dev environment, under the DB deployment phase, select Azure Resource Manager from the drop down for Azure Service Connection Type, update the Azure Subscription value from the dropdown for Execute Azure SQL: DacpacTask task.
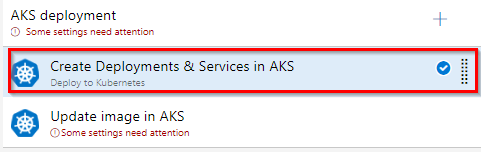
In the AKS deployment phase, select Create Deployments & Services in AKS task.
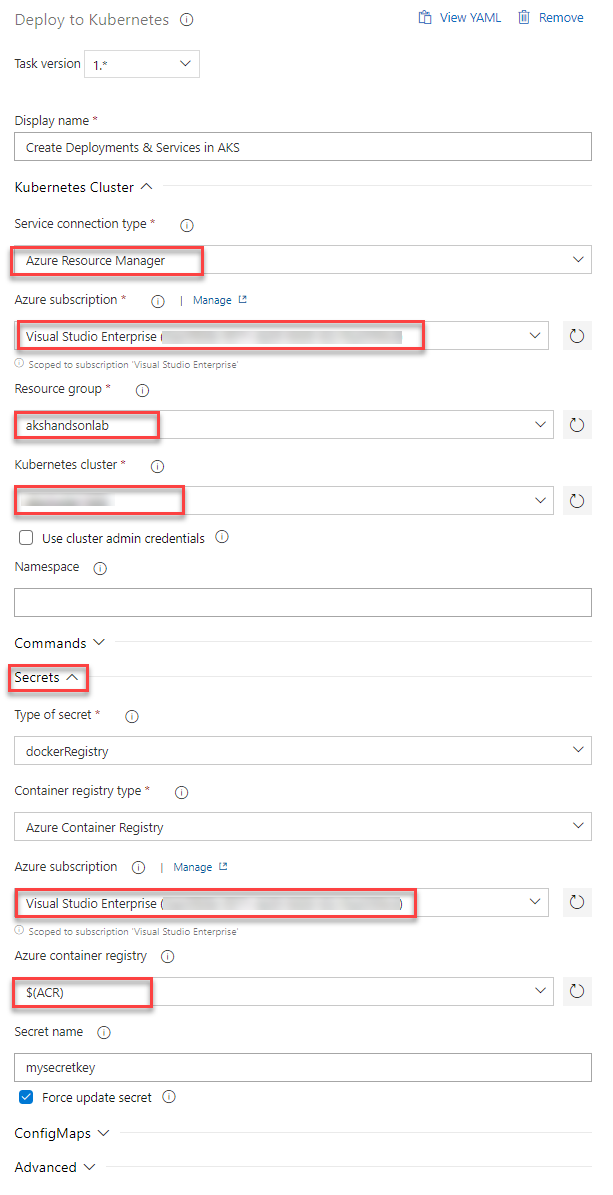
Update the Azure Subscription, Resource Group and Kubernetes cluster from the dropdown. Expand the Secrets section and update the parameters for Azure subscription and Azure container registry from the dropdown.
Repeat similar steps for Update image in AKS task.
Create Deployments & Services in AKS will create the deployments and services in AKS as per the configuration specified in mhc-aks.yaml file. The Pod, for the first time will pull up the latest docker image.
Update image in AKS will pull up the appropriate image corresponding to the BuildID from the repository specified, and deploys the docker image to the mhc-front pod running in AKS.
A secret called mysecretkey is created in AKS cluster through Azure DevOps by using command
kubectl create secretin the background. This secret will be used for authorization while pulling myhealth.web image from the Azure Container Registry.
Select the Variables section under the release definition, update ACR and SQLserver values for Pipeline Variables with the details noted earlier while configuring the environment. Select the Save button.
Exercise 2: Trigger a Build and deploy application
In this exercise, let us trigger a build manually and upon completion, an automatic deployment of the application will be triggered. Our application is designed to be deployed in the pod with the load balancer in the front-end and Redis cache in the back-end.
Select MyHealth.AKS.build pipeline. Click on Run pipeline
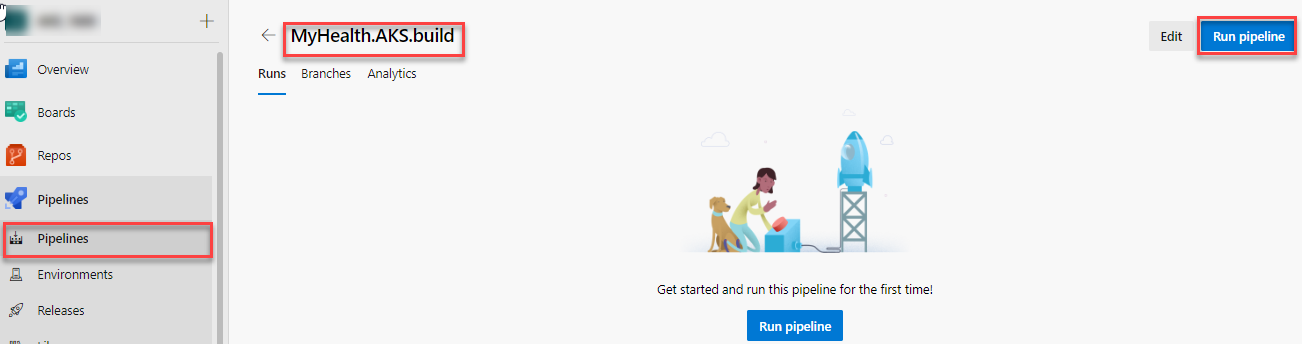
Once the build process starts, select the build job to see the build in progress.
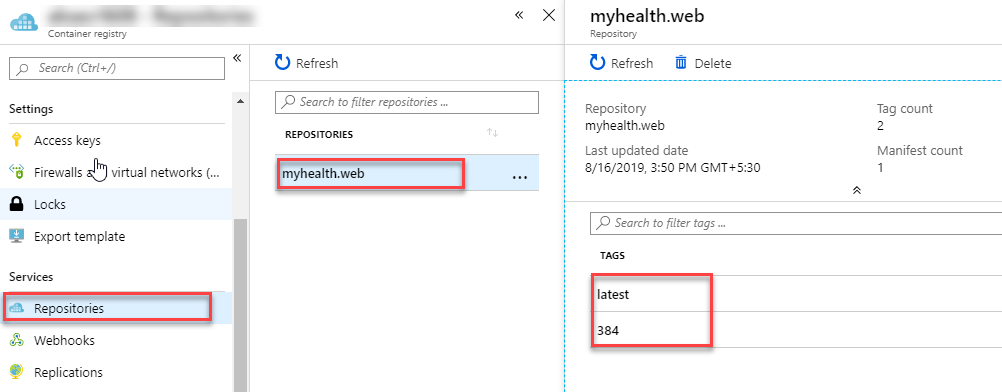
The build will generate and push the docker image to ACR. After the build is completed, you will see the build summary. To view the generated images navigate to the Azure Portal, select the Azure Container Registry and navigate to the Repositories.
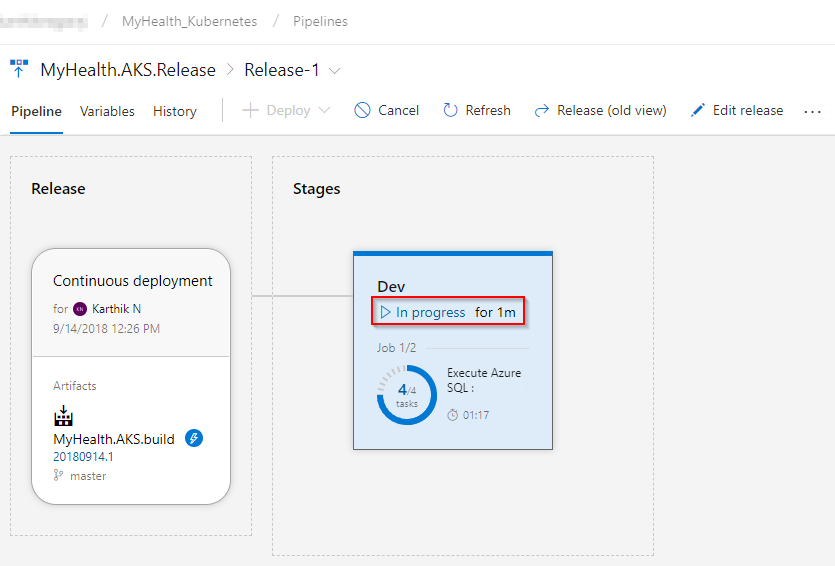
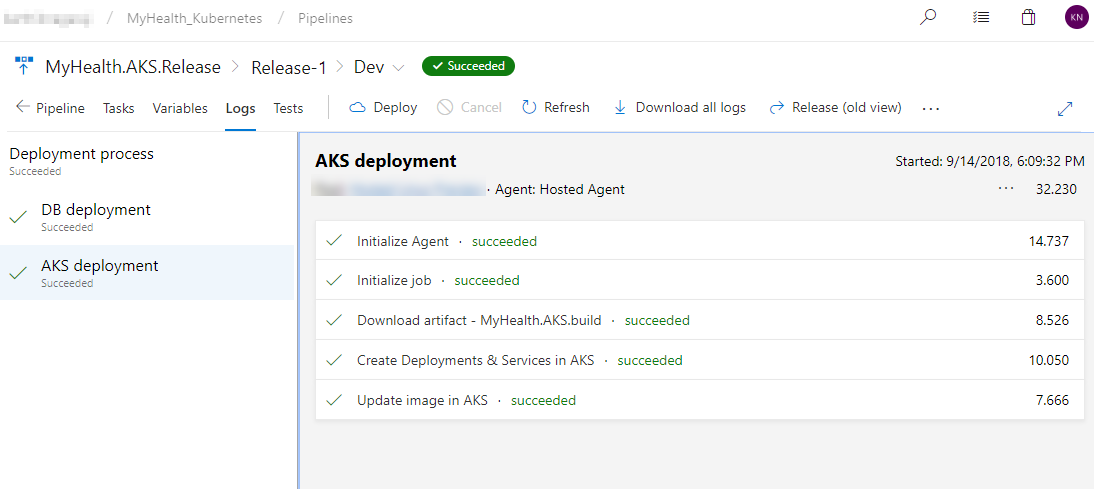
Switch back to the Azure DevOps portal. Select the Releases tab in the Pipelines section and double-click on the latest release. Select In progress link to see the live logs and release summary.
Once the release is complete, launch the Azure Cloud Shell and run the below commands to see the pods running in AKS:
Type
az aks get-credentials --resource-group yourResourceGroup --name yourAKSnamein the command prompt to get the access credentials for the Kubernetes cluster. Replace the variablesyourResourceGroupandyourAKSnamewith the actual values.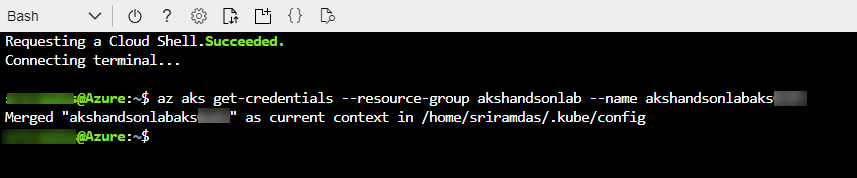
kubectl get pods
The deployed web application is running in the displayed pods.
To access the application, run the below command. If you see that External-IP is pending, wait for sometime until an IP is assigned.
kubectl get service mhc-front --watch
Copy the External-IP and paste it in the browser and press the Enter button to launch the application.

Kubernetes resource view in the Azure portal (preview)
The Azure portal includes a Kubernetes resource viewer (preview) for easy access to the Kubernetes resources in your Azure Kubernetes Service (AKS) cluster. Viewing Kubernetes resources from the Azure portal reduces context switching between the Azure portal and the kubectl command-line tool, streamlining the experience for viewing and editing your Kubernetes resources. The resource viewer currently includes multiple resource types, such as deployments, pods, and replica sets.
The Kubernetes resource view from the Azure portal replaces the AKS dashboard add-on, which is set for deprecation.

More information found at: https://docs.microsoft.com/en-us/azure/aks/kubernetes-portal
Summary
Azure Kubernetes Service (AKS) reduces the complexity and operational overhead of managing a Kubernetes cluster by offloading much of that responsibility to the Azure. With Azure DevOps and Azure Container Services (AKS), we can build DevOps for dockerized applications by leveraging docker capabilities enabled on Azure DevOps Hosted Agents.
Reference
Thanks to Mohamed Radwan for making a video on this lab. You can watch the following video that walks you through all the steps explained in this lab
 by
by