Interesting practices in cloud dev ops mainly for building, testing , deploying and security aspects .
Lot of exams dumps.
Articles help to build dockers and complete CI/CD automation for your applications. 1) Azure - Micro services 2)
Azure Dev ops (CI/CD) 3) Identity 4) secure dev ops
.
give call on (+61)0426622462 or email to :dasaradhreddyk@gmail.com
Summary : Excellent article which cover complete docker deployments for angular app.
Create agnular app with ng new
Design nginx-custom.conf so that it can handle redirects, gzip and other things.
Create docker file to multistage build and deploy with custom ngix-custom.conf.
Build and push docker images *docker build and docker push.
Publish docker to Kubbernetes cluster
Create a deployment in Kubernetes cluster (kubectlapply -f spa-deployment.yaml)
Create a ClusterIP service.kubecltapply -f SPA-service.yaml
Create a load balancer service to access it via some External IP, provided by the service.kubeclt apply -f SPA-load-balancer-service.yaml
kubectl get svc -owide
Now angular appliation avialble with public IP address.
Introduction
Angularis a JavaScript framework for building web applications and apps in JavaScript, HTML, and TypeScript, which is a superset of JavaScript. Angular provides built-in features for animation, HTTP service, and materials which in turn has features such as auto-complete, navigation, toolbar, menus, etc. The code is written in TypeScript, which compiles to JavaScript and displays the same in the browser.
In this tutorial, we will create a basic angular app. Write a docker file to build a compressed angular app and then create deployment manifest for angular application.
Steps to Deploy Angular application on Kubernetes
Prerequisite
Angular: A little knowledge of angular.
Nodejs:To run the application locally, we need node environment.
Docker: Docker CLI should be installed in your system to build and push the image. You can also set up a CI tool to build the docker image. I will talk about this in the next tutorial.
Nginx: Basic knowledge of Nginx configuration.
Kubernetes: Kubernetes is an orchestration tool, where we will deploy the application. For the demo sake, you can useminikubeas well.
What we will do
1: Create an Angular application
2: Write custom Nginx config
3: Write a multistage docker file
3: Create a K8s deployment manifest and service manifest
4: Test the application
Step 1: Create an Angular application
Now, let’s create an Angular Application. By running the below command, angular will create and initialize a new Angular app, which we will use to deploy.
ng new spa-demo
After completion of above command, go inside the directory.
Expiration header for images and other content (CSS, HTML etc), which travels through the web to the browser for the maximum amount of time but do change it according to need.
Every single page application uses its routing module to go to its route, but it needs to go through its home route, so we need to redirect every route to home route, then the single page application will take care of rest of the thing.
At last, we enable gzip compression.
Step 3: Create a multistage docker file to build the angular application
Now, create a Dockerfile inside the spa-demo project directory, named-Dockerfile. Here is the gistlink.
# Stage 0, "build-stage", based on Node.js, to build and compile the frontend FROM node:10.8.0as build-stage WORKDIR /app COPY package*.json /app/ RUN npm install COPY ./ /app/ ARG configuration=production RUN npm run build -- --output-path=./dist/out --configuration $configuration
# Stage 1, based on Nginx, to have only the compiled app, ready for production with Nginx FROM nginx:1.15 #Copy ci-dashboard-dist COPY --from=build-stage /app/dist/out/ /usr/share/nginx/html #Copy default nginx configuration COPY ./nginx-custom.conf /etc/nginx/conf.d/default.conf
The above Dockerfile consists of two stages:
First stage:Create a node environment and build the angular application with production configuration.
Second stage:Copy the dist folder from the previous stage to Nginx container and copy nginx-custom.conf inside the nginx
Step 4: Create a K8s deployment manifest and service manifest
To deploy the Angular application in any of the Kubernetes environments, the deployment manifest for angular is listed below. Before deploying the application to production, make sure you modify the manifest file to best suit your needs. You can change the name of the Deployment and the labels, and change your Docker registry and image tag accordingly.
Create a normal service to access the application internally, or you can use this service in ingress to expose it to some domain, namedSPA-service.yaml
For the demo purpose, create a load balancer service file to access it outside the Kubernetes cluster. Make sure Lable selector is the same as the deployment label, namedSPA-load-balancer-service.yaml
A cleaner multi-stage continuous deployment on Kubernetes of a Create React App with kustomize, helm and skaffold
(P)Bookmarks.dev - Open source Bookmarks and Codelets Manager for Developers & Co. See our How To guides to help you get started. Share your favorites bookmarks with the community and they might get published on Github -
Most applications depend on external factors that have different values depending on the environment where they are deployed. We mostly use for that environment variables. Guess what? Most of React Apps also have this need. In this blog posts presents a clean(er) way to make a multi-stage deployment of a Create React App on a Kubernetes Cluster. You can use this approach for a seamless integration into your continuous deployment pipeline.
In the beginning it will you show how to set up the React App and then guide you through several deployment possibilities on Kubernetes. You will deploy with native kubectl commands, with helm, with kustomize and in the end use skaffold.
The example app displays the latest public bookmarks published on www.bookmarks.dev. Depending on the environment the app is built for, it will display the environment name in the navigation bar and the header’s color is different.
Create a config.js file where you inject the environment variables in the window object (e.g. window.REACT_APP_API_URL=’https://www.bookmarks.dev/api/public/bookmarks’). Add this file to the public folder of your react application. Dockerize the react application and at Kubernetes deployment time overwrite the config.js file in the container - you can do that with Kubernetes configMaps via native kubectl commands, kustomize or helm.
To run this application on Kubernetes locally make sure you have Docker Desktop with Kubernetes enabled, this is what I used for testing, or minikube installed. You can also deploy it directly in the cloud if you have an account.
React App Setup
The react application presented in this tutorial is build with create-react-app.
The public folder
You need to add a config.js in the public folder. This will not be processed by webpack. Instead it will be copied into the build folder untouched. To reference the file in the public folder, you need to use the special variable called PUBLIC_URL:
Usually the API_URL will point to a different URL depending on the environment, but here it is the same overall.
This was you can set your environment variables on the window object. These are the properties mentioned above. Make sure they are unique, so a good practice is to add the REACT_APP_ prefix as suggested in Adding Custom Environment Variables.
WARNING: Do not store any secrets (such as private API keys) in your React app! Environment variables are embedded into the build, meaning anyone can view them by inspecting your app’s files.
At this point you can run and build the app locally the way you know it:
The runtime of static web-apps is the browser, where you don’t have access process.env, so the values that are dependent on the environment have to be set prior to that, namely at build time. If you do the deployment from your local machine, you can easily control the environment-variables - build the app for the environment you need and then deploy it. Tools like kustomize and skaffold, makes this feel like a breeze in the Kubernetes world as you’ll find out later in the article.
But if you follow a continuous deployment approach, you’d usually have several steps, which form a so called pipeline:
commit your code to a repository, hosted somewhere like GitHub
your build system gets notified
build system compiles the code and runs unit tests
create image and push it to a registry, such as Docker Hub.
from there you can deploy the image
The idea is to repeat as little steps as possible for the different environments. With the approach presented in this blog post, it will only be step number five (deployment), where we have environment specific configurations.
Containerize the application
First things first, let’s build a docker container to use for the deployment on Kubernetes. Containerizing the application requires a base image to create an instance of the container.
Create the Dockerfile
The Dockerfile in the project root directory contains the steps needed to build the Docker image:
# build environmentFROM node:12.9.0-alpine as buildWORKDIR /appENV PATH /app/node_modules/.bin:$PATHCOPY package.json /app/package.jsonRUN npm install--silentRUN npm config set unsafe-perm true#https://stackoverflow.com/questions/52196518/could-not-get-uid-gid-when-building-node-dockerRUN npm install react-scripts@3.0.1 -g--silentCOPY . /appRUN npm run build
# production environmentFROM nginx:1.17.3-alpineCOPY --from=build /app/build /usr/share/nginx/htmlEXPOSE 80CMD ["nginx", "-g", "daemon off;"]
Before you run any kubectl apply command, it is important to know what context and namespace you are applying your command against.
The easiest way to verify this, is to install kubectx and then issue kubectx to get the current context and kubens for the current namespac. The default namespace is usually called default. In this blog post we operate on the local docker-desktop context and the default namespace.
Now that you know where your kubernetes objects will be applied to, you can add them to a file, like deploy-to-kubernetes.yaml and apply the following the command:
kubectl apply -f deploy-to-kubernetes.yaml
This will create the multi-stage-react-app-example service of type NodePort. You can verify its presence by listing all services
kubeclt get svc
or grep it with kubectl get svc | grep multi-stage-react-app-example
Port forward
To access the application inside the Kubernetes cluster you can use port-forwarding. The command to forward the service created before is
This commands forwards the local port 3001 to the container port 80 specified in the deployment file. Now you can access the application inside the container at http://localhost:3001, which uses the LOCAL environment.
You might want to hit Ctrl + Shift + R to force refresh the website in the browser (Chrome might have cached the old version)
Tear down created Kubernetes objects
To delete the service and deployment created, issue the following command
kubectl delete -f deploy-to-kubernetes.yaml
Make the application deployment aware of the environment
Remember our purpose for continuous delivery pipeline: Make the application “aware” of the environment at deployment to cluster time.
The trick is now to mount the configMap into the container via a volume and overwrite the config.js file with the values from the configMap. Move now the configuration of the service and deployment resources in separate files in the kubernetes folder. The deployment file:
Note: you need to use subpath to only overwrite the config.js file, otherwise the content of the folder is replaced with this file
Deploy on kubernetes “dev” cluster
We will use the same local cluster to test our dev deployment. You apply now kubectl on all the files in the kubernetes directory:
kubectl apply -f kubernetes
Verify that the _config.js file has been replaced by connecting to the pod:
#first export list the pod holding our applicationexport MY_POD=`kubectl get pods | grep multi-stage-react-app-example | cut-f1-d' '`# connect to shell in alpine image
kubectl exec-it$MY_POD-- /bin/sh
# display content of the config.js file
less /usr/share/nginx/html/config.js
It should contain the variables for the dev environment:
Navigate to http://localhost:3001 and now you should see the DEV environment on the navigation bar.
In a continuous delivery pipeline you could have two steps:
create the configMap based on the dev.properties file
deploy on the target cluster with kubectl specified above
Tear down
kubectl delete -f kubernetes
You can take the same approach for other environments, like test or staging.
Deploy on Kubernetes with Kustomize
What if now when deployment into the prod cluster you want to have two pods, instead of one serving the web app. Of course you could modify the deployment.yaml file, specify 2 replicas instead of 1 and deploy. But you can solve this in an elegant matter by using Kustomize, which provides other advantages too.
Kustomize is a standalone tool to customize Kubernetes objects through a kustomization file. Since 1.14, Kubectl also supports the management of Kubernetes objects using a kustomization file, so you don’t necessarily need to extra install it. For this tutorial I suggest you do, as you’ll need it later with Skaffold - on MacOS brew install kustomize
With Kustomize you define base resources in the so called bases (cross cutting concerns available in environments) and in the overlays the properties that are specific for the different deployments. Here we place kustomize related files in the kustomize folder - tree kustomize:
In the base folder we define the service and deployment, because in this case they are overall the same (except the 2 replicas for prod, but we’ll deal with that later).
Deploy to dev cluster with Kustomize
Let’s say we want to deploy to our dev cluster with Kustomize. For that we will use the dev overlays. In the dev kustomization file:
we point to the bases defined before and use the dev.properties file to generate the configMap.
Before we apply the dev overlay to the cluster we can check what it generates by issuing the following command:
kubectl kustomize kustomize/overlays/dev
Note that the generated configMap name has a suffix (something like - multi-stage-react-app-example-config-gdgg4f85bt), which is appended by hashing the contents of the file. This ensures that a new ConfigMap is generated when the content is changed. In the deploymant.yaml file the configMap is still referenced by multi-stage-react-app-example-config, but in the generated Deployment object it has the generated name.
To apply the “dev kustomization” use the following command:
Now port forward (kubectl port-forward svc/multi-stage-react-app-example 3001:80) and go to http://localhost:3001
Update an environment variable value
If you for example would like to update the value of an environment variable say, window.REACT_APP_NAVBAR_COLOR='Blue' in the dev.properties file, what you need to do is apply gain the dev overlay:
kubectl apply -k kustomize/overlays/dev
#result similar to the following
configmap/multi-stage-react-app-example-config-dg44f5bkhh created
service/multi-stage-react-app-example unchanged
deployment.apps/multi-stage-react-app-example configured
Note the a new configMap is created and is applied with the deployment. Reload and now the navigation bar is blue.
Tear down
kubectl delete -k kustomize/overlays/dev
Deploy to production with kustomize
As mentioned before, maybe for production you would like to have two replicas delivering the application to achieve high availability. For that you can create an prod overlay that derives from that common base, similar as the dev overlay.
If you run kubectl get pods you should now see two entries, something like:
NAME READY STATUS RESTARTS AGE
multi-stage-react-app-example-59c5486dc4-2mjvw 1/1 Running 0 112s
multi-stage-react-app-example-59c5486dc4-s88ms 1/1 Running 0 112s
Now you can port forward and access the application the way you know it
Helm is a tool that streamlines installing and managing Kubernetes applications. Think of it like apt/yum/homebrew for Kubernetes.
Helm uses the so called Kubernetes charts. Charts are packages of pre-configured Kubernetes resources. If you want to learn more about Helm read the docs, we won’t go into much details here, only punctual where it is needed.
At the moment Helm has a client (helm) and a server (tiller). Tiller runs inside of your Kubernetes cluster, and manages releases (installations) of your charts.
Helm installation
On MacOS you can install the client with homebrew:
To install Tiller on your local Kubernetes cluster for testing just call the following command:
helm init
#result should something similar to the following:
Creating /Users/ama/.helm
Creating /Users/ama/.helm/repository
Creating /Users/ama/.helm/repository/cache
Creating /Users/ama/.helm/repository/local
Creating /Users/ama/.helm/plugins
Creating /Users/ama/.helm/starters
Creating /Users/ama/.helm/cache/archive
Creating /Users/ama/.helm/repository/repositories.yaml
Adding stable repo with URL: https://kubernetes-charts.storage.googleapis.com
Adding local repo with URL: http://127.0.0.1:8879/charts
$HELM_HOME has been configured at /Users/ama/.helm.
Tiller (the Helm server-side component) has been installed into your Kubernetes Cluster.
Please note: by default, Tiller is deployed with an insecure 'allow unauthenticated users' policy.
To prevent this, run `helm init` with the --tiller-tls-verify flag.
For more information on securing your installation see: https://docs.helm.sh/using_helm/#securing-your-helm-installation
To check the helm version you can run then the following command:
For this project the helm configuration is present in the helm-chart. This was initially created via the helm create helm-chart command and adjusted for this app’s needs.
Templates
The most important piece of the puzzle is the templates/ directory. This where Helm finds the YAML definitions for your Services, Deployments and other Kubernetes resources. Let’s take a look at the service definition:
It looks similar to the one used when installing with Kubectl or Kustomize, only that the values are substituted by Helm at deployment with the ones from Helm-specific objects.
Values
Values provide a way to override template defaults with your own configuration. They are present in the template via the .Values object as seen above.
Values can be set during helm install and helm upgrade operations, either by passing them in directly, or by uploading a values.yaml file.
The configMap
This time we will create the configMap as a Kubernetes object:
We use helm hooks to create the configMap before installing or upgrading a helm chart ("helm.sh/hook": pre-install, pre-upgrade)
The thing is that the resources that a hook creates are not tracked or managed as part of the release. Once Tiller verifies that the hook has reached its ready state, it will leave the hook resource alon - thus you cannot rely upon helm delete to remove the resource. One way to destroy the resource is to add the "helm.sh/hook": pre-install, pre-upgrade annotation to the hook template file.
Deploy to local cluster with helm
Before deploying with helm you might want to examine the chart for possible issues and do a helm lint:
helm lint helm-chart
and execute a dry-run to see the generated resources from the chart
Note the names generated for service and deployment local-release-helm-chart (generated from ) and local-release-multi-stage-react-app-example-config (generated from `-multi-stage-react-app-example-config)
Now run the installation without the --dry-run flag for the actual installation:
helm install-n local-release helm-chart/
Verify that the helm release is present by listing the helm releases (helm ls):
helm ls
NAME REVISION UPDATED STATUS CHART APP VERSION NAMESPACE
local-release 1 Fri Aug 30 06:46:09 2019 DEPLOYED helm-chart-0.1.0 1.0 default
Now port-forward the service (you know how the service it’s called from the dry run above local-release-helm-chart)
which will be used at deployment to override the configValues from the values.yaml file. Use the upsert variation this time, meaning that if the release is not present it will be created:
Now port forward kubectl port-forward svc/dev-release-helm-chart 3001:80 and access the app at http://localhost:3001 et voila you’ve deployed the dev environment.
Tear down dev-release
helm delete --purge dev-release
Skaffold
The last thing I want to present is deployment with Skaffold, which is one of my favorite tools.
Let’s see the official definition:
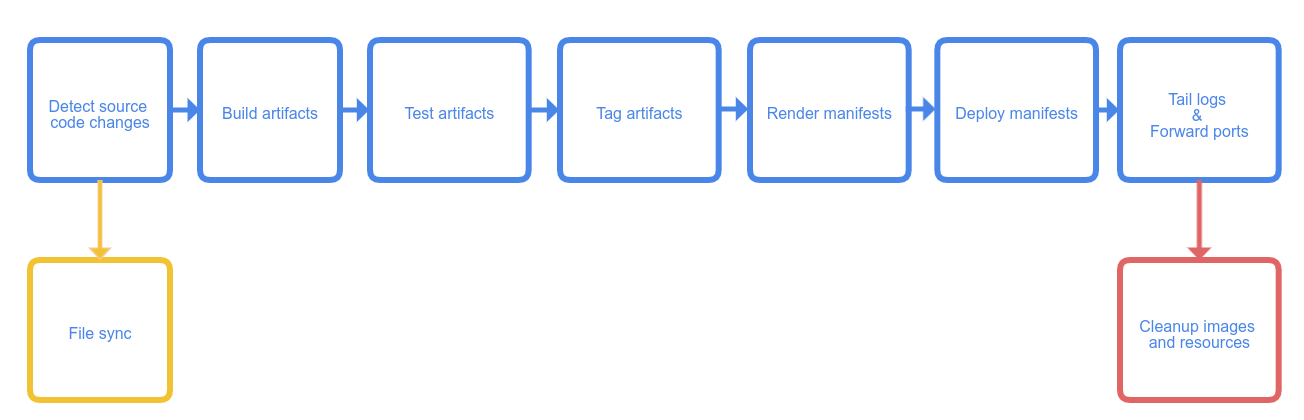
“Skaffold is a command line tool that facilitates continuous development for Kubernetes applications. You can iterate on your application source code locally then deploy to local or remote Kubernetes clusters. Skaffold handles the workflow for building, pushing and deploying your application. It also provides building blocks and describe customizations for a CI/CD pipeline.”
Skaffold features a five-stage workflow:
When you start Skaffold, it collects source code in your project and builds artifacts with the tool of your choice; the artifacts, once successfully built, are tagged as you see fit and pushed to the repository you specify. In the end of the workflow, Skaffold also helps you deploy the artifacts to your Kubernetes cluster, once again using the tools you prefer.
Skaffold installation
Before we begin you need to have Skaffold installed. See this link for the installation on your machine. For MacOS is as simple as:
brew install skaffold
Develop with Skaffold
You can configure Skaffold with the Skaffold configuration file skaffold.yaml, which is placed in the root of the project directory:
Let’s focus now on the build and deploy parts and ignore the portForward and profiles sections for the moment. We will come back to them later.
The build section is where we describe how the images are build - in our case we build from the dockerfile Dockerfile. For the build it uses the local Docker daemon. See builders for other options to build Docker images.
The deploy section specifies how the images are deployed. In the default configuration here we use kustomize to deploy the local overlay. Skaffold also supports using kubectl and helm. See Deployers for more information.
Skaffold is very flexible - see the skaffold.yaml reference file for other possibilities and explanations.
Local development
Local development means that Skaffold can skip pushing built container images, because the images are already present where they are run. For standard development setups such as docker-desktop, this works out of the box.
Remember you can check the current kubernetes context with
kubectx
# or with standard kubectl command
kubectl config current-context
Mine is docker-desktop.
To run Skaffold you can use the run command (this is the default modus operandi):
skaffold run --tail
in the project root directory.
The --tail option tails the logs in the container.
Now port-forward kubectl port-forward svc/multi-stage-react-app-example 3001:80 and access the app at http://localhost:3001
Tear down local deployment with Skaffold
skaffold delete
Continuous Development Mode
The skaffold run command, standard mode, instructs Skaffold to build and deploy your application exactly once. When you make changes to the source code, you will have to call skaffold run again to build and deploy your application.
Skaffold offers a skaffold dev, continous development mode, which enables the monitoring of the source repository, so that every time you make changes to the source code, Skaffold will build and deploy your application.
In this mode you can also specify the --port-forward, which will port forward your service to a port chosen by Skaffold. You can override the port by specifying it in the portForward section of the skaffold.yaml file.
In this mode it will also automatically display the containers logs (the --tail flag from skaffold run)
This mode is best suited when you have hot redeployment possibilities, but more about that in another post.
Tear down continuous developemtn with Skaffold
You can now use Ctrl+c to tear down the process.
Deploy to other environment with Skaffold profiles
With Skaffold profiles you can define build, test and deployment configurations for different contexts. Different contexts are typically different environments in your app’s lifecycle.
This is the profiles section we mentioned before the skaffold.yaml file
The build, test and deploy sections defined in the profile will completely replace the main configuration. The default values are the same in profiles as in the main config. In our case the build part is similar only the deployment parts are different.
Let’s say you want to deploy to the “production” environment. You can call Skaffold with the kustomize-prod profile in the following manner:
skaffold run -p kustomize-prod
Now port-forward kubectl port-forward svc/multi-stage-react-app-example 3001:80 and access the app at http://localhost:3001 You should now see the PROD environment.
Don’t forget you need to change your Kubernetes context (kubectx), before applying the Skaffold prod profile.
Tear down Skaffold profile
skaffold delete -p kustomize-prod
For more details about Skaffold profiles check out the docs.
Conclusion
It’s been a long ride, but hopefully you learned a few things, like how to deploy a create react app in kubernetes cluster and how to build a basis for a integration in your continuous delivery pipeline. You’ve learn to use Docker, kubernetes api manifests, kustomize, helm charts and skaffold.
 Steps to Deploy Angular application on Kubernetes
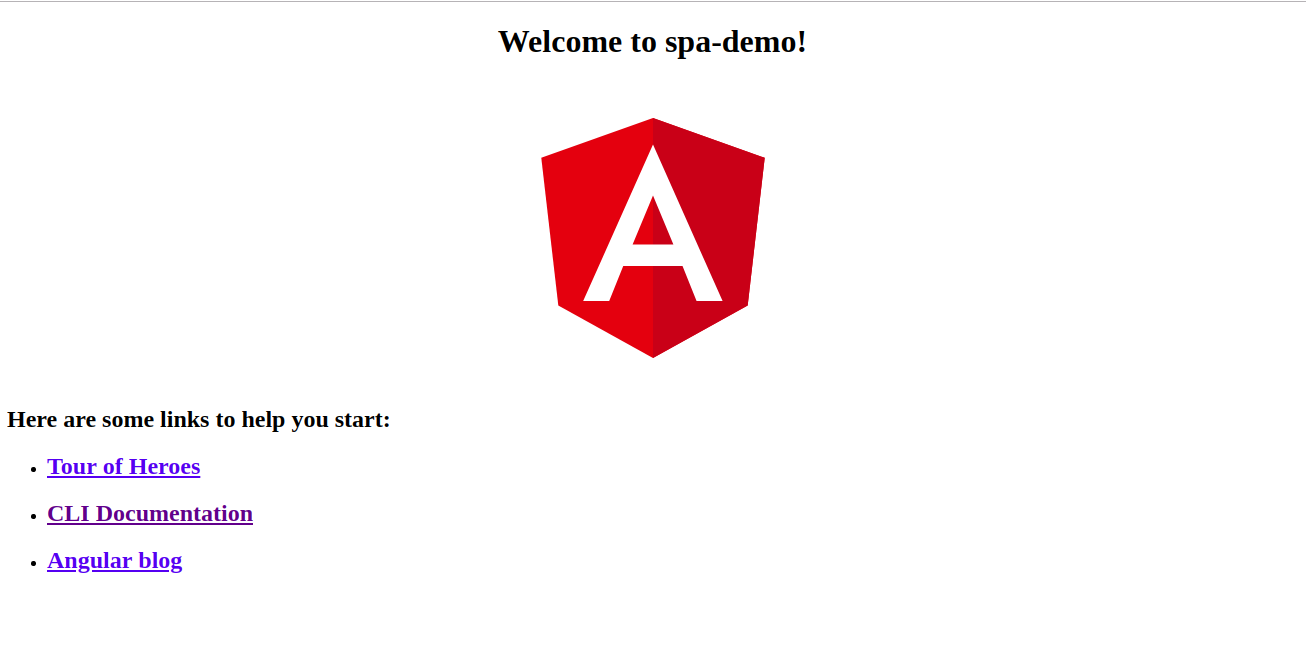 View of Angular App