Interesting practices in cloud dev ops mainly for building, testing , deploying and security aspects .
Lot of exams dumps.
Articles help to build dockers and complete CI/CD automation for your applications. 1) Azure - Micro services 2)
Azure Dev ops (CI/CD) 3) Identity 4) secure dev ops
.
give call on (+61)0426622462 or email to :dasaradhreddyk@gmail.com
Cypress is a front-end test automation framework built for the modern web. It is open source and written entirely in JavaScript. It addresses the key pain points developers and QA engineers face when testing modern applications:
A rich yet simple API for interactions with automatic waiting
Mocha, Chai, and Sinon bundled in
A sleek dashboard with automatic reloads for Test-Driven Development
Easy debugging
Network traffic control for validation and mocking
Automatic screenshots and videos
It is a very powerful tool that enables developers to write End-to-End tests entirely in JavaScript, directly accessing everything within the browser. It is also a versatile tool that can be used to test REST APIs.
At To-Do Studio, we use Cypress to test End-to-End scenarios, as well as REST APIs.
On developers’ computers, we install the Cypress Test Runner and write tests locally. Everything works perfectly. However, for CI/CD testing, we must configure Cypress with Azure DevOps Pipelines. The recipe for configuring Cypress is not as simple as it may seem at first. I’m writing this post to make sure that a configuration recipe is documented somewhere on the web to explain how to configure Cypress in Continuous Integration (CI) with Azure DevOps Pipelines. Thus, with the help of Google search, those who will have the same goal in the future will find the right answer easily.
Here is diagram presenting an overview of the major elements of the solution:
First, ensure during the build phase that the cypress tests files are zipped and published to the artifacts drop.
Second, during the release phase hosted on an Ubuntu agent, extract the zipped test files,run the tests using Cypress and publish the tests results. Here are the detailed steps:
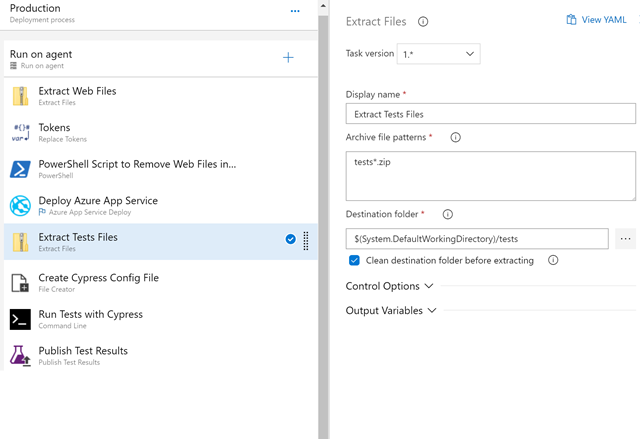
1. Extract the zip file containing the tests
Extract the zip file that was published to the artifacts drop by the build pipeline.
2. Run the tests
Start by creating the Cypress config file. Define the location of your tests with the integrationFolder configuration value. Do not use the testFiles configuration value or –spec command line option.
{"integrationFolder":"tests/e2e/specs","baseUrl":"https://info-staging.to-do.studio","projectId":"<insert your project Id>","reporter":"junit","reporterOptions":{"mochaFile":"tests/test-output-[hash].xml","toConsole":true,"attachments":true},"video":false,"pluginsFile":"tests/e2e/plugins/index.js","supportFile":"tests/e2e/support/index.js","env":{"urlEnv":"staging"}}
Follow by running the tests with Cypress using the command: npx cypress run –record –key <insert your record key>. npx install and run Cypress in a single step. npx is a npm package runner (x stands for eXecute). The typical use is to download and run a package temporarily. Please note that if you intent to record screenshots and videos with Cypresss Dashboard Service, you need to add the unique projectId into your cypress.json and pass the record key into the command. If you do not need visual results, simply omit the recording option and projectId.
3. Publish the tests results
Here you will publish the junit mocha files created during the tests run. Make sure that your merge test results and that it fails if there are test failures.
Very interesting comparision of Azure devops and Git actionaa and writing simple tests using cypress.
Testing is a critical activity that allows development teams to get early feedback about the correctness of their code and eliminate more issues in the early stages of the development cycle. Today’s article will talk about front-end testing with Cypress and its integration with Azure DevOps and GitHub.
What is Cypress?
Cypress is a free, open-source testing tool that runs on a Node.js process and allows a developer to write performance End-to-end, Integration, and unit tests using Mocha’s syntax in JavaScript.
It has two main components that come default in its installation:
Cypress Test Runner: Runner that executes your actual test cases.
Dashboard: Service that tracks and provides insight about how your tests ran.
How it works?
When you run a test using Cypress test runner, a Node.js process starts and both your application and the test code are embedded into two different iFrames in a browser managed by Cypress. The test’s code communicates with a Node.js process via WebSockets and acts as a proxy by intercepting every HTTP request from the application and then allows Cypress to mock the responses quickly.
Process Explorer
The ability to mock responses isn’t the only benefit of this architecture. By running on along your application, Cypress can access each DOM (document object model) element, the window element, and even when your test needs to perform a command like ‘click a button’, will send the command to the DOM element by using a DOM event directly instead of relying on out-of-process communication with a WebDriver.
Folder structure
After adding a new project, Cypress will automatically create the following folder structure:
Fixtures: Store static data that your tests can use.
Integration: Contains all test files.
Plugins: Special file that executes before the project is loaded and before the browser launches. During your test, execution that modifies or extends Cypress’s internal behavior.
Support: This folder contains files with reusable behavior, like custom commands, that run before every spec file.
Cypress.json: This file allows you to modify the Cypress’ default behavior by supplying specific configurations like base URL, timeouts, etc.
Installation
If you are developing an application based on Node.js, you can easily add Cypress as a dependency to your package.json by executing the following command on our project root directory.
npm install cypress --save-dev
In case you are using Yarn as a package manager, the command is the following:
yarn add cypress --dev
If you don’t want to add any dependency to your project or your project is based on programming languages different from Node.js, for example, Python and Go; you can still enjoy the Cypress testing tool by running the Test Runner inside a Docker container while running the website on the host outside the container. After starting your application on the host machine, run the Docker image with the following parameters:
I mainly use this repository for demo purposes. In its 0_Application folder, you can find a .NET 5 API developed using C# and a front-end application based on React.js.
First, you need to create the Cypress folder structure in your project.
.
└── cypress
    └── integration
Inside the integration, the folder creates a new JavaScript file called products and paste the following code.
describe('Testing Product CRUD operations', () => {
    beforeEach(() => {
        cy.visit('http://localhost:3000/products')
    })
    it('Adds a new product', () => {
        // Browse to add product
        cy.get('nav a').eq(1).click()
        cy.get('.dropdown-menu.show a').eq(1).click()
        // Add product
        cy.get('input[name="name"]').type('Test 01')
        cy.get('input[name="price"]').type('10')
        cy.get('button[type=submit]').click()
        // Check that there are at least one element
        cy.get('nav a').eq(1).click()
        cy.get('.dropdown-menu.show a').eq(0).click()
        cy.get('table[data-element-id="products"] tbody tr').should('have.length', 1)
    })
    it('Delete a product', () => {
        cy.get('nav a').eq(1).click()
        cy.get('.dropdown-menu.show a').eq(0).click()
        cy.get('table[data-element-id="products"] tbody tr button').eq(0).contains('Delete').click()
        cy.get('table[data-element-id="products"] tbody tr').should('have.length', 0)
    })
})
This integration test is composed of two steps. Before starting the execution of each test, the test runner will browse to the URL http://localhost:3000/products. Then it will sequentially execute the listed commands. In the first step, it browses the add product page by clicking on the relative link on the navbar, then it will fill the input, and finally will submit the form. The test will finish with the assertion that the products table will contain exactly one element. Instead, the second step will simply click on the first button that has Delete as text and check that the list is empty.
Cypress test runner execution
Integration with Azure DevOps
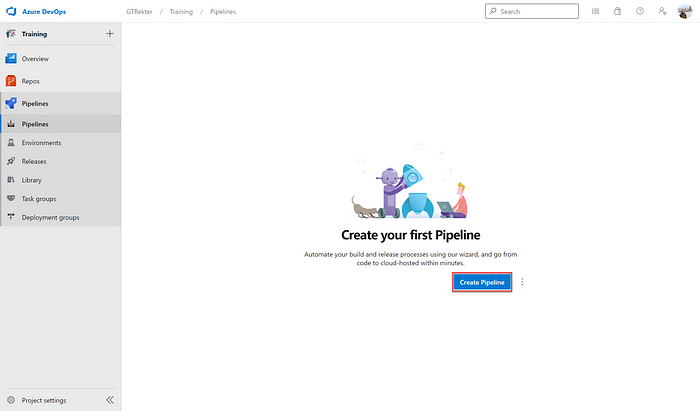
It is time to create your build pipeline.
From the dashboard, select Pipelines.
Click the New pipeline button.
Create build pipeline
Select GitHub and the repository where the source code resides.
First, instruct the service to trigger the pipeline when there are changes in the path Training/0_Application/Training.Web of the main branch.
It’s now time to push your change to your repository and run the pipeline.
Execution using Azure DevOps
Integration with GitHub Actions
First, you need to create a new GitHub Action in your repository.
Browse to GitHub, log in with your account and select your repository.
From the navigation bar, select Actions.
Click the New Workflow button.
GitHub Actions
GitHub will then propose many templates, but in our case, we need to start from scratch. For this reason, click the link set up a workflow yourself.
Setup a workflow from scratch
First, you need to specify what will trigger your action. In this case, I want to trigger the action every time there is a change in the directory 0_Application/Training.Web/ of the main branch.
on:
  push:
    paths:
      - 0_Application/Training.Web/**
    branches:
      - main
To make the workflow easier to manage, I will set an environment variable with the location of my application.
It’s now time to create the core of your workflow, the jobs that the agent will execute. Because the cypress task only runs on Linux, you need to instruct GitHub to use an agent installed on an Ubuntu machine.
jobs:
  build:
    runs-on: ubuntu-latest
Then, you can move forward by checking out your source code and installing Node.js and all of the dependencies specified in your package.json.
- uses: actions/checkout@v2

    - name: Set up Node.js version
      uses: actions/setup-node@v1
      with:
        node-version: '14.x'

    - name: yarn install, build, and test
      run: |
        yarn install
        yarn build
      working-directory: ${{ env.WORKING_DIRECTORY }}
It’s now time to perform some testing. To do so, I’m going to use different cypress-io/github-action@v2 actions for each browser.
Important: Because my application’s package.json is in a subfolder of the repository, I needed to add the parameter working-directory in each of my cypress-io/github-action@v2 task.
- name: Cypress run on chrome
  uses: cypress-io/github-action@v2
  with:
      browser: chrome
      start: yarn start
      wait-on: 'http://localhost:3000'
      working-directory: ${{ env.WORKING_DIRECTORY }}

- name: Cypress run on firefox
  uses: cypress-io/github-action@v2
  with:
      browser: firefox
      start: yarn start
      wait-on: 'http://localhost:3000'
      working-directory: ${{ env.WORKING_DIRECTORY }}

- name: Cypress run on edge
  uses: cypress-io/github-action@v2
  with:
      browser: edge
      start: yarn start
      wait-on: 'http://localhost:3000'
      working-directory: ${{ env.WORKING_DIRECTORY }}
- name: Set up Node.js version uses: actions/setup-node@v1 with: node-version: '14.x'
- name: yarn install, build, and test run: | yarn install yarn build working-directory: ${{ env.WORKING_DIRECTORY }}
- name: Cypress run on chrome uses: cypress-io/github-action@v2 with: browser: chrome start: yarn start wait-on: 'http://localhost:3000' working-directory: ${{ env.WORKING_DIRECTORY }}
- name: Cypress run on firefox uses: cypress-io/github-action@v2 with: browser: firefox start: yarn start wait-on: 'http://localhost:3000' working-directory: ${{ env.WORKING_DIRECTORY }}
- name: Cypress run on edge uses: cypress-io/github-action@v2 with: browser: edge start: yarn start wait-on: 'http://localhost:3000' working-directory: ${{ env.WORKING_DIRECTORY }}
It’s now time to push your change to your repository and start the workflow.
Execution using GitHub Action
After completing each step of your test, you will be able to see the execution time (in case it succeeds), the exception (in case it fails), and a summary at the end of both of the tests and GitHub Action.