Cypress is a front-end test automation framework built for the modern web. It is open source and written entirely in JavaScript. It addresses the key pain points developers and QA engineers face when testing modern applications:
- A rich yet simple API for interactions with automatic waiting
- Mocha, Chai, and Sinon bundled in
- A sleek dashboard with automatic reloads for Test-Driven Development
- Easy debugging
- Network traffic control for validation and mocking
- Automatic screenshots and videos
It is a very powerful tool that enables developers to write End-to-End tests entirely in JavaScript, directly accessing everything within the browser. It is also a versatile tool that can be used to test REST APIs.
At To-Do Studio, we use Cypress to test End-to-End scenarios, as well as REST APIs.
On developers’ computers, we install the Cypress Test Runner and write tests locally. Everything works perfectly. However, for CI/CD testing, we must configure Cypress with Azure DevOps Pipelines. The recipe for configuring Cypress is not as simple as it may seem at first. I’m writing this post to make sure that a configuration recipe is documented somewhere on the web to explain how to configure Cypress in Continuous Integration (CI) with Azure DevOps Pipelines. Thus, with the help of Google search, those who will have the same goal in the future will find the right answer easily.
Here is diagram presenting an overview of the major elements of the solution:

First, ensure during the build phase that the cypress tests files are zipped and published to the artifacts drop.

Second, during the release phase hosted on an Ubuntu agent, extract the zipped test files,run the tests using Cypress and publish the tests results. Here are the detailed steps:
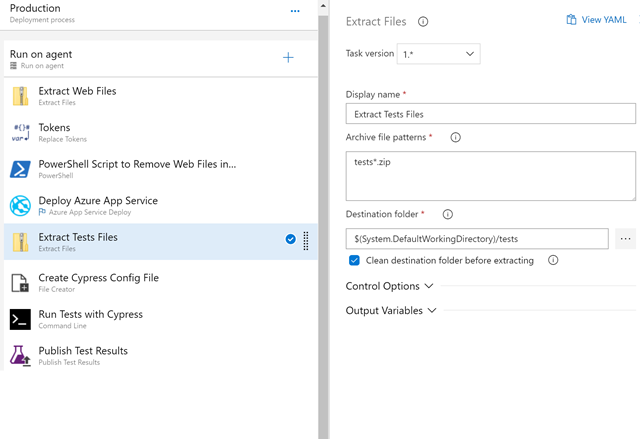
1. Extract the zip file containing the tests
Extract the zip file that was published to the artifacts drop by the build pipeline.
2. Run the tests
Start by creating the Cypress config file. Define the location of your tests with the integrationFolder configuration value. Do not use the testFiles configuration value or –spec command line option.
{
  "integrationFolder": "tests/e2e/specs",
  "baseUrl": "https://info-staging.to-do.studio",
  "projectId": "<insert your project Id>",
  "reporter": "junit",
  "reporterOptions": {
    "mochaFile": "tests/test-output-[hash].xml",
    "toConsole": true,
    "attachments": true
    },
  "video": false,
  "pluginsFile": "tests/e2e/plugins/index.js",
  "supportFile": "tests/e2e/support/index.js",
  "env": {
    "urlEnv": "staging"
  }
}

Follow by running the tests with Cypress using the command: npx cypress run –record –key <insert your record key>. npx install and run Cypress in a single step. npx is a npm package runner (x stands for eXecute). The typical use is to download and run a package temporarily. Please note that if you intent to record screenshots and videos with Cypresss Dashboard Service, you need to add the unique projectId into your cypress.json and pass the record key into the command. If you do not need visual results, simply omit the recording option and projectId.

3. Publish the tests results
Here you will publish the junit mocha files created during the tests run. Make sure that your merge test results and that it fails if there are test failures.


No comments:
Post a Comment