Tuesday, December 1, 2020

Improving Performance with Batching Client GraphQL Queries


Modern apps are chatty—they require a lot of data, and thus make a lot of requests to underlying services to fulfill those needs. Layering GraphQL over your services solves this issue, since it encapsulates multiple requests into a single operation, avoiding the cost of multiple round trips.

Apollo makes it easy to compose your application from individual components that manage their own data dependencies. This pattern enables you to grow your app and add new features without risk of breaking existing functionality. It does however come with a performance cost as each component will fire off uncoordinated GraphQL queries as they are being mounted by React.

In this article we will dive into transport-level query batching, an advanced Apollo feature that enables you to significantly improve performance of complex applications.

By the end of this post, you should be able to answer the following questions about batching client operations with Apollo:
  • How does batching work?
  • What are the tradeoffs with batching?
  • Is batching necessary?
  • Can batching be done manually?
  • Can I fix automatic batching?.
. . .

How does batching work?

Batching is the process of taking a group of requests, combining them into one, and making a single request with the same data that all of the other queries would have made. This is usually done with a timing threshold.

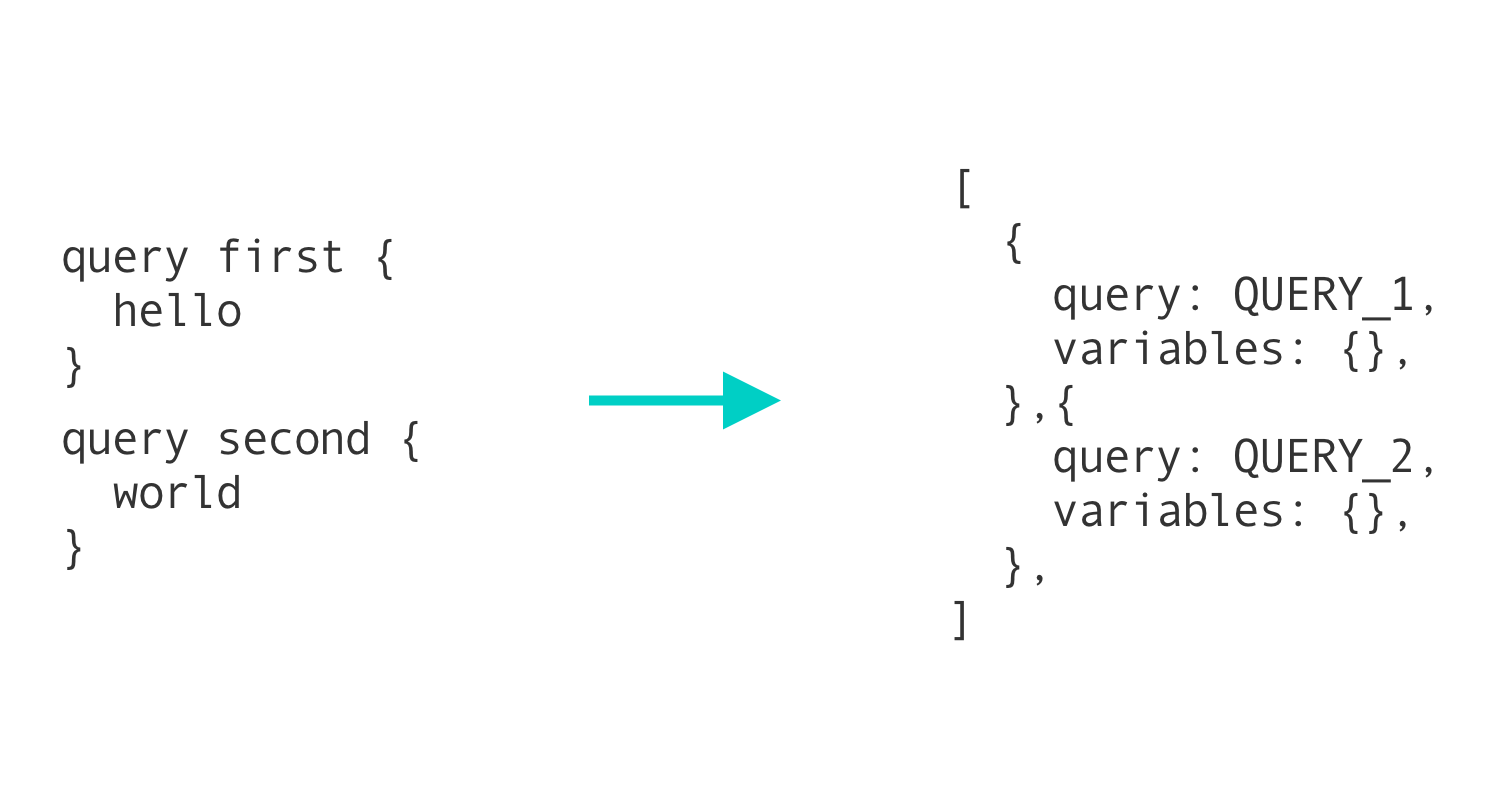
In GraphQL apps, batching usually takes one of two forms. The first form takes all operations and combines them into a single operation using the alias feature in GraphQL. This approach is not recommended, however, since this removes the ease of tracking metrics on a per-operation basis and adds additional complexity to the client.
For a deeper dive into how batching works with Apollo, check out this post introducing batching in an earlier version of Apollo Client. Even though some of the implementation details have changed, the concepts are still relevant today.
. . .

The Example App

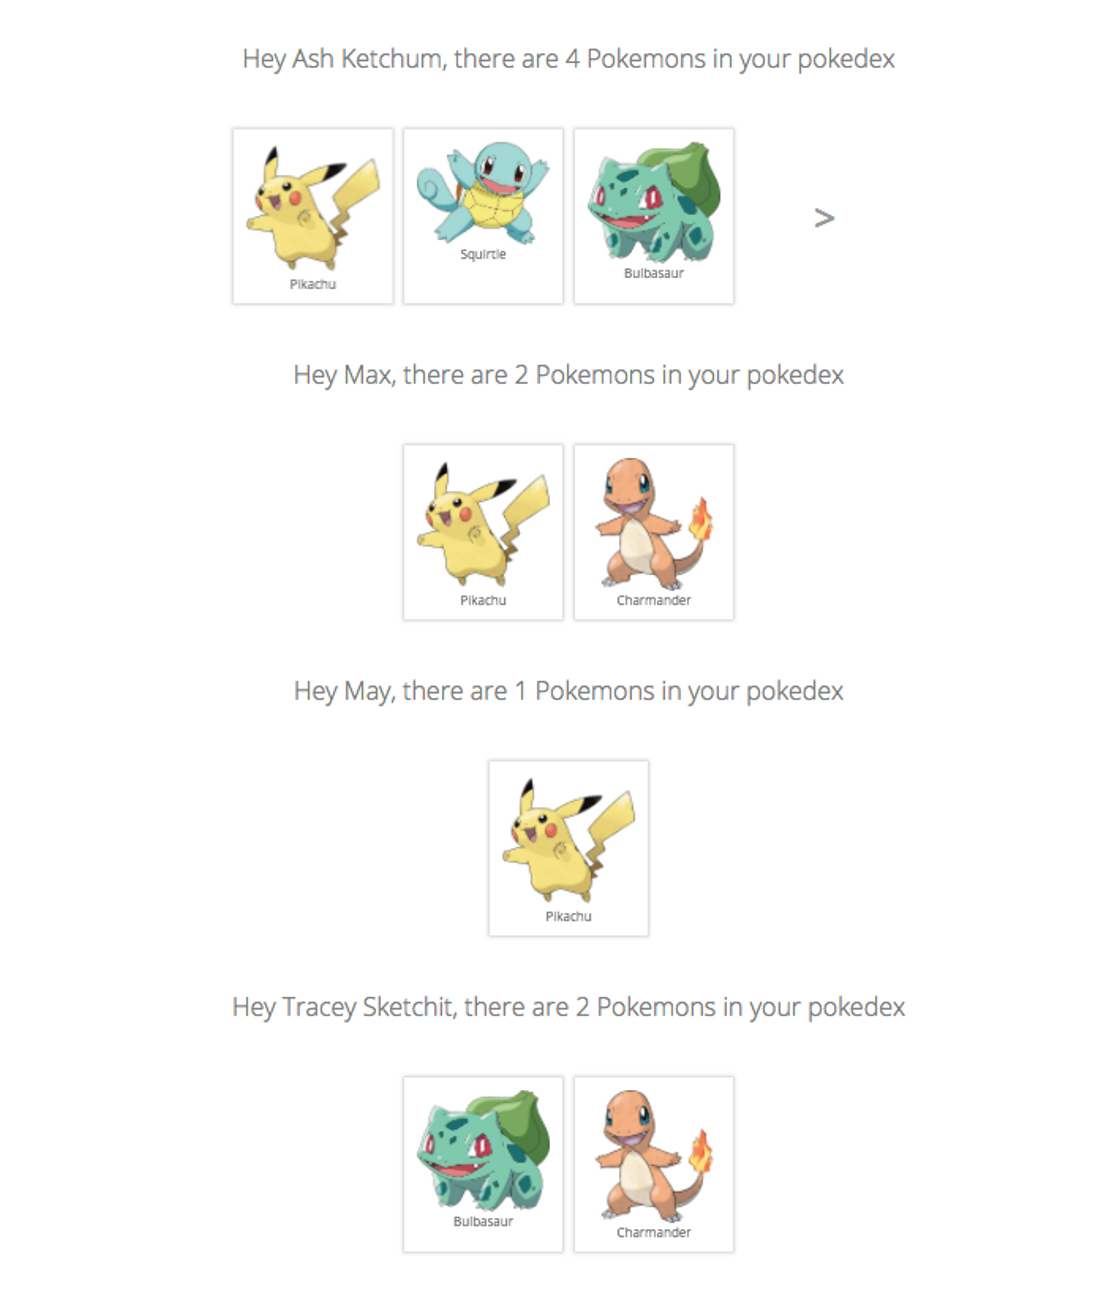
We will use an extended version of the Learn Apollo Pokedex app to explore the performance gains query batching can provide. The original Pokedex app lists all Pokemon for a single trainer. We make the app multi-tenant by rendering the Pokedex component for each trainer. This is how the app looks like with 6 trainers.


1. Before Batching Queries

Chrome DevTools has a very detailed network traffic inspection feature. If you are serious about app performance take a look at the documentation. When you load the extended pokedex and filter for requests to the GraphQL backend it looks like this


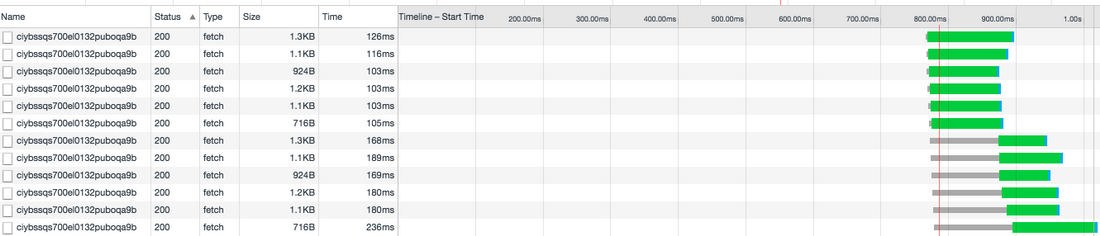
The first thing you notice is that Apollo is generating 12 requests. This makes sense as we are rendering 12 Pokedex components. Each request takes around 100 ms and the first 6 requests completes within 126 ms. But now something interesting happens.

The following 6 requests are stalled for up to 126 ms while the first requests complete. All browsers have a limit on concurrent connections. For Chrome the limit is currently 6 concurrent requests to the same hostname, so 7 requests will take roughly double the amount of time to complete as 6 requests.

2. After Batching Queries

This is where Apollos Query Batching comes into play. If Query Batching is enabled, Apollo will not issue requests immediately. Instead it will wait for up to 10 ms to see if more requests come in from other components. After the 10 ms, Apollo will issue 1 request containing all the queries. This eliminates the issue with stalled connections and delivers significantly better performance


The performance of this combined query is almost as good as a single query from the first test.
. . .

Manually Batching Queries

Batching can be done manually. Often, for the cases where batching may still be a necessity, inexpensive operations can be manually batched together to prevent unnecessary requests. In GraphQL, this is done by combining smaller queries into one larger one.

For example, if there was a page with four content blocks on it, rather than having each block fetch its own data, a container could fetch the data and pass it to the components manually. This is conceptually similar to the first implementation of batching described in the first section.

This may sound counterintuitive to the patterns that have been established, like colocating queries with the components that use their response, but there are ways around this.

This isn’t suggesting to write one large GraphQL query at the container-level. Instead, write queries normally, next to the components that use them. When you’re ready to optimize a section of an app, convert those queries to fragments and export them from the component file.

You can then import these fragments in the container, let the container make the single, large query, and pass the fragment results back to the children. Using container components in this way can even allow you to control loading and error states at the container-level, rather than in each component.

Take a look at this CodeSandbox for a full example of this in action:

Even manual batching has issues, though. Since manually batched operations are much larger,their ability to take advantage of whole-query caching is reduced. Whole-query cache TTLs are based on the field in an operation with the shortest TTL.

Increasing the number of fields in an operation increases the chances that a field that can’t be cached for a long time is included, reducing the ability to cache the whole operation. For more on whole-query caching, and how these TTLs are calculated, read this doc.
. . .

Automatic batching (Apollo Client)

There is no silver bullet for batching. If batching is enabled, there is always the potential for portions of the batch to run slower, and thus hold up the remaining portions of the batch. Sometimes, however, the trouble of manually batching operations outweighs the benefits. Manually batching may be too complicated, or too large of a refactor to reasonably undertake.

Enabling batching in Apollo Client:
import ApolloClient, { createBatchingNetworkInterface } from *'apollo-client'* const client = new ApolloClient({ networkInterface: createBatchingNetworkInterface({ uri: *'https://api.graph.cool/simple/v1/ciybssqs700el0132puboqa9b', * batchInterval: 10}), dataIdFromObject: o => o.id })

Some of the issues around batching can be solved by manually debatching expensive operations–that is, allowing most operations to be batched like normal, but preventing batching for ones that are known to cause issues. Doing this requires a few steps:
  1. Build components as usual, with colocated queries.
  2. Identify the most expensive operations using a tool like Apollo Engine(these are not necessarily just the largest queries).
  3. Mark expensive operations on the client using an operation’s context. You can set the context by specifying a prop on your Query component.
  4. Use split to switch between apollo-link-http or apollo-link-batch-http depending on the context of the operation.

Take a look at this CodeSandbox for a full example of this in action:


. . .

Conclusion

Batching is a tricky topic. There are plenty of reasons to use some form of client request batching, but many times these solutions just cause more problems than they solve.

Hopefully, armed with this information, you can feel confident when making a decision about how to boost the performance of the client.

Tuesday, October 6, 2020

The FrontEnd Bottleneck


Once you get data from your backend, how do you ensure that you serve it to your client efficiently? Nobody wants to see a loading pizza (above) forever!

The PRPL Pattern

PRPL stands for:

  • Push critical resources for the initial URL route.
  • Render initial route.
  • Pre-cache remaining routes.
  • Lazy-load and create remaining routes on demand.

PRPL means that you only need to make one initial fetch and you can pre-cache the data for your routes. This allows you to store data on the client side in a quickly accessible manner and navigate between routes without making additional fetches.

React Router PRPL

React router fundamentally runs via a PRPL pattern. React-Redux is capable of making one initial fetch, storing the data in state, and setting up many routes that can load without fetching more data from the backend.

Lazy load means that you can wait to load data that users rarely interact with, such as their profile update page or old post history. You can also lazy-load heavy data like images and videos.

Bundling and Code-Splitting

Bundling allows us to efficiently load script files by bundling them into one big file. Bundling solves the latency associated with fetching the code from many scripts. Webpack is a great library for bundling and minification in React. Webpack also allows you to use code-splitting to create multiple bundles. This way, you can lazy-load the important scripts and wait to load the scripts that are rarely used. Package managers like yarn and npm are used in React to manage bigger libraries that your App depends on.

The Virtual DOM

Updates to the regular DOM tend to be slow, mostly because of a lack of precision. A program might accidentally update an entire tree when it only needed to update the innerText of a single element. Frontend JS frameworks like React and Angular help us optimize the precision of our DOM updates through a tool commonly referred to as the virtual DOM. The virtual DOM is just an abstract representation of the real DOM as a hierarchy of objects. Since object lookup is so fast, React can quickly compare a previous version of the virtual DOM to a new version of the DOM in a process called ‘diffing’. With diffing, react can precisely locate all the DOM nodes that need to be updated, and batch all those updates for maximal performance. The diffing process is a great optimization for complex apps that share state across many components.

HTTP Caching

HTTP caching dramatically improves the performance of apps. HTTP caching allows your browser to save fetched pages. This is done automatically by the browser, though there are ways to control how it’s done. I won’t go into this in detail here, but I am attaching a couple resources.

Client-Side Caching in React

If a user visits your website, closes the browser, leaves for lunch, and then comes back to the page later, there is no good reason to refetch all the page data again. The browser’s built in localStorage and sessionStorage are great for saving data so you don’t have to refetch later on.

//set
localStorage.setItem('key', 'value')
//get
localStorage.getItem('key')

localStorage.setItem will store data even when a user closes the browser and comes back later. You can conditionally ask for localStorage data in your event listeners or lifecycle methods to tell React whether it should refetch from the backend.

Here’s an example in sudo code:

const cache = localStorage.getItem(data)
if (cache) {
this.setState(
{
siteData: JSON.parse(cache)
})
return
} else {
\\fetch data from backend
}

If you want the stored data to expire when the current session ends, you can use sessionStorage , which comes with the same methods as localStorage .

Service Workers

I would be remiss if I didn’t mention service workers. These are the proxy servers that handle offline experience. They essentially stand between your app and the network, handling events that require a network connection. They can do things like ‘background sync,’ which defers an action until the user has a stable network connection. They don’t necessarily speed up your application, but they do make your app smarter.

Conclusion

Performance is a HUGE topic with many different areas of expertise. This article barely scratches the surface, but if you incorporate each of the elements we have covered, you will dodge some of the most common performance issues with a growing app. I hope this helps!

Friday, October 2, 2020

Azure Event Grid Log Streams


Azure Event Grid is a serverless event bus that lets you send event data from any source to any destination.

You can create event-driven workflows using Event Grid to send your Auth0 tenant logs to targets, such as Azure Functions, Event Hubs, Sentinel, and Logic Apps.

For a full list of the event type codes that Auth0 supports, see Log Event Type Codes.

Send events from Auth0 to Azure Event Grid

To send Auth0 events to Azure, you must:

  1. Enable the Event Grid resource provider.
  2. Set up an event source (in this case, this is Auth0).
  3. Set up an event handler, which is the app or service where the event will be sent.

To learn more, see Microsoft's Concepts in Azure Event Grid.

Enable Event Grid resource provider

If you haven’t previously used Event Grid, you will need to register the Event Grid resource provider. If you've used Event Grid before, skip to the next section.

In your Azure portal:

  1. Select Subscriptions.
  2. Select the subscription you’re using for Event Grid.
  3. On the left menu, under Settings, select Resource providers.
  4. Find Microsoft.EventGrid.
  5. Select Register.
  6. Refresh to make sure the status changes to Registered.

Set up an Auth0 event source

Use the Auth0 Dashboard to set up Auth0 for use as an event source.

  1. Log in to the Auth0 Dashboard.
  2. Navigate to Logs > Streams.
  3. Click + Create Stream.
  4. Select Azure Event Grid, and enter a unique name for your new stream.
  5. On the next screen, provide the following settings for your Event Grid stream:
SettingDescription
NameA unique display name to distinguish this integration from other integrations.
Azure Subscription IDThe unique alphanumeric string that identifies your Azure subscription.
Azure RegionThe region in which your Azure subscription is hosted.
Resource Group nameThe name of the Azure resource group, which allows you to manage all Azure assets within one subscription.
  1. Click Save.

Activate your Auth0 Partner Topic in Azure

Activating the Auth0 topic in Azure allows events to flow from Auth0 to Azure.

  1. Log in to the Azure Portal.
  2. Search Partner Topics at the top, and click Event Grid Partner Topics under services.
  3. Click on the topic that matches the stream you created in your Auth0 Dashboard.
  4. Confirm that the Source field matches your Auth0 account.
  5. Click Activate.

Subscribe to your Partner Topic

Subscribe to an Event Grid partner topic to tell Event Grid which events to send to your event handler.

  1. On the Event Grid partner topic Overview page, select + Event Subscription on the toolbar.
  2. On the Create Event Subscription page:
    1. Enter a name for the event subscription.
    2. Select your desired Azure service or WebHook for the Endpoint type.
    3. Follow the instructions for the particular service.
    4. Back on the Create Event Subscription page, select Create.

To send events to your topic, please follow the instructions in this article.

Set up an event handler

Go to your Azure subscription and spin up a service that is supported as an event handler. For a full list of supported event handlers, see Microsoft's Event Handlers in Azure Event Grid.

Testing

At this point, your Event Grid workflow should be complete.

Verify the integration

To verify that the integration is working as expected:

  1. Log in to the Auth0 Dashboard.
  2. Navigate to Logs > Streams.
  3. Click on your Event Grid stream.
  4. Once on the stream, click the Health tab. The stream should be active and as long as you don't see any errors, the stream is working.

Delivery attempts and retries

Auth0 events are delivered to your server via a streaming mechanism that sends each event as it is triggered. If your server is unable to receive the event, Auth0 will try to redeliver it up to three times. If still unsuccessful, Auth0 will log the failure to deliver, and you will be able see these failures in the Health tab for your log stream.