Wednesday, August 26, 2020

Comparing Startup.cs between the ASP.NET Core 3.0 templates


The .NET Core 3.0 SDK includes many more templates out-of-the-box than previous versions. In this post I compare some of the different templates used by ASP.NET Core 3 apps, and look at some of the new helper methods used for service and middleware configuration in ASP.NET Core 3.0.

I'm only looking at the ASP.NET Core templates in this post:

There are many more templates than these that I'm not covering here - Blazor templates, client-side templates, worker templates - you can see them all by running dotnet new list!

The ASP.NET Core Empty template

You can create the "empty" template by running dotnet new web, and it's pretty, well, empty. You get the standard Program.cs configuring the Generic Host, and a sparse Startup.cs shown below:

public class Startup
{
    public void ConfigureServices(IServiceCollection services) { }

    public void Configure(IApplicationBuilder app, IWebHostEnvironment env)
    {
        if (env.IsDevelopment())
        {
            app.UseDeveloperExceptionPage();
        }

        app.UseRouting();

        app.UseEndpoints(endpoints =>
        {
            endpoints.MapGet("/", async context =>
            {
                await context.Response.WriteAsync("Hello World!");
            });
        });
    }
}

The main difference compared to ASP.NET Core 2.x apps is the conspicuous use of endpoint routing. This was introduced in 2.2, but could only be used for MVC controllers. In 3.0, endpoint routing is the preferred approach, with the most basic setup provided here.

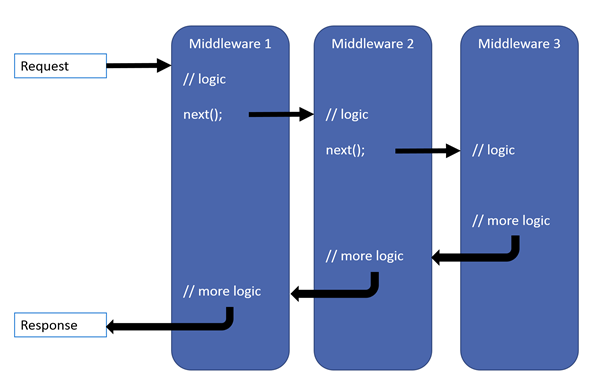
Endpoint routing separates the process of selecting which "endpoint" will execute from the actual running of that endpoint. An endpoint consists of a path pattern, and something to execute when called. It could be an MVC action on a controller or it could be a simple lambda, as shown in this example where we're creating an endpoint using MapGet() for the path /.

The UseRouting() extension method is what looks at the incoming request and decides which endpoint should execute. Any middleware that appears after the UseRouting() call will know which endpoint will run eventually. The UseEndpoints() call is responsible for configuring the endpoints, but also for executing them.

If you're new to endpoint routing, I suggest taking a look at this post by Areg Sarkissian, or this post by Jürgen Gutsch.

The ASP.NET Core Web API template

The next most complex template is the Web API template, created by running dotnet new webapi. This includes a simple [ApiController] Controller with a single Get method. The Startup.cs file (shown below) is slightly more complex than the empty template, but includes many of the same aspects.

 public class Startup
{
    public Startup(IConfiguration configuration)
    {
        Configuration = configuration;
    }

    public IConfiguration Configuration { get; }

    public void ConfigureServices(IServiceCollection services)
    {
        services.AddControllers();
    }

    public void Configure(IApplicationBuilder app, IWebHostEnvironment env)
    {
        if (env.IsDevelopment())
        {
            app.UseDeveloperExceptionPage();
        }

        app.UseHttpsRedirection();

        app.UseRouting();

        app.UseAuthorization();

        app.UseEndpoints(endpoints =>
        {
            endpoints.MapControllers();
        });
    }
}

It isn't used in the default template, but the IConfiguration is injected in the constructor in this template. In any real application you'll almost certainly need access to this to configure your services, so it makes sense.

In ConfigureServices, there's a call to an extension method, AddControllers(), which is new in ASP.NET Core 3.0. In 2.x, you would typically call services.AddMvc() for all ASP.NET Core applications. However, this would configure the services for everything MVC used, such as Razor Pages and View rendering. If you're creating a Web API only, then those services were completely superfluous.

To get around this, I showed in a previous post how you could create a stripped down version of AddMvc(), only adding the things you really need for creating Web APIs. The AddControllers() extension method now does exactly that - it adds the services required to use Web API Controllers, and nothing more. So you get Authorization, Validation, formatters, and CORS for example, but nothing related to Razor Pages or view rendering. For the full details of what's included see the source code on GitHub.

The middleware pipeline is fleshed out a little compared to the empty template. We have the developer exception page when running in the Development environment, but note there's no exception page in other environments. That's because it's expected that the ApiController will transform errors to the standard Problem Details format.

Next is the HTTPS redirection middleware, which ensures requests are made over a secure domain (definitely a best practice). Then we have the Routing middleware, early in the pipeline again, so that subsequent middleware can use the selected endpoint when deciding how to behave.

The Authorization middleware is new in 3.0, and is enabled largely thanks to the introduction of endpoint routing. You can still decorate your controller actions with [Authorize] attributes, but now the enforcement of those attributes occurs here. The real advantage is that you can apply authorization policies to non-MVC endpoints, which previously had to be handled in a manual, imperative manner.

Finally, the API controllers are mapped by calling endpoints.MapControllers(). This only maps controllers that are decorated with routing attributes - it doesn't configure any conventional routes.

The ASP.NET Core Web App (MVC) template

The MVC template (dotnet new mvc) includes a few more pieces than the Web API template, but it's been slimmed down slightly from its equivalent in 2.x. There's only a single controller, the HomeController, the associated Views, and required shared Razor templates.

Startup.cs is very similar to the Web API template, with just a few differences I discuss below:

public class Startup
{
    public Startup(IConfiguration configuration)
    {
        Configuration = configuration;
    }

    public IConfiguration Configuration { get; }

    public void ConfigureServices(IServiceCollection services)
    {
        services.AddControllersWithViews();
    }

    public void Configure(IApplicationBuilder app, IWebHostEnvironment env)
    {
        if (env.IsDevelopment())
        {
            app.UseDeveloperExceptionPage();
        }
        else
        {
            app.UseExceptionHandler("/Home/Error");
            app.UseHsts();
        }

        app.UseHttpsRedirection();
        app.UseStaticFiles();

        app.UseRouting();

        app.UseAuthorization();

        app.UseEndpoints(endpoints =>
        {
            endpoints.MapControllerRoute(
                name: "default",
                pattern: "{controller=Home}/{action=Index}/{id?}");
        });
    }
}

In place of the AddControllers() extension method, this time we have AddControllersWithViews. As you might expect, this adds the MVC Controller services that are common to both Web API and MVC, but also adds the services required for rendering Razor views.

As this is an MVC app, the middleware pipeline includes the Exception handler middleware for environments outside of Development, and also adds the HSTS and HTTPS redirection middleware, the same as for 2.2.

Next up is the static file middleware, which is placed before the routing middleware. This ensures that routing doesn't need to happen for every static file request, which could be quite frequent in an MVC app.

The only other difference from the Web API template is the registration of the MVC controllers in the endpoint routing middleware. In this case a conventional route is added for the MVC controllers, instead of the attribute routing approach that is typical for Web APIs. Again, this is similar to the setup in 2.x, but adjusted for the endpoint routing system.

ASP.NET Core Web App (Razor) template

Razor Pages was introduced in ASP.NET Core 2.0 as a page-based alternative to MVC. For many apps, Razor Pages provides a more natural model than MVC, However it's fundamentally built on top of the MVC infrastructure, so the Startup.cs from dotnet new webapp looks very similar to the MVC version:

public class Startup
{
    public Startup(IConfiguration configuration)
    {
        Configuration = configuration;
    }

    public IConfiguration Configuration { get; }

    public void ConfigureServices(IServiceCollection services)
    {
        services.AddRazorPages();
    }

    public void Configure(IApplicationBuilder app, IWebHostEnvironment env)
    {
        if (env.IsDevelopment())
        {
            app.UseDeveloperExceptionPage();
        }
        else
        {
            app.UseExceptionHandler("/Error");
            app.UseHsts();
        }

        app.UseHttpsRedirection();
        app.UseStaticFiles();

        app.UseRouting();

        app.UseAuthorization();

        app.UseEndpoints(endpoints =>
        {
            endpoints.MapRazorPages();
        });
    }
}

The first change in this file is the replacement of AddControllersWithViews() with AddRazorPages(). As you might expect, this adds all of the additional services required for Razor Pages. Interestingly it does not add the services required for using standard MVC controllers with Razor Views. If you want to use both MVC and Razor Pages in your app, you should continue to use the AddMvc() extension method.

The only other change to Startup.cs is to replace the MVC endpoint with the Razor Pages endpoint. As with the services, if you wish to use both MVC and Razor Pages in your app, then you'll need to map both endpoints, e.g.

app.UseEndpoints(endpoints =>
{
    endpoints.MapControllers(); // Map attribute-routed API controllers
    endpoints.MapDefaultControllerRoute(); // Map conventional MVC controllers using the default route
    endpoints.MapRazorPages();
});

Summary

This post provided a brief overview of the Startup.cs files created by the various ASP.NET Core templates using the .NET Core 3.0 SDK. Each template adds a little extra to the previous one, providing a few extra features. In many ways the templates are very similar to those from .NET Core 2.x. The biggest new features are the ability to more easily include the minimal number of MVC services required by your app, and the new endpoint routing, which is the standard routing approach in .NET Core 3.0

How to use Async pipe in Angular applications


In this article, we will learn how to use async pipe in Angular 8 application. We start off with defining an Async pipe and listing its advantages, followed by how to use the code. We will then look at how to create an ASP.NET application and how to write the backend related code using SQL server.

What is Async Pipe?

Async Pipe is an impure pipe which automatically subscribes to an observable to emit the latest values. It not only subscribes to an observable but it also subscribes to promise and calls the method. When the components get destroyed, it automatically unsubscribes it to reduce memory leaks.

Advantages of Async Pipe

  1. Async Pipe makes rendering of data from observable and promise easier.
  2. For promises, it automatically calls the method, and
  3. for observables, it automatically calls subscribe and unsubscribe.

Using the Code

Prerequisites

  • Basic knowledge of Angular
  • Visual Studio Code must be installed
  • Angular CLI must be installed
  • Node JS must be installed

Step 1

Let's create a new Angular project using the following NPM command:

ng new asyncPipe

Step 2

Now, let's create a new component by using the following command:

ng g c async-pipe-example

Step 3

Now, open the async-pipe-example.component.html file and add the following code in the file:

<div class="card">       
<div class="card-body pb-0">         
<h4 style="text-align:  center">{{SampleMessage}}         </h4>

<div class="row">           
<div class="col-12 col-md-12">             
<div class="card">                    
<div class="card-body position-relative">                 
<div class="table-responsive cnstr-record product-tbl">
<table class="table table-bordered heading-hvr">
	<tbody>
		<tr>
			<td>
			</td>
			<th width="50">Art.No   Brand   Price/Unit   Provider   P. Art.  N  S. A/C
			</th>
		</tr>
	</tbody>
	<tbody>
		<tr>
			<td>
			</td>
			<td align="center">{{product.ArtNo}}    {{product.Brand}}    
			{{product.Price }}    {{product.Provider}}    
            {{product.ProviderArtNo}}    {{product.SalesAccount}}
			<p>Here in the below code we can see how to apply async pipe 
               with our structural directive *ngFor</p>

			<pre lang="C++"> 

Step 4

Now, open the async-pipe-example.component.ts file and add the following code in this file:

import { Component, OnInit } from '@angular/core';    
import { ProductsService } from '../product.service';    
import { Observable } from 'rxjs';    
    
@Component({    
  selector: 'app-async-pipe-example',    
  templateUrl: './async-pipe-example.component.html',    
  styleUrls: ['./async-pipe-example.component.css']    
})    
export class AsyncPipeExampleComponent implements OnInit {    
  products = [];    
  products$:Observable<any>;    
  SampleMessage="Example of Angular Async Pipe";    
    
  constructor(private _productService:ProductsService) { }    
    
  ngOnInit() {    
    //this.getProductsUsingSubscribeMethod();    
    this.getProductsUsingAsyncPipe();    
  }    
    
  public getProductsUsingSubscribeMethod() {    
    this.SampleMessage="Example of Angular Subscribe Method";    
    this._productService.getAllProducts().subscribe((data: any) => {    
      this.products =data;    
      console.log(data);    
    })    
  }    
    
  public getProductsUsingAsyncPipe() {    
    this.SampleMessage="Example of Angular Async Pipe";    
    this.products$ =this._productService.getAllProducts();    
  }      
} 

Here in the below code, we are using observables of any type and to get the asynchronous flow data, either we can use subscribe method to subscribe the observables or we can simply use 'async pipe' which automatically subscribes to an Observable and returns the latest value and it also unsubscribes automatically to avoid memory leaks.

public getProductsUsingAsyncPipe() {      
  this.SampleMessage="Example of Angular Async Pipe";      
  this.products$ =this._productService.getAllProducts();      
}

Step 5

Now, open the product.service.ts file and add the following code:

import { Injectable } from '@angular/core';    
import { HttpClient } from '@angular/common/http';    
  
@Injectable()       
export class ProductsService {      
    private url = '';    
    private baseUrl = "http://localhost:49661/";//Replace it with your http address and port
    constructor(public http: HttpClient) {    
    }      
    getAllProducts() {    
        this.url = this.baseUrl+'api/Product/getAllProducts';    
        return this.http.get<any[]>(this.url);    
    }      
}

WEB API - Create an ASP.NET Application

Follow these steps to create an ASP.NET application.

Step 1

In Visual Studio 2019, click on File -> New -> Project.

How To Create Nested Grid Using Angular 8

Step 2

Choose the Create option and select ASP.NET web application.

How To Create Nested Grid Using Angular 8

Step 3

Select Web API and click Ok.

How To Create Nested Grid Using Angular 8

Step 4

Now right click on Controller and then add a New Item.

How To Create Nested Grid Using Angular 8

Step 5

Choose ADO.NET Entity Data Model and then click on Add.

How To Create Nested Grid Using Angular 8

Step 6

Next step is EF Designer, just click on Next.

How To Create Nested Grid Using Angular 8

Step 7

A new pop-up will show. Click on Next. If yours isn't established, then click on New Connection.

How To Create Nested Grid Using Angular 8

Step 8

Copy your database connection server name and paste it in the server name textbox. You will see all the database, select your database and click on OK.

How To Create Nested Grid Using Angular 8

Step 9

The next popup will show, paste your database server name, and choose for the database and test for the connection, then click on Next. Here, in the new screen, select your tables and store the procedure. Then click on Finish.

How To Create Nested Grid Using Angular 8

Our next step is to right-click on the controllers folder and add a new controller. Name it as "Product controller" and add the following namespace in the student controller.

Here is the complete code for getting all the product data and their nested product information data.

Complete Product Controller Code

using System.Linq;  
using System.Web.Http;  
using CompanyDetails.Models;  
namespace CompanyDetails.Controllers {  
    [RoutePrefix("api/Company")]  
    public class CompanyController: ApiController {  
        CompanyEntities2 DB = new CompanyEntities2();  
        [HttpGet]  
        [Route("getAllProducts")]  
        public object getAllProducts(string countrycode) {  
            var productDetails = DB.USP_GetAllProducts().ToList();  
            return productDetails;  
        }  
    }  
}  

Now, it's time to enable CORS. Go to Tools, open NuGet Package Manager, search for CORS, and install the "Microsoft.Asp.Net.WebApi.Cors" package.

If you are running your frontend application in a different port and your server is running on another port, then to avoid a Cross-Origin-Resource-Sharing issue, you have to add small code in webapiconfig.cs file.

Open Webapiconfig.cs and add the following lines:

EnableCorsAttribute cors = new EnableCorsAttribute("*", "*", "*");  
config.EnableCors(cors);  

Backend

Here, we will do backend related code using SQL server.

The very first step is to create a database.

Create Database

Let’s create a database on your local SQL Server. I hope you have installed SQL Server 2017 in your machine (you can use SQL Server 2008, 2012, or 2016, as well).

Step 1

Create a database product.

create database product  

Step 2

Create a product table using the following code:

USE [Product]  
GO  
/****** Object: Table [dbo].[Product] Script Date: 12/18/2019 10:23:19 PM ******/  
SET ANSI_NULLS ON  
GO  
SET QUOTED_IDENTIFIER ON  
GO  
CREATE TABLE [dbo].[Product](  
[ProductId] [int] IDENTITY(1,1) NOT NULL,  
[ArtNo] [nvarchar](50) NULL,  
[Provider] [nvarchar](50) NULL,  
[ProviderArtNo] [nvarchar](50) NULL,  
[Brand] [nvarchar](50) NULL,  
CONSTRAINT [PK_Product] PRIMARY KEY CLUSTERED  
(  
[ProductId] ASC  
)WITH (PAD_INDEX = OFF, STATISTICS_NORECOMPUTE = OFF, _
 IGNORE_DUP_KEY = OFF, ALLOW_ROW_LOCKS = ON, ALLOW_PAGE_LOCKS = ON) ON [PRIMARY]  
) ON [PRIMARY]  
GO  

Make product ID the primary key.

Now it's time to add some stored procedures.

Step 3

All you have to do is paste the following code in a new query:

USE [Product]  
GO  
/****** Object: StoredProcedure [dbo].[USP_GetAllProducts] 
 Script Date: 12/18/2019 10:24:35 PM ******/  
SET ANSI_NULLS ON  
GO  
SET QUOTED_IDENTIFIER ON  
GO  
ALTER Proc [dbo].[USP_GetAllProducts]  
As  
Begin  
Select p.*,pci.Price,pci.BuyAccount,pci.SalesAccount from [Product] p  
End  

With this step, we have successfully completed our front end, web API, and back end coding.

Now it's time to run the project by using 'npm start' or 'ng serve' command and check the output.

Image 10

Conclusion

In this article, we have learned how to use async pipe in Angular 8 application.

Please give your valuable feedback/comments/questions about this article. Please let me know if you liked and understood this article and how I could improve it.

Understanding the ASP.NET Core middleware pipeline


Middlewhat?

The ASP.NET Core architecture features a system of middleware, which are pieces of code that handle requests and responses. Middleware are chained to each other to form a pipeline. Incoming requests are passed through the pipeline, where each middleware has a chance to do something with them before passing them to the next middleware. Outgoing responses are also passed through the pipeline, in reverse order. If this sounds very abstract, the following schema from the official ASP.NET Core documentation should help you understand:

Middleware pipeline

Middleware can do all sort of things, such as handling authentication, errors, static files, etc… MVC in ASP.NET Core is also implemented as a middleware.

Configuring the pipeline

You typically configure the ASP.NET pipeline in the Configure method of your Startup class, by calling Use* methods on the IApplicationBuilder. Here’s an example straight from the docs:

public void Configure(IApplicationBuilder app)
{
    app.UseExceptionHandler("/Home/Error");
    app.UseStaticFiles();
    app.UseAuthentication();
    app.UseMvcWithDefaultRoute();
}

Each Use* method adds a middleware to the pipeline. The order in which they’re added determines the order in which requests will traverse them. So an incoming request will first traverse the exception handler middleware, then the static files middleware, then the authentication middleware, and will eventually be handled by the MVC middleware.

The Use* methods in this example are actually just “shortcuts” to make it easier to build the pipeline. Behind the scenes, they all end up using (directly or indirectly) these low-level primitives: Use and Run. Both add a middleware to the pipeline, the difference is that Run adds a terminal middleware, i.e. a middleware that is the last in the pipeline.

A basic pipeline with no branches

Let’s look at a simple example, using only the Use and Run primitives:

public void Configure(IApplicationBuilder app)
{
    // Middleware A
    app.Use(async (context, next) =>
    {
        Console.WriteLine("A (before)");
        await next();
        Console.WriteLine("A (after)");
    });

    // Middleware B
    app.Use(async (context, next) =>
    {
        Console.WriteLine("B (before)");
        await next();
        Console.WriteLine("B (after)");
    });

    // Middleware C (terminal)
    app.Run(async context =>
    {
        Console.WriteLine("C");
        await context.Response.WriteAsync("Hello world");
    });
}

Here, each middleware is defined inline as an anonymous method; they could also be defined as full-blown classes, but for this example I picked the more concise option. Non-terminal middleware take two arguments: the HttpContext and a delegate to call the next middleware. Terminal middleware only take the HttpContext. Here we have two middleware A and B that just log to the console, and a terminal middleware C which writes the response. Here’s the console output when we send a request to our app:

A (before)
B (before)
C
B (after)
A (after)

We can see that each middleware was traversed in the order in which it was added, then traversed again in reverse order. The pipeline can be represented like this:

Basic pipeline

Short-circuiting middleware

A middleware doesn’t necessarily have to call the next middleware. For instance, if the static files middleware can handle a request, it doesn’t need to pass it down to the rest of the pipeline, it can respond immediately. This behavior is called short-circuiting the pipeline.

In the previous example, if we comment out the call to next() in middleware B, we get the following output:

A (before)
B (before)
B (after)
A (after)

As you can see, middleware C is never invoked. The pipeline now looks like this:

Short-circuited pipeline

Branching the pipeline

In the previous examples, there was only one “branch” in the pipeline: the middleware coming after A was always B, and the middleware coming after B was always C. But it doesn’t have to be that way. You might want a given request to be processed by a completely different pipeline, based on the path or anything else.

There are two types of branches: branches that rejoin the main pipeline, and branches that don’t.

Making a non-rejoining branch

This can be done using the Map or MapWhen method. Map lets you specify a branch based on the request path. MapWhen gives you more control: you can specify a predicate on the HttpContext to decide whether to branch or not. Let’s look at a simple example using Map:

public void Configure(IApplicationBuilder app)
{
    app.Use(async (context, next) =>
    {
        Console.WriteLine("A (before)");
        await next();
        Console.WriteLine("A (after)");
    });

    app.Map(
        new PathString("/foo"),
        a => a.Use(async (context, next) =>
        {
            Console.WriteLine("B (before)");
            await next();
            Console.WriteLine("B (after)");
        }));

    app.Run(async context =>
    {
        Console.WriteLine("C");
        await context.Response.WriteAsync("Hello world");
    });
}

The first argument for Map is a PathString representing the path prefix of the request. The second argument is a delegate that configures the branch’s pipeline (the a parameter represents the IApplicationBuilder for the branch). The branch defined by the delegate will process the request if its path starts with the specified path prefix.

For a request that doesn’t start with /foo, this code produces the following output:

A (before)
C
A (after)

Middleware B is not invoked, since it’s in the branch and the request doesn’t match the prefix for the branch. But for a request that does start with /foo, we get the following output:

A (before)
B (before)
B (after)
A (after)

Note that this request returns a 404 (Not found) response: this is because the B middleware calls next(), but there’s no next middleware, so it falls back to returning a 404 response. To solve this, we could use Run instead of Use, or just not call next().

The pipeline defined by this code can be represented as follows:

Non-rejoining branch

(I omited the response arrows for clarity)

As you can see, the branch with middleware B doesn’t rejoin the main pipeline, so middleware C isn’t called.

Making a rejoining branch

You can make a branch that rejoins the main pipeline by using the UseWhen method. This method accepts a predicate on the HttpContext to decide whether to branch or not. The branch will rejoin the main pipeline where it left it. Here’s an example similar to the previous one, but with a rejoining branch:

public void Configure(IApplicationBuilder app)
{
    app.Use(async (context, next) =>
    {
        Console.WriteLine("A (before)");
        await next();
        Console.WriteLine("A (after)");
    });

    app.UseWhen(
        context => context.Request.Path.StartsWithSegments(new PathString("/foo")),
        a => a.Use(async (context, next) =>
        {
            Console.WriteLine("B (before)");
            await next();
            Console.WriteLine("B (after)");
        }));

    app.Run(async context =>
    {
        Console.WriteLine("C");
        await context.Response.WriteAsync("Hello world");
    });
}

For a request that doesn’t start with /foo, this code produces the same output as the previous example:

A (before)
C
A (after)

Again, middleware B is not invoked, since it’s in the branch and the request doesn’t match the predicate for the branch. But for a request that does start with /foo, we get the following output:

A (before)
B (before)
C
B (after)
A (after)

We can see that the request passes trough the branch (middleware B), then goes back to the main pipeline, ending with middleware C. This pipeline can be represented like this:

Rejoining branch

Note that there is no Use method that accepts a PathString to specify the path prefix. I’m not sure why it’s not included, but it would be easy to write, using UseWhen:

public static IApplicationBuilder Use(this IApplicationBuilder builder, PathString pathMatch, Action<IApplicationBuilder> configuration)
{
    return builder.UseWhen(
        context => context.Request.Path.StartsWithSegments(pathMatch),
        configuration);
}

Conclusion

As you can see, the idea behind the middleware pipeline is quite simple, but it’s very powerful. Most of the features baked in ASP.NET Core (authentication, static files, caching, MVC, etc) are implemented as middleware. And of course, it’s easy to write your own!

Cache Design and patterns

 In this article  we will look at application design and how cache design will be helping to get data from back end quickly.  scope of this ...