Saturday, August 22, 2020

Microservices Design - API Gateway Pattern

According to the definition by Gartner: “Microservice is a tightly scoped, strongly encapsulated, loosely coupled, independently deployable, and independently scalable application component.”

The goal of the microservices is to sufficiently decompose/decouple the application into loosely coupled microservices/modules in contrast to monolithic applications where modules are highly coupled and deployed as a single big chunk. This will be helpful due to the following reasons:

  • Each microservice can be deployed, upgraded, scaled, maintained, and restarted independent of sibling services in the application.
  • Agile development & agile deployment with an autonomous cross-functional team.
  • Flexibility in using technologies and scalability.

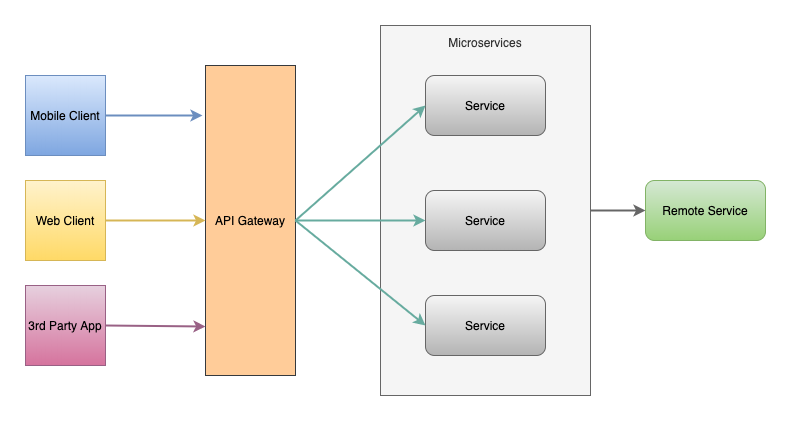
Different loosely coupled services are deployed based upon their own specific needs where each service has its fine-grained APIs model to serve different clients (Web, Mobile, and 3rd party APIs).

Client to Microservices connections

Image for post

While thinking of the client directly communicating with each of the deployed microservices, the following challenges should be taken into consideration:

  1. In the case where microservice is exposing fine-grained APIs to the client, the client should request to each microservice. In a typical single page, it may be required for multiple server round trips in order to fulfill the request. This may be even worse for low network operating devices such as mobile.
  2. Diverse communication protocol (such as gRpc, thrift, REST, AMQP e.t.cexisting in the microservices makes it challenging and bulky for the client to adopt all those protocols.
  3. Common gateway functionalities (such as authentication, authorization, logging) have to be implemented in each microservice.
  4. It will be difficult to make changes in microservices without disrupting client connection. For e.g while merging or dividing microservices, it may be required to recode the client section.

API Gateway

To address the above-mentioned challenges, an additional layer is introduced that sits between the client and the server acting as a reverse proxy routing request from the client to the server. Similar to the facade pattern of Object-Oriented Design, it provides a single entry point to the APIs encapsulating the underlying system architecture which is called API Gateway.

In short, it behaves precisely as API management but it is important not to confuse API management with API Gateway.

Image for post

Functionalities of API Gateway:

Routing

Encapsulating the underlying system and decoupling from the clients, the gateway provides a single entry point for the client to communicate with the microservice system.

Offloading

API gateway consolidates the edge functionalities rather than making every microservices implementing them. Some of the functionalities are:

  • Authentication and authorization
  • Service discovery integration
  • Response caching
  • Retry policies, circuit breaker, and QoS
  • Rate limiting and throttling
  • Load balancing
  • Logging, tracing, correlation
  • Headers, query strings, and claims transformation
  • IP whitelisting
  • IAM
  • Centralized Logging (transaction ID across the servers, error logging)
  • Identity Provider, Authentication and Authorization

Backend for Frontend (BFF) pattern

It is a variation of the API Gateway pattern. Rather than a single point of entry for the clients, it provides multiple gateways based upon the client. The purpose is to provide tailored APIs according to the needs of the client, removing a lot of bloats caused by making generic APIs for all the clients.

Image for post

How many BFFs do you need?

The base concept of BFF is developing niche backends for each user experience. The guideline by Phil Calçado is ‘one experience, one BFF’. If the requirements across clients (IOS client, android client, a web browser e.t.c) vary significantly and the time to market of a single proxy or API becomes problematic, BFFs are a good solution. It should also be noted that the more complex design requires a complex setup.

GraphQL and BFF

GraphQL is a query language for your API. Phil Calçado presents in this article that BFF and GraphQL are related but not mutually exclusive concepts. He adds that BFFs are not about the shape of your endpoints, but about giving your client applications autonomy where you can build your GraphQL APIs as many BFFs or as an OSFA (one-size-fits-all) API.

Notable API Gateways

Netflix API Gateway: Zuul

The Netflix streaming service available on more than 1000 different device types (televisions, set‑top boxes, smartphones, gaming systems, tablets, e.t.c) handing over 50,000 requests per second during peak hours, found substantial limitations in OSFA (one-size-fits-all) REST API approach and used the API Gateway tailored for each device.

Zuul 2 at Netflix is the front door for all requests coming into Netflix’s cloud infrastructure. Zuul 2 significantly improves the architecture and features that allow our gateway to handle, route, and protect Netflix’s cloud systems, and helps provide our 125 million members the best experience possible.

Image for post

Amazon API Gateway

AWS provides fully managed service for creating, publishing, maintaining, monitoring, and securing REST, HTTP, and WebSocket where developers can create APIs that access AWS or other web services, as well as data stored in the AWS Cloud.

Image for post

Kong API Gateway

Kong Gateway is an open-source, lightweight API gateway optimized for microservices, delivering unparalleled latency performance and scalability. If you just want the basics, this option will work for you. It is scalable easily horizontally by adding more nodes. It supports large and variable workloads with very low latency.

Image for post

Other API Gateways

Choosing the right API gateway

Some of the common baseline for evaluation criteria include simplicity, open-source vs propriety, scalability & flexibility, security, features, community, administrative (support, monitoring & deployment), environment provisioning(installation, configuration, hosting offering), pricing, and documentation.

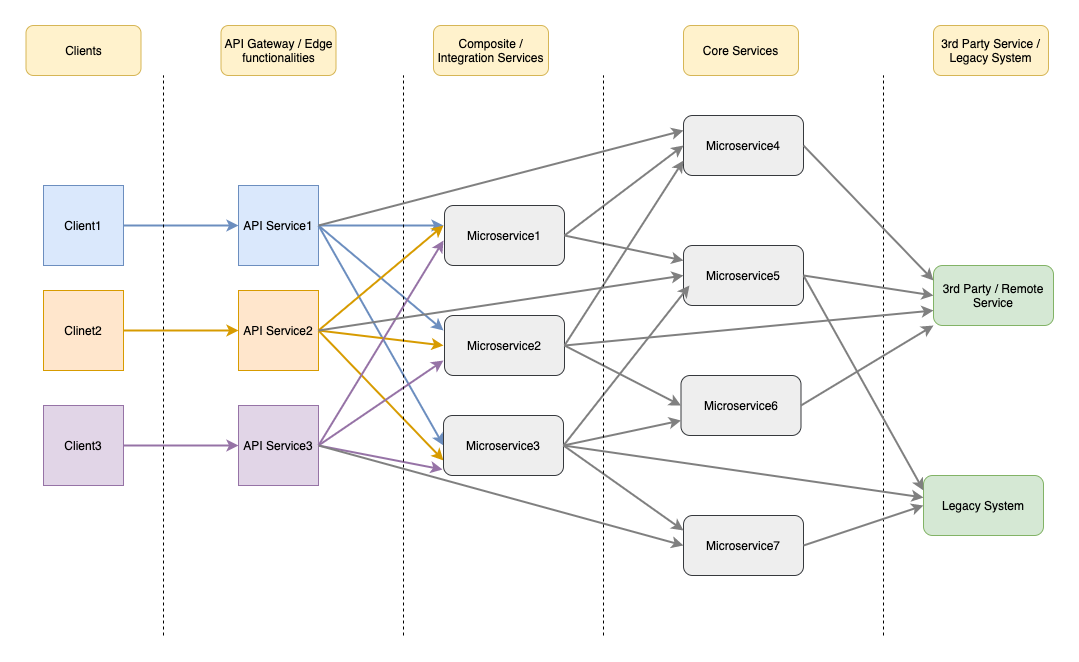
API Composition / Aggregation

Some API requests in API Gateway map directly to single service API which can be served by routing request to the corresponding microservice. However, in the case of complex API operations that requires results from several microservices can be served by API composition/aggregation (a scatter-gather mechanism). In case of dependency of one another service where synchronous communication is required, the chained composition pattern has to be followed. The composition layer has to support a significant portion of ESB/integration capabilities such as transformations, orchestration, resiliency, and stability patterns.

A root container is deployed with the special distributor and aggregator functionalities (or microservices). The distributor is responsible for breaking down into granular tasks and distributing those tasks to microservice instances. The aggregator is responsible for aggregating the results derived by business workflow from composed microservice.

API Gateway and Aggregation

API gateway with added features results in overambitious gateways that encourage designs that continue to be difficult to test and deploy. It is highly recommended to avoid aggregation and data transformation in the API Gateway. Domain smarts are better suited to be done in application code that follows the defined software development practices. Netflix API Gateway, Zuul 2 removed a lot of the business logic from Gateway that they had in Zuul to origin systems. For more details, refer here.

Image for post

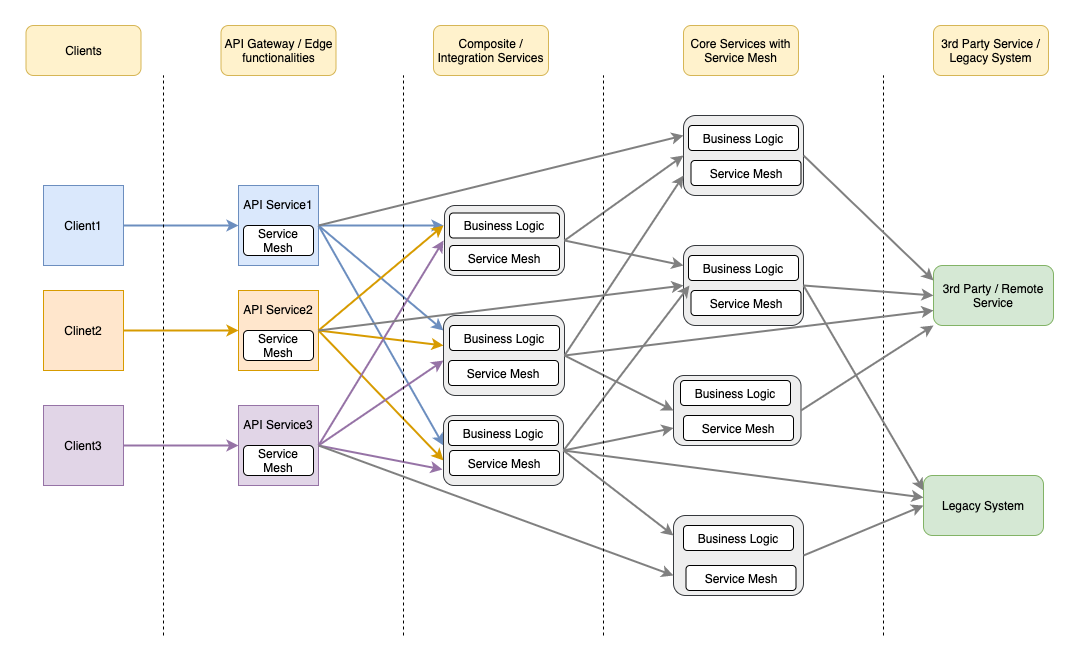
Service Mesh and API Gateway

Service mesh in microservices is a configurable network infrastructure layer that handles interprocess communication. This is akin to what is often termed as sidecar proxy or sidecar gateway. It provides a lot of functionalities such as:

  • Load Balancing
  • Service Discovery
  • Health Checks
  • Security

On the surface, it appears as though API gateways and service meshes solve the same problem and are therefore redundant. They do solve the same problem but in different contexts. API gateway is deployed as a part of a business solution that is discoverable by the external clients handling north-south traffic(face external client), however, service mesh handles east-west traffic (among different microservices).

Implementing service mesh avoids the resilient communication pattern such as circuit breakers, discovery, health checks, service observability in your own code. For a small number of microservices, alternative strategies for failure management should be considered as service mesh integration may overkill you. For a larger number of microservices, it will be beneficial.

Combining these two technologies can be a powerful way to ensure application uptime and resiliency while ensuring your applications are easily consumable. Viewing two as a contemporary can be a bad idea and it is better to view two as being complementary to one another in deployments that involve both microservices and APIs.

Image for post

Considerations for API Gateway implementation:

  • Possible single point of failure or bottleneck.
  • Increase in response time due to additional network hop through API Gateway and risk of complexity.

References:

  1. https://microservices.io/index.html
  2. https://docs.microsoft.com/en-us/azure/architecture/
  3. https://github.com/wso2/reference-architecture/blob/master/api-driven-microservice-architecture.md
  4. https://tsh.io/blog/design-patterns-in-microservices-api-gateway-bff-and-more/
  5. https://www.infoq.com/articles/service-mesh-ultimate-guide/
  6. https://samnewman.io/patterns/architectural/bff/
  7. https://netflixtechblog.com/

Thursday, August 20, 2020

YAML-defined CI/CD for ASP .NET Core 3.1


This is the twenty-fifth of a new series of posts on ASP .NET Core 3.1 for 2020. In this series, we’ll cover 26 topics over a span of 26 weeks from January through June 2020, titled ASP .NET Core A-Z! To differentiate from the 2019 series, the 2020 series will mostly focus on a growing single codebase (NetLearner!) instead of new unrelated code snippets week.

Previous post:

NetLearner on GitHub:

In this Article:

Y is for YAML-defined CI/CD for ASP .NET Core

If you haven’t heard of it yet, YAML is yet another markup language. No really, it is. YAML literally stands for Yet Another Markup Language. If you need a reference for YAML syntax and how it applies to Azure DevOps Pipelines, check out the official docs:

In the NetLearner repository, check out the sample YAML code:

NOTE: Before using the aforementioned YAML sample in an Azure DevOps project, please replace any placeholder values and rename the file to remove the .txt suffix.

In the context of Azure DevOps, you can use Azure Pipelines with YAML to make it easier for you set up a CI/CD pipeline for Continuous Integration and Continuous Deployment. This includes steps to build and deploy your app. Pipelines consist of stages, which consist of jobs, which consists of steps. Each step could be a script or task. In addition to these options, a step can also be a reference to an external template to make it easier to create your pipelines.

DevOps Pipeline in YAML

Getting Started With Pipelines

To get started with Azure Pipelines in Azure DevOps:

  1. Log in at: https://dev.azure.com
  2. Create a Project for your Organization
  3. Add a new Build Pipeline under Pipelines | Builds
  4. Connect to your code location, e.g. GitHub repo
  5. Select your repo, e.g. a specific GitHub repository
  6. Configure your YAML
  7. Review your YAML and Run it

From here on forward, you may come back to your YAML here, edit it, save it, and run as necessary. You’ll even have the option to commit your YAML file “azure-pipelines.yml” into your repo, either in the master branch or in a separate branch (to be submitted as a Pull Request that can be merged).

YAML file in Azure DevOps

If you need more help getting started, check out the official docs and Build 2019 content at:

To add pre-written snippets to your YAML, you may use the Task Assistant side panel to insert a snippet directly into your YAML file. This includes tasks for .NET Core builds, Azure App Service deployment and more.

Task Assistant in Azure DevOps

OS/Environment and Runtime

From the sample repo, take a look at the sample YAML code sample “azure-pipelines.yml.txt“. Near the top, there is a definition for a “pool” with a “vmImage” set to ‘windows-latest’.

pool:
 vmImage: 'windows-latest'

If I had started off with the default YAML pipeline configuration for a .NET Core project, I would probably get a vmImage value set to ‘ubuntu-latest’. This is just one of many possible values. From the official docs on Microsoft-hosted agents, we can see that Microsoft’s agent pool provides at least the following VM images across multiple platforms, e.g.

  • Windows Server 2019 with Visual Studio 2019 (windows-latest OR windows-2019)
  • Windows Server 2016 with Visual Studio 2017 (vs2017-win2016)
  • Ubuntu 18.04 (ubuntu-latest OR ubuntu-18.04)
  • Ubuntu 16.04 (ubuntu-16.04)
  • macOS X Mojave 10.14 (macOS-10.14)
  • macOS X Catalina 10.15 (macOS-latest OR macOS-10.15)

In addition to the OS/Environment, you can also set the .NET Core runtime version. This may come in handy if you need to explicitly set the runtime for your project.

steps:
- task: DotNetCoreInstaller@0
 inputs:
 version: '3.1.0'

Restore and Build

Once you’ve set up your OS/environment and runtime, you can restore (dependencies) and build your project. Restoring dependencies with a command is optional since the Build step will take care of the Restore as well. To build a specific configuration by name, you can set up a variable first to define the build configuration, and then pass in the variable name to the build step.

variables:
  BuildConfiguration: 'Release'
  SolutionPath: 'YOUR_SOLUTION_FOLDER/YOUR_SOLUTION.sln'

steps:
# Optional: 'dotnet restore' is not necessary because the 'dotnet build' command executes restore as well.
#- task: DotNetCoreCLI@2
#  displayName: 'Restore dependencies'
#  inputs:
#    command: restore
#    projects: '**/*.csproj'

- task: DotNetCoreCLI@2
  displayName: 'Build web project'
  inputs:
    command: 'build'
    projects: $(SolutionPath)

In the above snippet, the BuildConfiguration is set to ‘Release’ so that the project is built for its ‘Release’ configuration. The displayName is a friendly name in a text string (for any step) that may include variable names as well. This is useful for observing logs and messages during troubleshooting and inspection.

NOTE: You may also use script steps to make use of dotnet commands with parameters you may already be familiar with, if you’ve been using .NET Core CLI Commands. This makes it easier to run steps without having to spell everything out.

variables:
 buildConfiguration: 'Release'

steps:
- script: dotnet restore

- script: dotnet build --configuration $(buildConfiguration)
 displayName: 'dotnet build $(buildConfiguration)'

From the official docs, here are some more detailed steps for restore and build, if you wish to customize your steps and tasks further:

steps:
- task: DotNetCoreCLI@2
 inputs:
 command: restore
 projects: '**/*.csproj'
 feedsToUse: config
 nugetConfigPath: NuGet.config 
 externalFeedCredentials: <Name of the NuGet service connection>

Note that you can set your own values for an external NuGet feed to restore dependencies for your project. Once restored, you may also customize your build steps/tasks.

steps:
- task: DotNetCoreCLI@2
 displayName: Build
 inputs:
 command: build
 projects: '**/*.csproj'
 arguments: '--configuration Release'

Unit Testing and Code Coverage

Although unit testing is not required for a project to be compiled and deployed, it is absolutely essential for any real-world application. In addition to running unit tests, you may also want to measure your code coverage for those unit tests. All these are possible via YAML configuration.

From the official docs, here is a snippet to run your unit tests, that is equivalent to a “dotnet test” command for your project:

steps:
- task: DotNetCoreCLI@2
 inputs:
 command: test
 projects: '**/*Tests/*.csproj'
 arguments: '--configuration $(buildConfiguration)'

Also, here is another snippet to collect code coverage:

steps:
- task: DotNetCoreCLI@2
 inputs:
 command: test
 projects: '**/*Tests/*.csproj'
 arguments: '--configuration $(buildConfiguration) --collect "Code coverage"'

Once again, the above snippet uses the “dotnet test” command, but also adds the –collect option to enable the data collector for your test run. The text string value that follows is a friendly name that you can set for the data collector. For more information on “dotnet test” and its options, check out the docs at:

Publish and Deploy

Finally, it’s time to package and deploy your application. In this example, I am deploying my web app to Azure App Service.

- task: DotNetCoreCLI@2
  displayName: 'Publish and zip'
  inputs:
    command: publish
    publishWebProjects: False
    projects: $(SolutionPath)
    arguments: '--configuration $(BuildConfiguration) --output $(Build.ArtifactStagingDirectory)'
    zipAfterPublish: True

- task: AzureWebApp@1
  displayName: 'Deploy Azure Web App'
  inputs:
    azureSubscription: '<REPLACE_WITH_AZURE_SUBSCRIPTION_INFO>'
    appName: <REPLACE_WITH_EXISTING_APP_SERVICE_NAME>
    appType: 'webApp'
    package: $(Build.ArtifactStagingDirectory)/**/*.zip

The above snippet runs a “dotnet publish” command with the proper configuration setting, followed by an output location, e.g. Build.ArtifactStagingDirectory. The value for the output location is one of many predefined build/system variables, e.g. System.DefaultWorkingDirectory, Build.StagingDirectory, Build.ArtifactStagingDirectory, etc. You can find out more about these variables from the official docs:

Note that there is a placeholder text string for the Azure Subscription ID. If you use the Task Assistant panel to add a “Azure App Service Deploy” snippet, you will be prompted to select your Azure Subscription, and a Web App location to deploy to, including deployment slots if necessary.

The PublishBuildArtifacts task uploads the package to a file container, ready for deployment. After your artifacts are ready, a zip file will become available in a named container, e.g. ‘drop’.

# Optional step if you want to deploy to some other system using a Release pipeline or inspect the package afterwards
- task: PublishBuildArtifacts@1
  displayName: 'Publish Build artifacts'
  inputs:
    PathtoPublish: '$(Build.ArtifactStagingDirectory)'
    ArtifactName: 'drop'
    publishLocation: 'Container'

You may use the Azure DevOps portal to inspect the progress of each step and troubleshoot any failed steps. You can also drill down into each step to see the commands that are running in the background, followed by any console messages.

Azure DevOps success messages

NOTE: to set up a release pipeline with multiple stages and optional approval conditions, check out the official docs at:

Triggers, Tips & Tricks

Now that you’ve set up your pipeline, how does this all get triggered? If you’ve taken a look at the sample YAML file, you will notice that the first command includes a trigger, followed by the word “master”. This ensures that the pipeline will be triggered every time code is pushed to the corresponding code repository’s master branch. When using a template upon creating the YAML file, this trigger should be automatically included for you.

trigger: 
- master

To include more triggers, you may specify triggers for specific branches to include or exclude.

trigger:
 branches:
 include:
 - master
 - releases/*
 exclude:
 - releases/old*

Finally here are some tips and tricks when using YAML to set up CI/CD using Azure Pipelines:

  • Snippets: when you use the Task Assistant panel to add snippets into your YAML, be careful where you are adding each snippet. It will insert it wherever your cursor is positioned, so make sure you’ve clicked into the correction location before inserting anything.
  • Order of tasks and steps: Verify that you’ve inserted (or typed) your tasks and steps in the correct order. For example: if you try to deploy an app before publishing it, you will get an error.
  • Indentation: Whether you’re typing your YAML or using the snippets (or some other tool),  use proper indentation. You will get syntax errors of the steps and tasks aren’t indented correctly.
  • Proper Runtime/OS: Assign the proper values for the desired runtime, environment and operating system.
  • Publish: Don’t forget to publish before attempting to deploy the build.
  • Artifacts location: Specify the proper location(s) for artifacts when needed.
  • Authorize Permissions: When connecting your Azure Pipeline to your code repository (e.g. GitHub repo) and deployment location (e.g. Azure App Service), you will be prompted to authorize the appropriate permissions. Be aware of what permissions you’re granting.
  • Private vs Public: Both your Project and your Repo can be private or public. If you try to mix and match a public Project with a private Repo, you may get the following warning message: “You selected a private repository, but this is a public project. Go to project settings to change the visibility of the project.” 

References

Cache Design and patterns

 In this article  we will look at application design and how cache design will be helping to get data from back end quickly.  scope of this ...