Like Asp.Net Core, Angular is the another most popular framework for the development purpose of the frontend development. Using this framework, we can easily develop any Single Page. In this framework, frontend design quite similar to Razor views in MVC. Since Angular is also supporting MVVM pattern for UI design and data binding, so we can use Angular in case of UI designing in place of Razor views. Angular can also work with the Asp.Net Core framework.
Steps to Create Web Apps And Databse
In this article, we will discuss the procedure to create an SPA application (Single Page Application) in the Asp.Net Core framework along with Angular. For this, we will create the application for the Product master where we can perform the CRUD operations (Create, Read, Update & Delete operations) on the product masters. For this purpose, we use Angular 5 in the frontend for design the interfaces, Web API for the backend communication and Entity Framework Core to fetch data or save data within the SQL Server Database. In this section, we will discuss step by step process related to creating the Single Page Application using Angular.
Prerequisites
Visual Studio 2017 (either Community edition or others)
.Net Core 2.1 SDK or Later
RDBMS Database Systems (SQL Server)
Download and Install Latest version of Node.js
Step 1 - Create the Projects
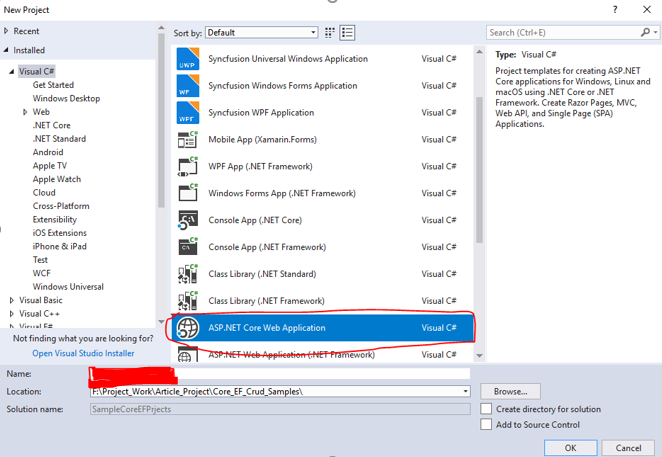
So, first we need to create Project in Microsoft Visual Studio 2017. So, open Microsoft Visual Studio then clicks on the Project option under New Submenu of File. File => New => Projects
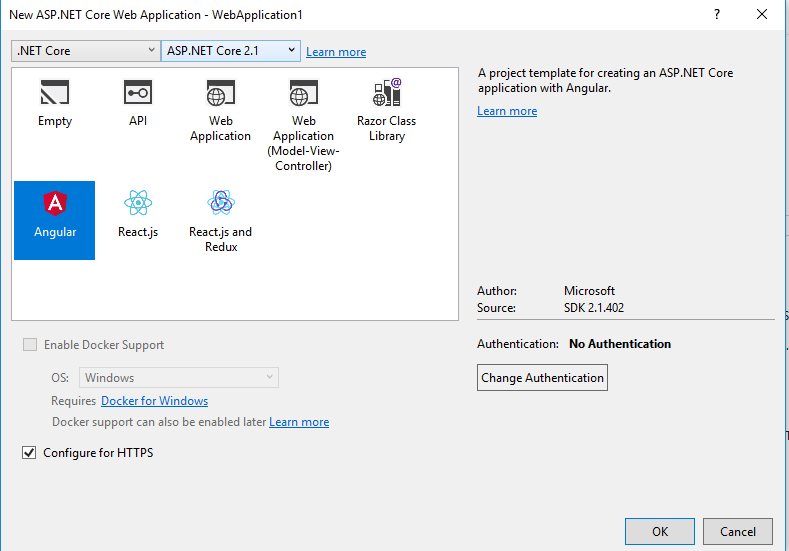
Then Select Asp.Net Core Web Application from the Project List and Provide a Project Name in the Name box and then click on OK Button.
After click on the OK Button, Project template popup will be open. In this popup window, we need to select Angular Project Template along with the Asp.net Core 2.1 version from this window and click on OK Button.

Now, visual studio scaffolding the Asp.Net Core Angular Project Structure and create the below folder projects structured –
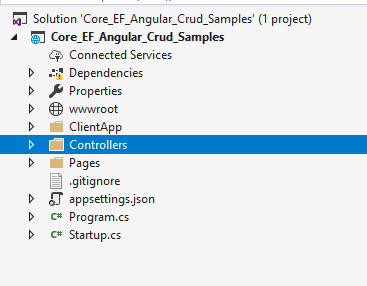
In the above folder structure, visual studio created Controllers and Views folders. For this article, we did use the Views folder since we will design our interface using Angular. The controller’s folder contains the Web API Controller. In the folder of ClientApp, the entire code related files exists for the client side of our applications. In the component folder under ClientApp, visual studio creates some components by default as per the selected Angular Template. These components is not related to our application. That’s why we delete the folder like fetch-data, counter etc from the component folder under Clientapp.
Step 2 – Create Product Table in Database
Now, create the Product table in the Sql Server Database which contains the Below Columns:
CREATE TABLE DBO.PRODUCT
(
 Id INT NOT NULL IDENTITY(1,1),
 ProductCode NVARCHAR(30) NOT NULL,
 ProductName NVARCHAR(100) NOT NULL,
 Manufacturer NVARCHAR(100) NOT NULL,
 ShippingNo NVARCHAR(100) NOT NULL,
 SerialNo INT NULL,
 BatchNo NVARCHAR(100) NOT NULL,
 MRP DECIMAL(18,2) NOT NULL,
 Quantity INT NOT NULL,
 CreatedOn DATETIME2 NOT NULL DEFAULT GETDATE(),
 LastModifiedOn DATETIME2 NULL,
 CONSTRAINT [PK_Product_Id] PRIMARY KEY (Id)
)
Step 3 - Create Entity Data Model (EDM)
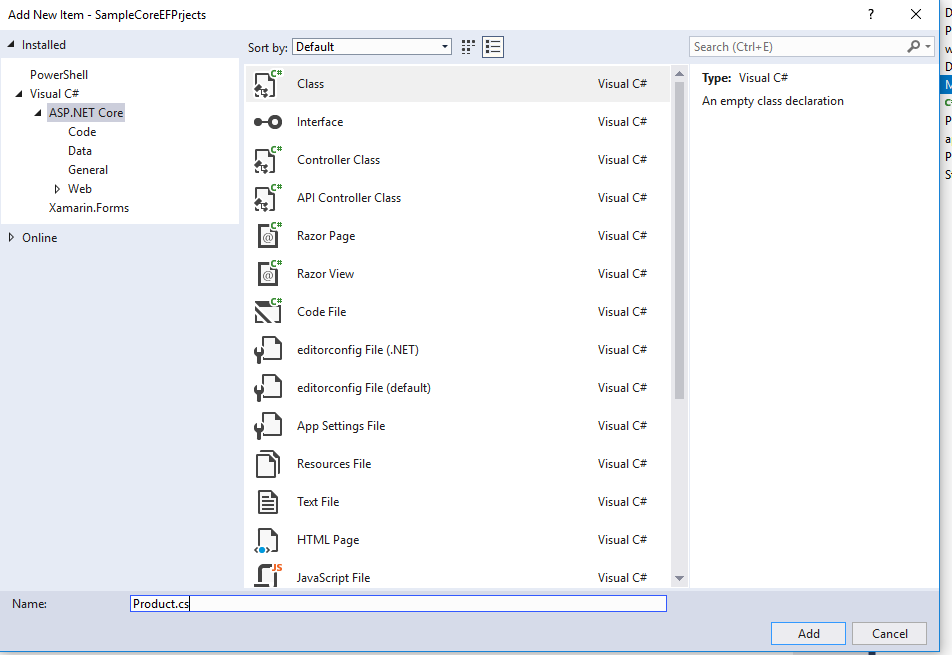
Now, it’s time to create EDM model for the Product table which as per the above section. Now Create a folder Name Models in the Projects Structure. Now right on the folder and choose Add ? New Item and create a class file named Product.cs as below –
 using System;
 using System.Collections.Generic;
 using System.Linq;
 using System.Threading.Tasks;

 namespace Core_EF_Angular_Crud_Samples.Models
 {
 public class Product
 {
 public int Id { get; set; }
 public string ProductCode { get; set; }
 public string ProductName { get; set; }
 public string Manufacturer { get; set; }
 public string ShippingNo { get; set; }
 public int SerialNo { get; set; }
 public string BatchNo { get; set; }
 public decimal MRP { get; set; }
 public int Quantity { get; set; }
 public DateTime? CreatedOn { get; set; }
 public DateTime? LastModifiedOn { get; set; }
 }
 }
Step 4 - Scaffold the Product Controllers
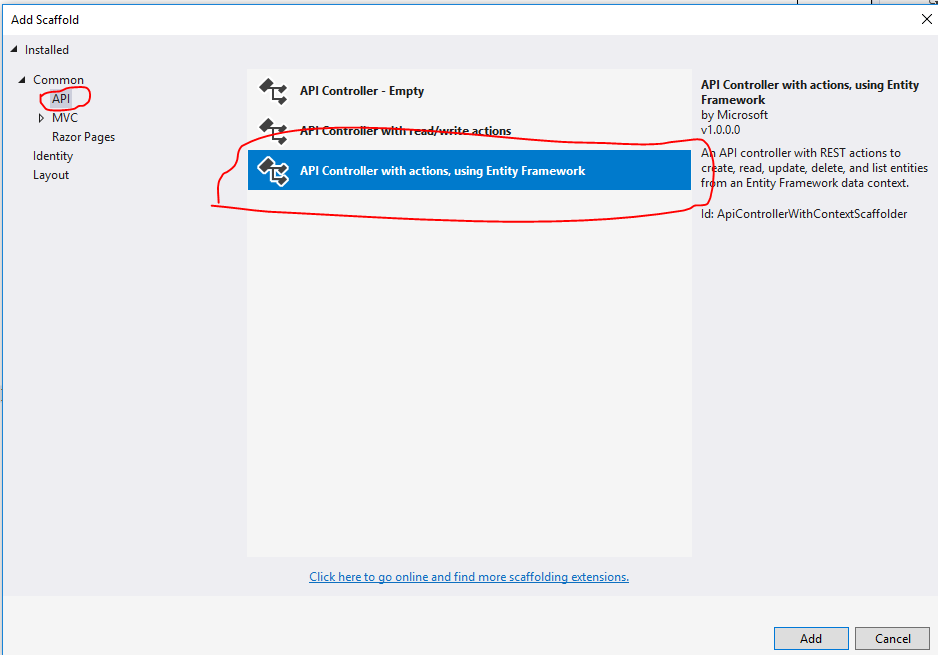
Now, we will scaffold the Product model for the create the controller class. This scaffold process will automatically create the crud related operations along with Entity Framework Core and also create a product controller with controller folder which is mainly responsible for sending or receiving the data to database or from database. For this, we need to select the controller folders and right click the mouse and then click on Add Button.
Add => New Scaffold ItemIt will open the scaffold window where need to select API Controller with actions, using Entity Framework under the API the API tab in the left section and then click on Add Button.
Now, another window will open called Model Class Window and plant it automatically in which we need to perform the below task –
Select Product class from the Model Class drop down
Click on plus (+) sign button and provide the name of the DataContext class as SampleCoreEFPrjects.Models.DataContext
Select the name SampleCoreEFPrjects.Models.DataContext from the Data Context Class dropdown.
Click on add Button Sample Code of Product Controllers
 using System;
 using System.Collections.Generic;
 using System.Linq;
 using System.Threading.Tasks;
 using Microsoft.AspNetCore.Http;
 using Microsoft.AspNetCore.Mvc;
 using Microsoft.EntityFrameworkCore;
 using Core_EF_Angular_Crud_Samples.Models;

 namespace Core_EF_Angular_Crud_Samples.Controllers
 {
 [Route("api/[controller]")]
 [ApiController]
 public class ProductsController : ControllerBase
 {
 private readonly DataContext _context;
 public ProductsController(DataContext context)
 {
 _context = context;
 }

 // GET: api/Products
 [HttpGet]
 public IEnumerable<Product> GetProduct()
 {
 return _context.Product;
 }

 // GET: api/Products/5
 [HttpGet("{id}")]
 public async Task<IActionResult> GetProduct(int id)
 {
 if (!ModelState.IsValid)
 {
 return BadRequest(ModelState);
 }

 var product = await _context.Product.FindAsync(id);
 if (product == null)
 {
 return NotFound();
 }
 return Ok(product);
 }

 // PUT: api/Products/5
 [HttpPut("{id}")]
 public async Task<IActionResult> PutProduct(Product product)
 {
 if (!ModelState.IsValid)
 {
 return BadRequest(ModelState);
 }

 if (product.Id == 0)
 {
 return BadRequest();
 }

 _context.Entry(product).State = EntityState.Modified;

 try
 {
 product.LastModifiedOn = DateTime.Now;
 await _context.SaveChangesAsync();
 }
 catch (DbUpdateConcurrencyException)
 {
 if (!ProductExists(product.Id))
 {
 return NotFound();
 }
 else
 {
 throw;
 }
 }
 return NoContent();
 }

 // POST: api/Products
 [HttpPost]
 public async Task<IActionResult> PostProduct(Product product)
 {
 if (!ModelState.IsValid)
 {
 return BadRequest(ModelState);
 }
 product.CreatedOn = DateTime.Now;
 _context.Product.Add(product);
 await _context.SaveChangesAsync();

 return CreatedAtAction("GetProduct", new { id = product.Id }, product);
 }

 // DELETE: api/Products/5
 [HttpDelete("{id}")]
 public async Task<IActionResult> DeleteProduct(int id)
 {
 if (!ModelState.IsValid)
 {
 return BadRequest(ModelState);
 }

 var product = await _context.Product.FindAsync(id);
 if (product == null)
 {
 return NotFound();
 }

 _context.Product.Remove(product);
 await _context.SaveChangesAsync();

 return Ok(product);
 }

 private bool ProductExists(int id)
 {
 return _context.Product.Any(e => e.Id == id);
 }
 }
 }
In this process, it automatically creates the controller code. It also create data context class which communicate with the database using Entity Framework.
 using System;
 using System.Collections.Generic;
 using System.Linq;
 using System.Threading.Tasks;
 using Microsoft.EntityFrameworkCore;

 namespace Core_EF_Angular_Crud_Samples.Models
 {
 public class DataContext : DbContext
 {
 public DataContext (DbContextOptions<DataContext> options)
 : base(options)
 {
 }

 public DbSet<Core_EF_Angular_Crud_Samples.Models.Product>Product { get; set; }
 }
 }
Now,we need to add the files in the ClientApp folder. We first need to create the sub pages for the applications. We need to create the below mentioned folder and file in the ClientApp folder. Every folder must be contains two files i.e. one is for the typescript filer (extension .ts) and another is the simple html files (.html).
home (home.component.ts & home.component.html)
fetch-product (fetch-data.component.ts & fetch-data.component.html)
add-product (productadd .component.html & productadd.component.ts)
In the fetch-data.component.ts , we will display all products list in product details sections.
 import { Component, Inject } from '@angular/core';
 import { HttpClientModule, HttpClient } from '@angular/common/http';
 import { Http, Response, Headers } from '@angular/http';
 import { Router, ActivatedRoute } from '@angular/router';
 import { Observable } from 'rxjs/Observable';
 import 'rxjs/add/operator/map';
 import 'rxjs/add/operator/catch';
 import 'rxjs/add/observable/throw';
 import 'rxjs/Rx';

 @Component({
 selector: 'app-fetch-data',
 templateUrl: './fetch-data.component.html'
 })

 export class FetchDataComponent {
 public productList: Array<any> = [];
 myAppUrl: string = "";

 constructor(public http: Http, private _router: Router, @Inject('BASE_URL') baseUrl: string) {
 this.myAppUrl = baseUrl;
 this.getProductList();
 }

 getProductList() {
 let self = this;
 this.http.request(this.myAppUrl + '/api/Products')
 .subscribe((res: Response) => {
 self.productList = res.json();
 });
 }

 delete(productId: number, code: string) {
 if (confirm("Do you want to delete Product with Code: " + code)) {
 let self = this;
 let headers = new Headers();
 headers.append('Content-Type', 'application/json; charset=utf-8');
 this.http.delete(this.myAppUrl + "api/Products/"+ productId, { headers: headers })
 .subscribe((res: Response) => {
 self.getProductList();
 });
 }
 }
 }
Sample code of fetch-data.components.html<div class="row"> <div class="page-header"> <h1>Product Master Details</h1> </div> </div> <p> <a [routerLink]="['/product-add']">Create New</a> </p> <table class="table"> <thead> <tr> <th> Product Code </th> <th> Product Name </th> <th> Manufacturer </th> <th> Shipping No </th> <th> Serial No </th> <th> Batch No </th> <th> Price </th> <th> Quantity </th> <th> Create Date </th> <th> Modified Date </th> <th></th> </tr> </thead> <tbody> <tr *ngFor="let item of productList"> <td></td> <td></td> <td></td> <td></td> <td></td> <td></td> <td></td> <td></td> <td></td> <td></td> <td> <td> <a [routerLink]="['/product-edit/', item.id]">Edit</a> | <a [routerLink]="" (click)="delete(item.id, item.productCode)">Delete</a> </td> </tr> </tbody> </table>
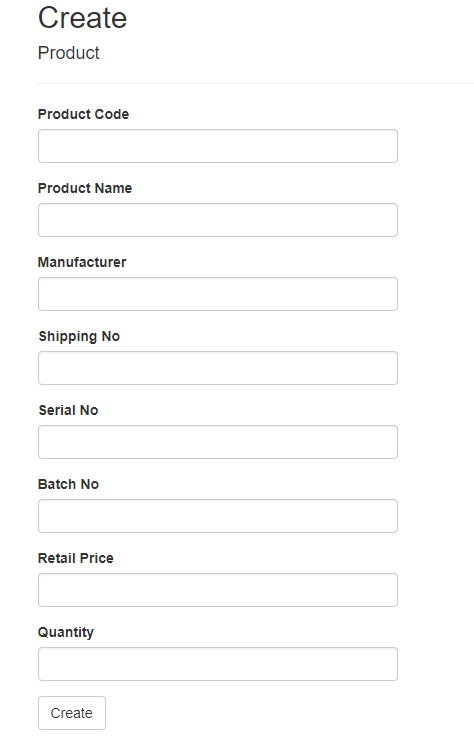
Now, we need to add code for the design of the Create New Product interface from where we can create new product. On complete the product creation, this interface will auto redirect the Product list UI where updated list will be shown. So, for this purpose we need to add the below files along the code.
The Sample Code of productadd.component.ts import { Component, OnInit, Inject } from '@angular/core';
import { Http, Headers, Response } from '@angular/http';
import { Router, ActivatedRoute } from '@angular/router';
import { Observable } from 'rxjs/Observable';
import 'rxjs/add/operator/map';
import 'rxjs/add/operator/catch';
import 'rxjs/add/observable/throw';
import 'rxjs/Rx';
@Component({
selector: 'product-add',
templateUrl: './productadd.component.html'
})
export class productAddComponent implements OnInit {
title: string = 'Create'
errorMessage: any;
modelData: any = {};
myAppUrl: string = "";
id: number = 0;
constructor(private _avRoute: ActivatedRoute, public http: Http, private _router: Router, @Inject('BASE_URL') baseUrl: string) {
debugger;
this.myAppUrl = baseUrl;
if (this._avRoute.snapshot.params["id"]) {
this.id = this._avRoute.snapshot.params["id"];
}
}
ngOnInit() {
debugger;
if (this.id > 0) {
this.title = "Edit";
let self = this;
let headers = new Headers();
headers.append('Content-Type', 'application/json; charset=utf-8');
this.http.get(this.myAppUrl + "api/Products/" + this.id, { headers: headers })
.subscribe((res: Response) => {
self.modelData = JSON.parse(res._body);
});
}
}
save(): void {
if (this.validateData()) {
let self = this;
let headers = new Headers();
headers.append('Content-Type', 'application/json; charset=utf-8');
if (this.title == "Create") {
this.http.post(this.myAppUrl + "api/Products", this.modelData, { headers: headers })
.subscribe((res: Response) => {
self._router.navigate(['/product-list']);
});
}
if (this.title == "Edit") {
this.http.put(this.myAppUrl + "api/Products/" + this.id, this.modelData, { headers: headers })
.subscribe((res: Response) => {
self._router.navigate(['/product-list']);
});
}
}
}
private validateData(): boolean {
let status: boolean = true;
let strMessage: string = '';
if (this.isNullOrUndefined(this.modelData)) {
status = false;
strMessage = 'Fill the the Fields in the Forms';
}
else if (this.isNullOrUndefined(this.modelData.productCode)) {
status = false;
strMessage = 'Provide Product Code Properly...';
}
else if (this.isNullOrUndefined(this.modelData.productName)) {
status = false;
strMessage = 'Provide Product Name Properly...';
}
else if (this.isNullOrUndefined(this.modelData.manufacturer)) {
status = false;
strMessage = 'Provide Manufacturer details Properly...';
}
else if (this.isNullOrUndefined(this.modelData.shippingNo)) {
status = false;
strMessage = 'Provide Shipping No Properly...';
}
else if (this.isNullOrUndefined(this.modelData.serialNo)) {
status = false;
strMessage = 'Provide Serial No Properly...';
}
else if (this.isNullOrUndefined(this.modelData.batchNo)) {
status = false;
strMessage = 'Provide Batch No Properly...';
}
else if (this.isNullOrUndefined(this.modelData.mrp)) {
status = false;
strMessage = 'Provide Retial Price Properly...';
}
else if (this.isNullOrUndefined(this.modelData.quantity)) {
status = false;
strMessage = 'Provide Quantity Properly...';
}
if (status === false)
alert(strMessage);
return status;
}
isNullOrUndefined(data: any): boolean {
return this.isUndefined(data) || this.isNull(data);
}
isUndefined(data: any): boolean {
return typeof (data) === "undefined";
}
isNull(data: any): boolean {
return data === null;
}
cancel() {
this._router.navigate(['/product-list']);
}
}
The Sample code of productadd.component.html<h2></h2> <h4>Product</h4> <hr /> <div class="row"> <div class="col-md-4"> <div class="form-group row"> <label class=" control-label col-md-4">Product Code</label> <div class="col-md-8"> <input class="form-control" type="text" [(ngModel)]="modelData.productCode" required> </div> </div> <div class="form-group row"> <label class=" control-label col-md-4">Product Name</label> <div class="col-md-8"> <input class="form-control" type="text" [(ngModel)]="modelData.productName" required> </div> </div> <div class="form-group row"> <label class=" control-label col-md-4">Manufacturer</label> <div class="col-md-8"> <input class="form-control" type="text" [(ngModel)]="modelData.manufacturer" required> </div> </div> <div class="form-group row"> <label class=" control-label col-md-4">Shipping No</label> <div class="col-md-8"> <input class="form-control" type="text" [(ngModel)]="modelData.shippingNo" required> </div> </div> <div class="form-group row"> <label class=" control-label col-md-4">Serial No</label> <div class="col-md-8"> <input class="form-control" type="number" [(ngModel)]="modelData.serialNo" required> </div> </div> <div class="form-group row"> <label class=" control-label col-md-4">Batch No</label> <div class="col-md-8"> <input class="form-control" type="text" [(ngModel)]="modelData.batchNo" required> </div> </div> <div class="form-group row"> <label class=" control-label col-md-4">Price</label> <div class="col-md-8"> <input class="form-control" type="number" [(ngModel)]="modelData.mrp" required> </div> </div> <div class="form-group row"> <label class=" control-label col-md-4">Quantity</label> <div class="col-md-8"> <input class="form-control" type="number" [(ngModel)]="modelData.quantity" required> </div> </div> <div class="form-group"> <button type="submit" class="btn btn-default" (click)="save()">Save</button> <button class="btn" (click)="cancel()">Cancel</button> </div> </div> </div>
The above component is basically responsible for insert new data into the database or edit the existing data. Now we add another typescript files called app.module.ts within the app folder and it contains the below code –
 import { BrowserModule } from '@angular/platform-browser';
 import { NgModule, NO_ERRORS_SCHEMA } from '@angular/core';
 import { FormsModule } from '@angular/forms';
 import { HttpClientModule } from '@angular/common/http';
 import { RouterModule } from '@angular/router';
 import { APP_BASE_HREF } from '@angular/common';
 import { HttpModule } from '@angular/http';

 import { AppComponent } from './app.component';
 import { NavMenuComponent } from './nav-menu/nav-menu.component';
 import { HomeComponent } from './home/home.component';
 import { FetchDataComponent } from './fetch-product/fetch-data.component';
 import { productAddComponent } from './add-product/productadd.component';

 @NgModule({
 declarations: [
 AppComponent,
 NavMenuComponent,
 HomeComponent,
 FetchDataComponent,
 productAddComponent
 ],
 imports: [
 BrowserModule.withServerTransition({ appId: 'ng-cli-universal' }),
 HttpClientModule,
 FormsModule,
 HttpModule,
 RouterModule.forRoot([
 { path: '', component: HomeComponent, pathMatch: 'full' },
 { path: 'product-list', component: FetchDataComponent },
 { path: 'product-add', component: productAddComponent },
 { path: 'product-edit/:id', component: productAddComponent },
 { path: '**', redirectTo: 'home' }
 ])
 ],
 providers: [],
 bootstrap: [AppComponent],
 schemas: [NO_ERRORS_SCHEMA]
 })
 export class AppModule { }
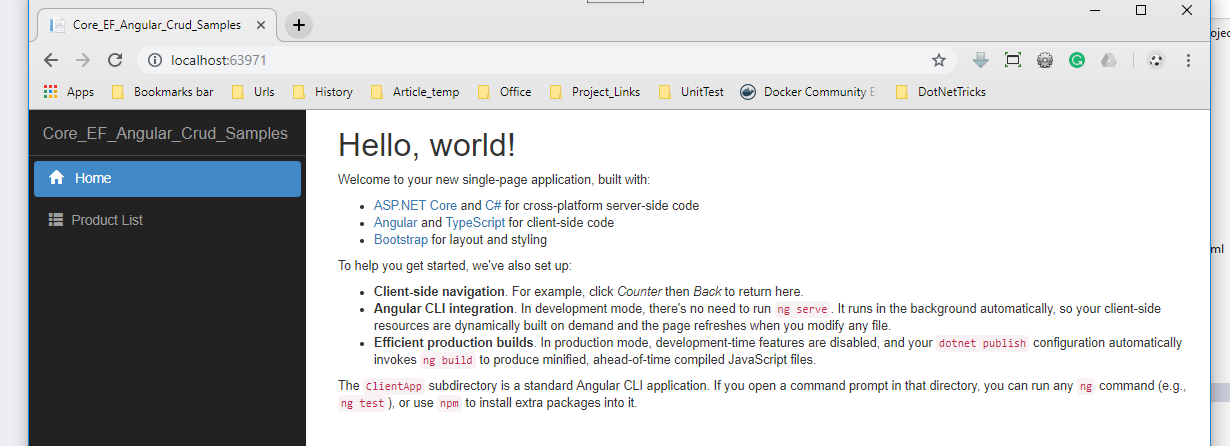
In the above section, angular module has been defined. Also, within the module, we will create the router based combinations to move one part of the application to another. Now compile the entire project from Visual Studio and can run in the browser. Now run the application where the below screen saver in the server.
Now click on the Product List link button and it will display the all the saved product details

On click of the Delete button, a confirmation of the delete is required if he or she is not required on the table. Click on the edit button, it will collect the all the field value of that product and assign the toolbar. We can change the value of any field and then save to the database. Now Create Product page basically used for the product create. After completion of the data entry, user need to decide either he or she want to save data permanently or click on the cancel button which internally redirected to the Product List Page.
Summary
In this article, we discuss how to develop an application using Angular, Asp.Net Core and Entity Framework Core. Hope this will help you.