Sunday, August 9, 2020

Microservice mesh


In this note we are grouping the studies around microservice to microservice communication with Kubernetes deployment. We are addressing:

  • how ingress controller helps inside Kubernetes
  • how API gateway helps for API management and service integration
  • how to expose service in hybrid cloud
  • how to discover service

All come back to the requirements, skill set and fit to purpose.

Definitions

Service meshes provide visibility, resiliency, traffic, and security control of distributed application services. They deliver policy-based networking for microservices in the contraints of virtual network and continuous topology updates. Externalizing, via declarations, the logic to support network potential issues, like resiliency, simplifies dramatically developers work.

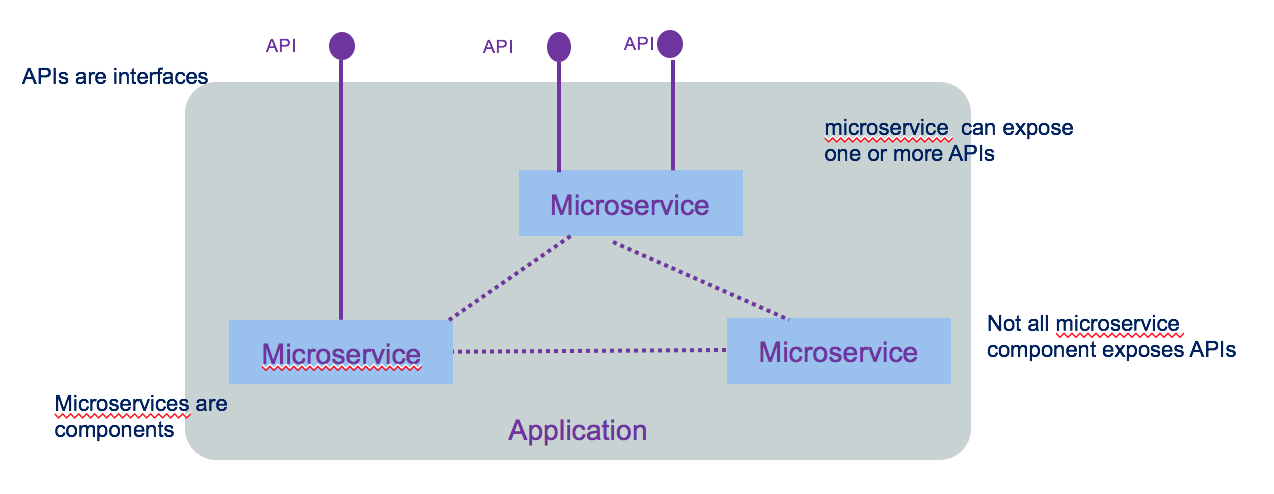
Some misconception to clarify around microservice and APIs:

  • microservices are not fine grained web services
  • APIs are not equivalent to microservices
  • microservices are not implementation of APIs

API is an interface, a way to make a request to get or change data in an application. In modern use API refers to REST web APIs using HTTP protocol, with JSON format (sometime XML is still used). Interface decouples the caller from the implementation. The caller has no idea how it is implemented.

A microservice is in fact a component. micro refers to the granularity of the component not of the exposed interface. The following diagram illustrates all those concepts.

We encourage you to go to read integration design and architecture series.

Container orchestration like Kubernetes are mainly doing application scheduling, cluster management, resource provisioning, platform and workload monitoring and service discovery.

When application solutions are growing in size and complexity, you need to addres the following items:

  • visibility on how traffic is flowing between microservice, how routing is done between microservice based on requests contained or the origination point or the end point
  • how to support resiliency by handling failure in a graceful manner
  • how to ensure security with identity assertion
  • how to enforce security policy

which defined the requirements for service mesh.

Service mesh architecture defines a data and control planes:

  • Control plane: supports policy and configuration for services in the mesh, and provides aggregation for telemetry. It has API and CLI to centralize control to the services deployed. In Kubernetes control planes are deployed in a system namespace.
  • Data plane: handles the actual inspection, transiting, and routing of network traffic. It is responsible for health checking, load balancing, authentication, authorization, inbound (ingress) and outbound (egress) cluster network traffic.

Applications / microservices are unaware of data plane.

Context

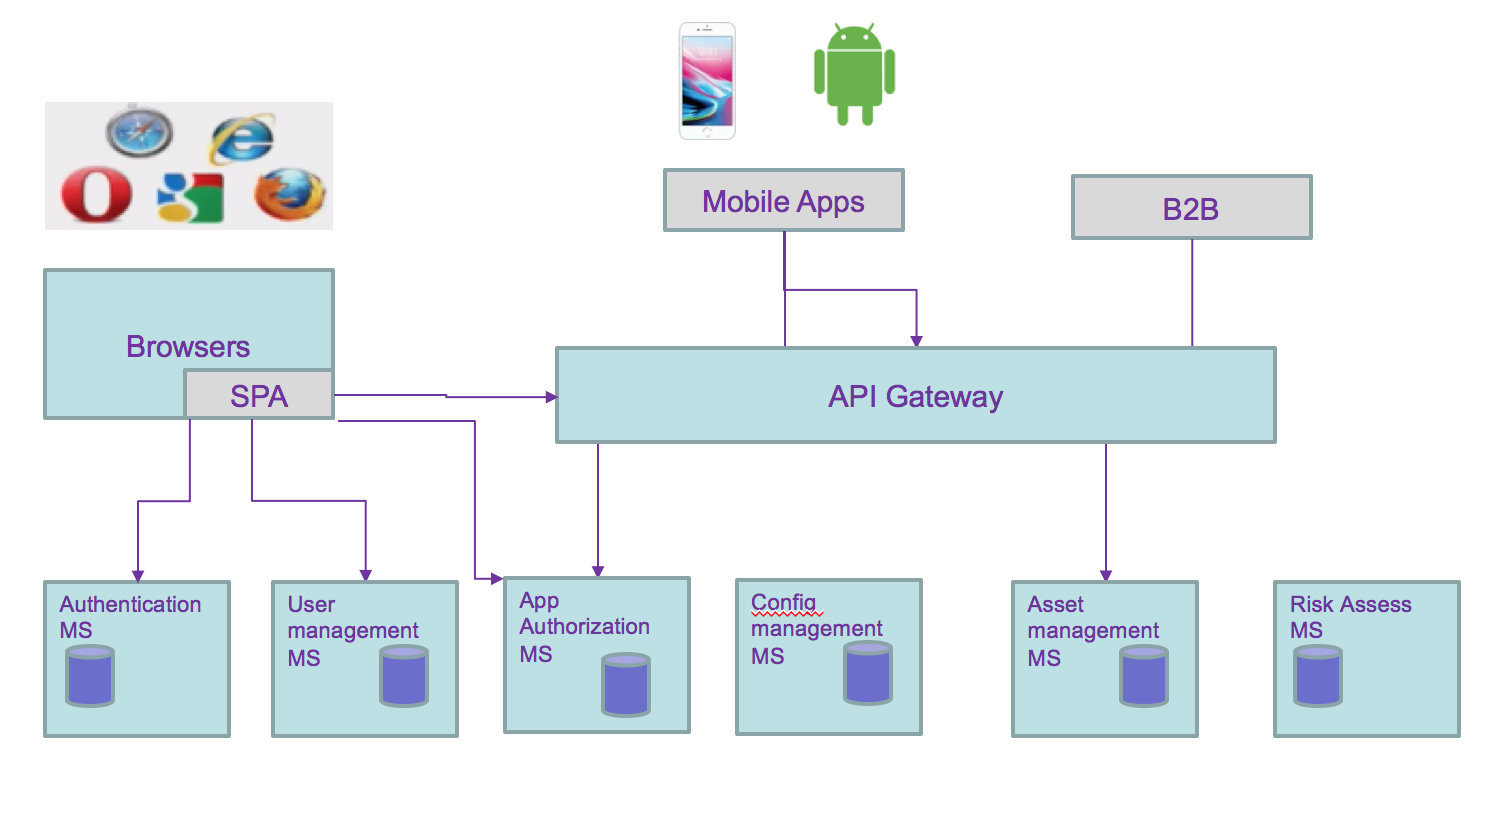
Traditional modern architecture involves having different components exposing reusable APIs, addressing different channels (mobile, single page application, traditional server pages or B2B apps), consuming APIs (mobile APIs, back end for front end, shared common apis like authentication, authorization,...) and backend services addressing reusable business services:

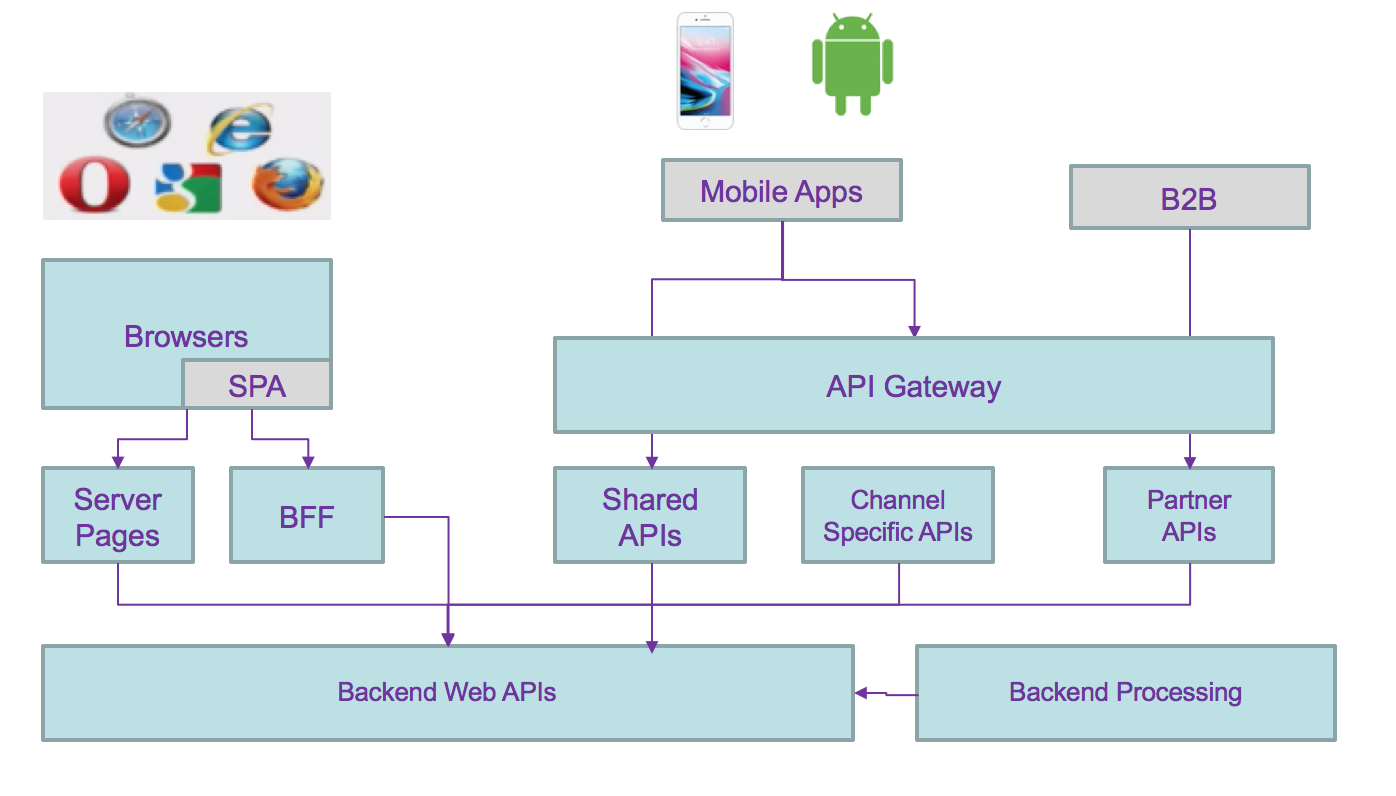
API management can be added via API gateway. This is a distributed application with cross related communication channels, where any changes to the service interface characteristics impact any of the components.

Moving to microservices architecture style adds more communication challenges and devops complexity but provides a lot of business values such as: rapid deployment of new business capabilities, co-evolving in parallel of other services. focusing on business domain with clear ownership of the business function and feature roadmap better operation procedure, automated, and with easy rollout and continuous delivery. A/B testing to assess how new feature deployed improve business operations * Improve resiliency by deploying on multi language cluster

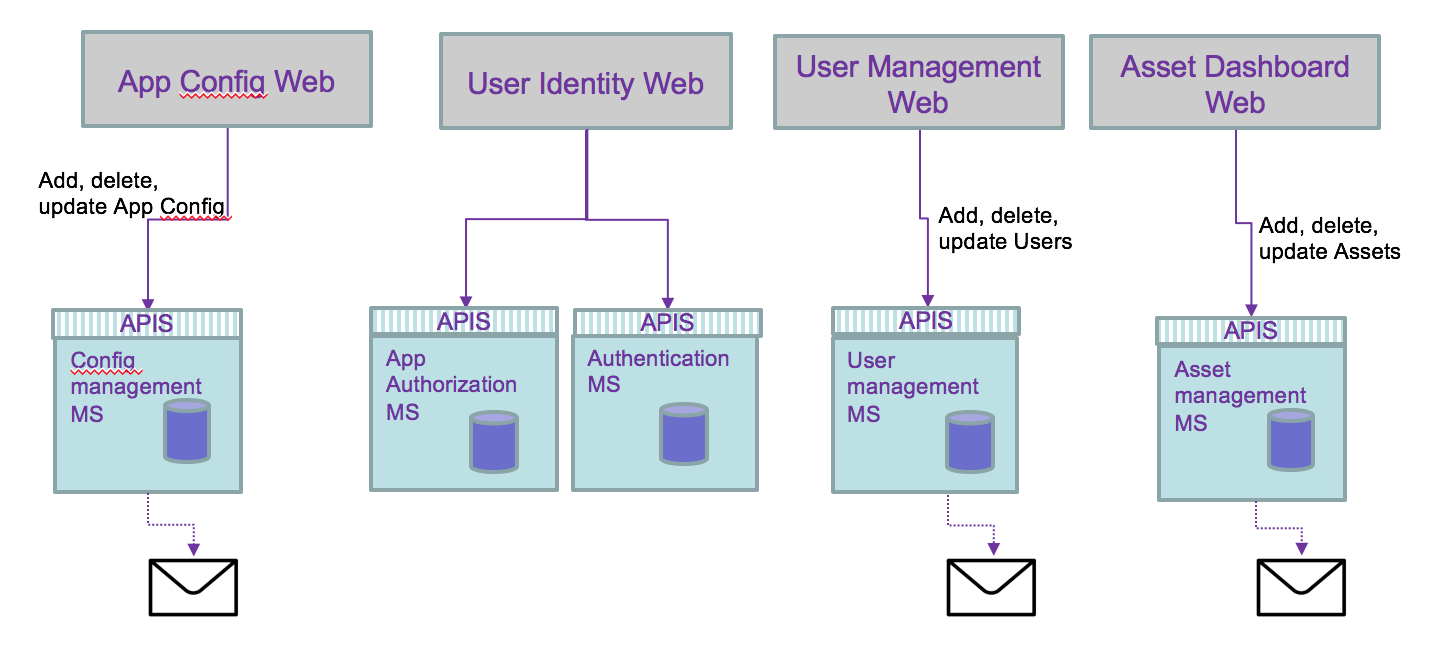
As an example we can use the following predictive maintenance asset solution with the following capabilities to support:

  • user authentication
  • user management: add / delete new user
  • user self registration, reset password
  • user permission control
  • user profile
  • asset management
  • risk assessment service

Each could be grouped by business domain like the user management, asset management, and application access control. So domain separation can be a good microservice boundary. But if the number of user reach millions then we may need to optimize the runtime processing of reading user credential, and scale the service differently, leading to a service map like the diagram below, where runtime and management are separated services.

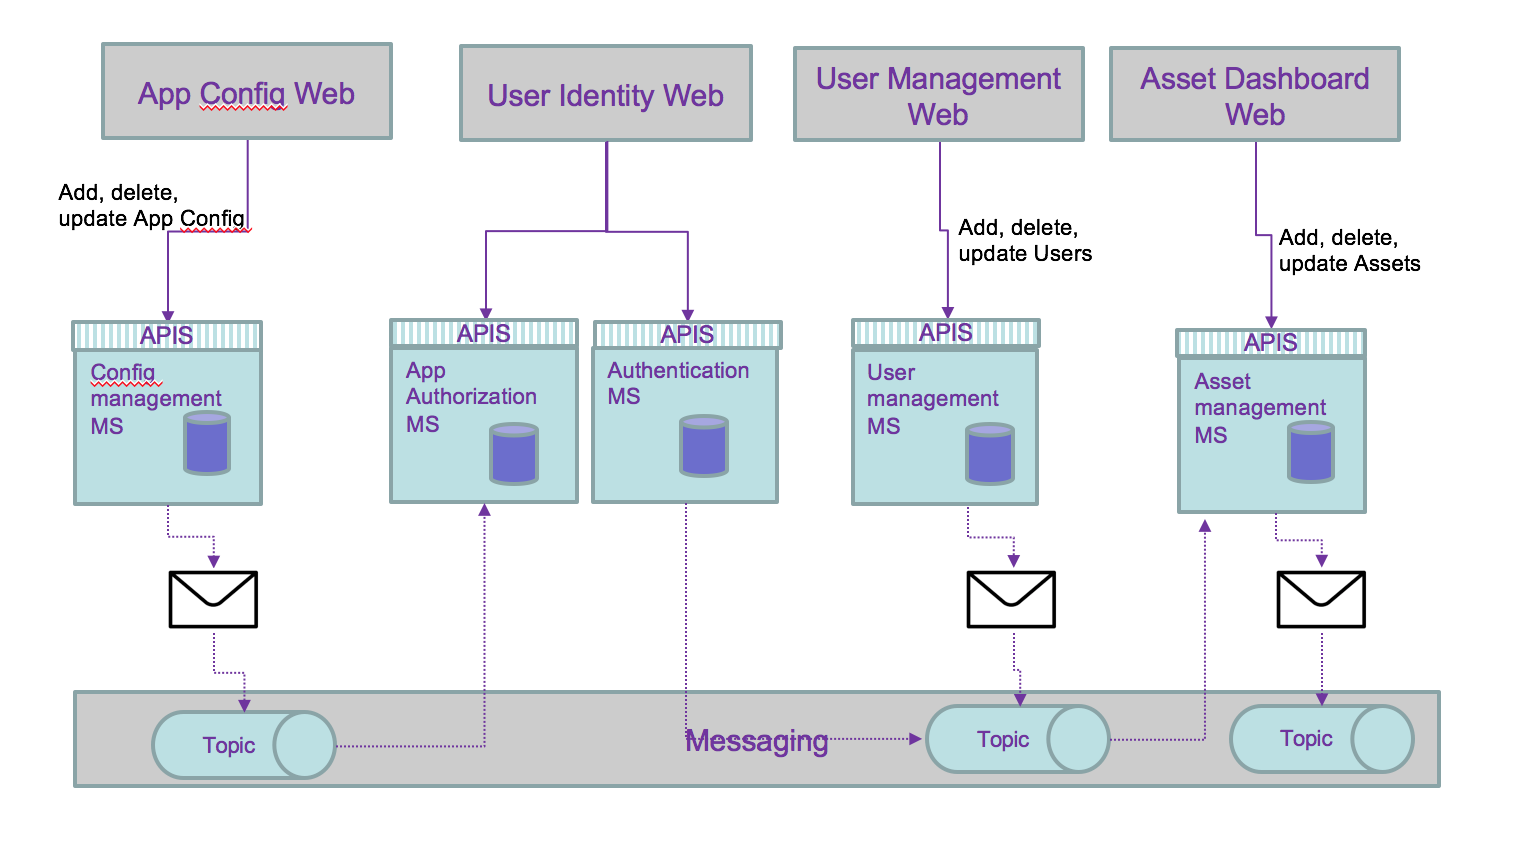
All of these still does not address the fact that data are distributed and even more with microservices owning their data persistence. As developers and architects we still have to address the following data integrity problems:

  • two phases commit
  • compensating operation
  • eventual data consistency: some microservice updating data may share those updates with other microservices.
  • Data aggregation: adding new views on data, owned by a microservice, to support new aggregates. Examples are preparing data view for machine learning modeling, analytics, or business intelligence...

From the previous microservice allocation we can see the needs to propagate data update between services. Adding or unsubscribing a user involves updating the asset the user own and the authentication runtime service:

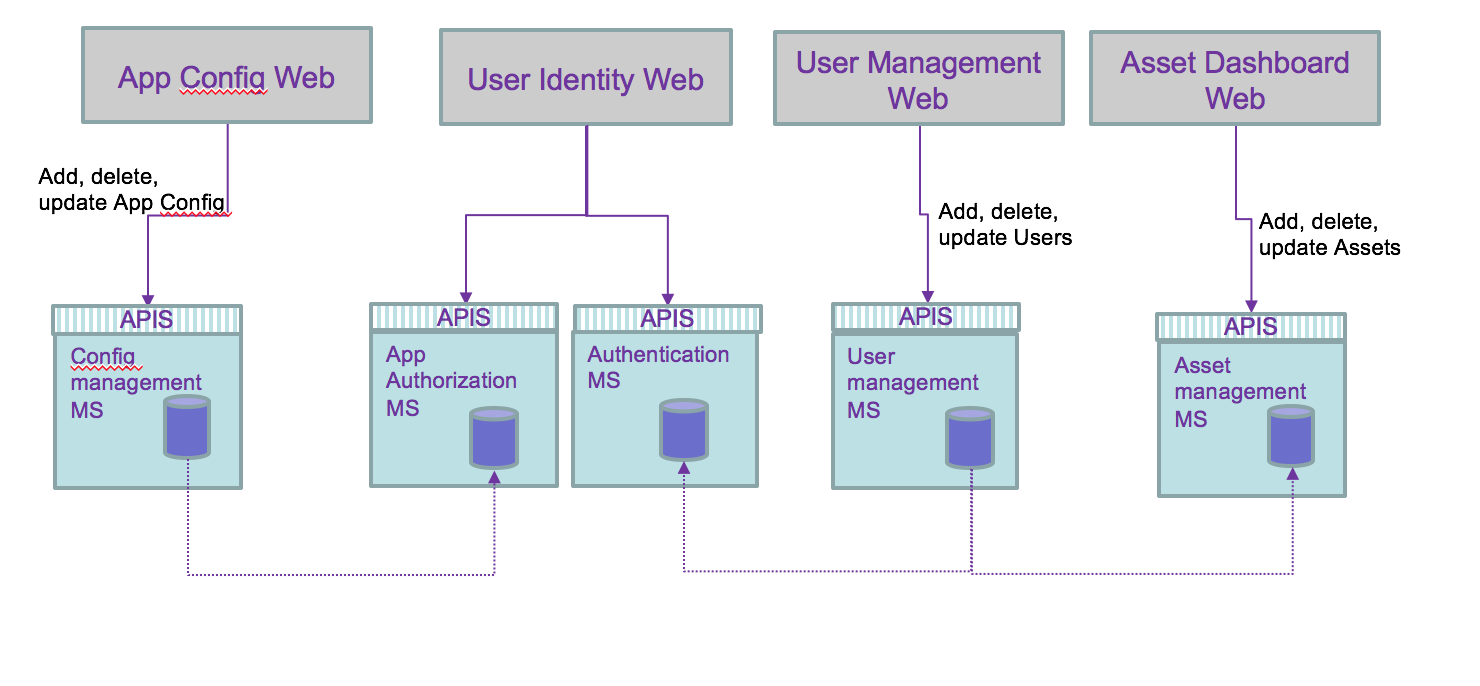
Adding a new application changes the authorization runtime service.

We are now looking at the following questions:

  • how does webapp access APIs for their main service, of back end for front end service.
  • how does deployed microservice access other service: discover and access?
  • How data consistency can be ensured?
  • is there a simpler way to manage cross microservice dependency?

The answers depend on the existing infrastructure and environment, and deployment needs.

Service routing

We have to dissociate intra-cluster communication versus inter clusters or cluster to external services. Without getting into too much detail of IP routing within Kubernetes some important elements of the cluster are important to remember: microservices are packaged as docker container and expose port. When deployed they run in a pod within a node (physical or virtual machine) containers can talk to other containers only if they are on the same machine, or when they have exposed port. * Kubernetes is configured with a large flat subnet (e.g. 172.30.0.0/16) which is used for internal application traffic inside of the cluster. Each worker node in the Kubernetes cluster is assigned one or more non-overlapping slices of this network, coordinated by the Kubernetes master node. When a container is created in the cluster, it gets assigned to a worker node and is given an IP address from the slice of the subnet for the worker node.

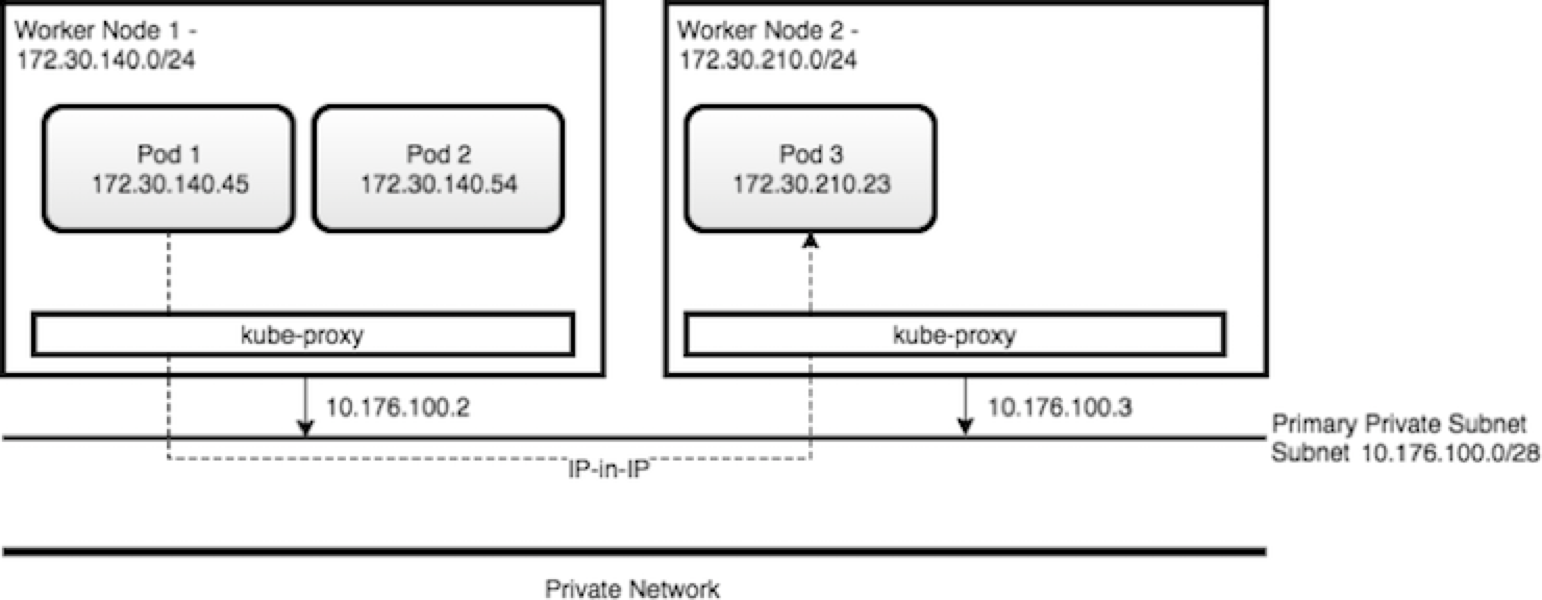
  • Kube-proxy intercepts and controls where to forward the traffic, either to another worker node running your destination pod, or outside of the cluster
  • Kube proxy watches the API Server on the Master Node for the addition and removal of Services endpoints. It configures the IPtable rules to capture the traffic for its ClusterIP and forwards it to one of the endpoints.
  • Worker nodes have internal DNS service and load balancer

Within Kubernetes, Ingress is a service that balances network traffic workloads in your cluster by forwarding public or private requests to your apps. You use ingress when you need to support HTTP, HTTPS, TLS, load balancing, expose app outside of the cluster, and custom routing rules...

One ingress resource is required by namespace. So if microservices are in the same namespace you can define a domain name for those services (e.g. assetmanagement.greencompute.ibmcase.com) and defined path for each service:

apiVersion: extensions/v1beta1
kind: Ingress
metadata:
  name: assetmanagement
spec:
  rules:
    - host: assetmanagement.greencompute.ibmcase.com
      http:
        paths:
          - path: /assetconsumer
            backend:
              serviceName: asset-consumer-svc
              servicePort: 8080
          - path: /assetdashboard
            backend:
              serviceName: asset-dashboard-bff-svc
              servicePort: 8080
          - path: /assetmgrms
            backend:
              serviceName: asset-mgr-ms-svc
              servicePort: 8080
The backend for front end component, the asset manager microservice and the asset consumer components are exposed in the same domain. The serviceName matches the service exposed for each components. The following diagram presents how an external application accesses deployed microservice within Kubernetes pod.

The following diagram shows how Ingress directs communication from the internet to a deployed microservice:

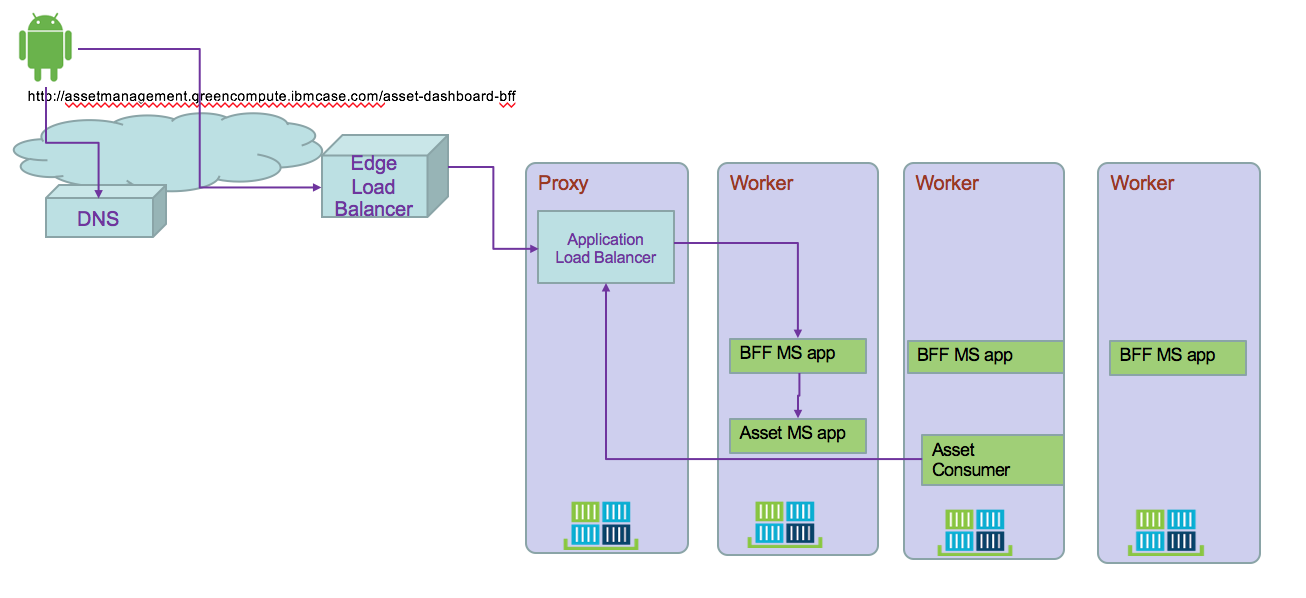
  1. A user sends a request to your app by accessing your app's URL. Using DNS name abstracts the application from the underlying infrastructure. Inter clusters microservice to microservice should use the same approach
  2. A DNS system service resolves the hostname in the URL to the portable public IP address of the load balancer
  3. Based on the resolved IP address, the client sends the request to the load balancer service that exposes the Application Load Balancer (ALB)
  4. The ALB checks if a routing rule for the app path in the cluster exists. If a matching rule is found, the request is forwarded according to the rules that you defined in the Ingress resource to the pod where the app is deployed. If multiple app instances are deployed in the cluster, the ALB load balances the requests between the app pods. To also load balance incoming HTTPS connections, you can configure the ALB to you can use your own TLS certificate to decrypt the network traffic.
  5. Microservice to microservice can use this DNS name to communicate between service.

Using Ingress, the global load balancer can support parallel, cross region, clusters.

Service exposition

There is an architecture style focusing on APIs which proposes to have different SLA and semantic for external, internet facing API versus internal back end APIs only exposed within intranet. This article presents using different API gateways to support this architecture.

Backend data services are not exposed directly to internet. API Gateway provides a secure end point for external web app to access those business functions.

So the decisions on how to expose service are linked to:

  • do you need to do API management
  • do you need to secure APIs
  • do you need to expose to internet
  • do you need to support other protocol then HTTP
  • do you need to have multiple instance of the application

When deploying a microservice to Kubernetes it is recommended to use Ingress rule as presented above.. The following yaml file exposes the BFF service using ClusterIP:

apiVersion: v1
kind: Service
metadata:
  name: asset-consumer-svc
  labels:
    chart: asset-consumer
spec:
  type: ClusterIP
  ports:
  - port: 8080
    targetPort: 8080
    protocol: TCP
    name: asset-consumer-svc
  selector:
    app: asset-consumer

Service discovery

When deploying on Kubernetes cluster, microservices use the DNS lookup to discover deployed microservice.

ISTIO

ISTIO provides an easy way to create a network of deployed services with load balancing, service-to-service authentication, traffic flow management, monitoring, etc... By deploying a special sidecar proxy (called Envoy) throughout your environment, all network communication between microservices is intercepted and controlled by ISTIO control panel.

The control plane manages the overall network infrastructure and enforces the policy and traffic rules.

To deploy ISTIO to IBM cloud private you can access the ICP catalog and search for istio. But as it is the version 0.7 we recommend to do your own installation using istio.io download page to get the last release.

ICP installation

Here is a quick summary of the steps:

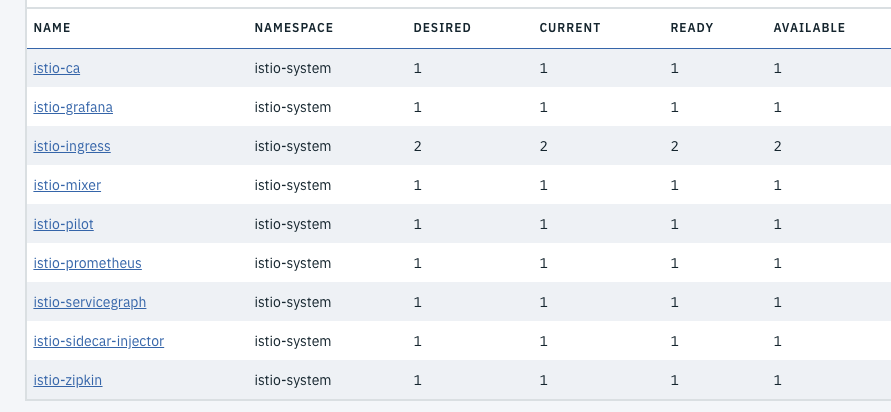
#1- Download istio latest versions
#2- Modify your PATH to get access to istioctl CLI tool. Verify with
$ istioctl version
#3- Connect to your ICP cluster
#4- Install istio without TLS security
$ kubectl apply -f install/kubernetes/istio-demo.yaml
#5- Verify the deployed services
$ kubectl get svc -n istio-system
NAME                       TYPE           CLUSTER-IP   EXTERNAL-IP   PORT(S)                                                                       AGE
grafana                    ClusterIP      10.0.0.170   <none>        3000/TCP                                                                      16m
istio-citadel              ClusterIP      10.0.0.123   <none>        8060/TCP,9093/TCP                                                             16m
istio-egressgateway        ClusterIP      10.0.0.16    <none>        80/TCP,443/TCP                                                                16m
istio-galley               ClusterIP      10.0.0.52    <none>        443/TCP                                                                       16m
istio-grafana              ClusterIP      10.0.0.71    <none>        3000/TCP                                                                      14d
istio-ingress              LoadBalancer   10.0.0.91    <pending>     80:31196/TCP,443:30664/TCP                                                    14d
istio-mixer                ClusterIP      10.0.0.6     <none>        9091/TCP,15004/TCP,9093/TCP,9094/TCP,9102/TCP,9125/UDP,42422/TCP              14d
istio-pilot                ClusterIP      10.0.0.39    <none>        15003/TCP,15005/TCP,15007/TCP,15010/TCP,15011/TCP,8080/TCP,9093/TCP,443/TCP   14d
istio-policy               ClusterIP      10.0.0.17    <none>        9091/TCP,15004/TCP,9093/TCP                                                   16m
istio-security             ClusterIP      10.0.0.162   <none>        8060/TCP                                                                      14d
istio-servicegraph         ClusterIP      10.0.0.65    <none>        8088/TCP                                                                      14d
istio-sidecar-injector     ClusterIP      10.0.0.195   <none>        443/TCP                                                                       14d
istio-statsd-prom-bridge   ClusterIP      10.0.0.37    <none>        9102/TCP,9125/UDP                                                             16m
istio-telemetry            ClusterIP      10.0.0.27    <none>        9091/TCP,15004/TCP,9093/TCP,42422/TCP                                         16m
istio-zipkin               ClusterIP      10.0.0.96    <none>        9411/TCP                                                                      14d
prometheus                 ClusterIP      10.0.0.118   <none>        9090/TCP                                                                      14d
servicegraph               ClusterIP      10.0.0.7     <none>        8088/TCP                                                                      16m
tracing                    ClusterIP      10.0.0.66    <none>        80/TCP                                                                        16m
zipkin                     ClusterIP      10.0.0.176   <none>        9411/TCP                                                                      16m
The default installation configuration does not install sidecar-injector, Prometheus, Grafana, service-graph, zipkin but istio-proxy, Ingress, Mixer, Pilot.

Installing your solution

Be sure your application is using HTTP 1.1 or 2.0. To create a service mesh with Istio, you update the deployment of the pods to add the Istio Proxy (based on the Lyft Envoy Proxy) as a side car to each pod. With the deployment of istio-sidecar-injector this is done automatically for any container deployed within a namespace where istio is enabled. Here is a command to do so: kubectl label namespace greencompute istio-injection=enabled

We are summarizing the support to Istio for a specific solution in this article.

More reading

Istio and Kubernetes Workshop Advanced traffic management with ISTIO Istio workshop for IBM Cloud Container service Our Istio FAQ

Asynchronous loosely coupled solution using events

If we change of paradigm and use a messaging approach or better an event approach of the data update requirements, we will implement a loosly coupled solution with a pub/sub communication protocol. We need to think about the activities that apply within each service and how they can be of interest to other components. Internal microservice tasks are becoming facts about something happened and those facts may be published as events for others to consume. The first level of refactoring may become:

An event is a fact that happens in the past and carry all the data needed, and it becomes a source of record. It becoming consistent if it is played in a messaging backbone via topics.

But the persistence of data can be externalized to consumer and then simplify the architecture:

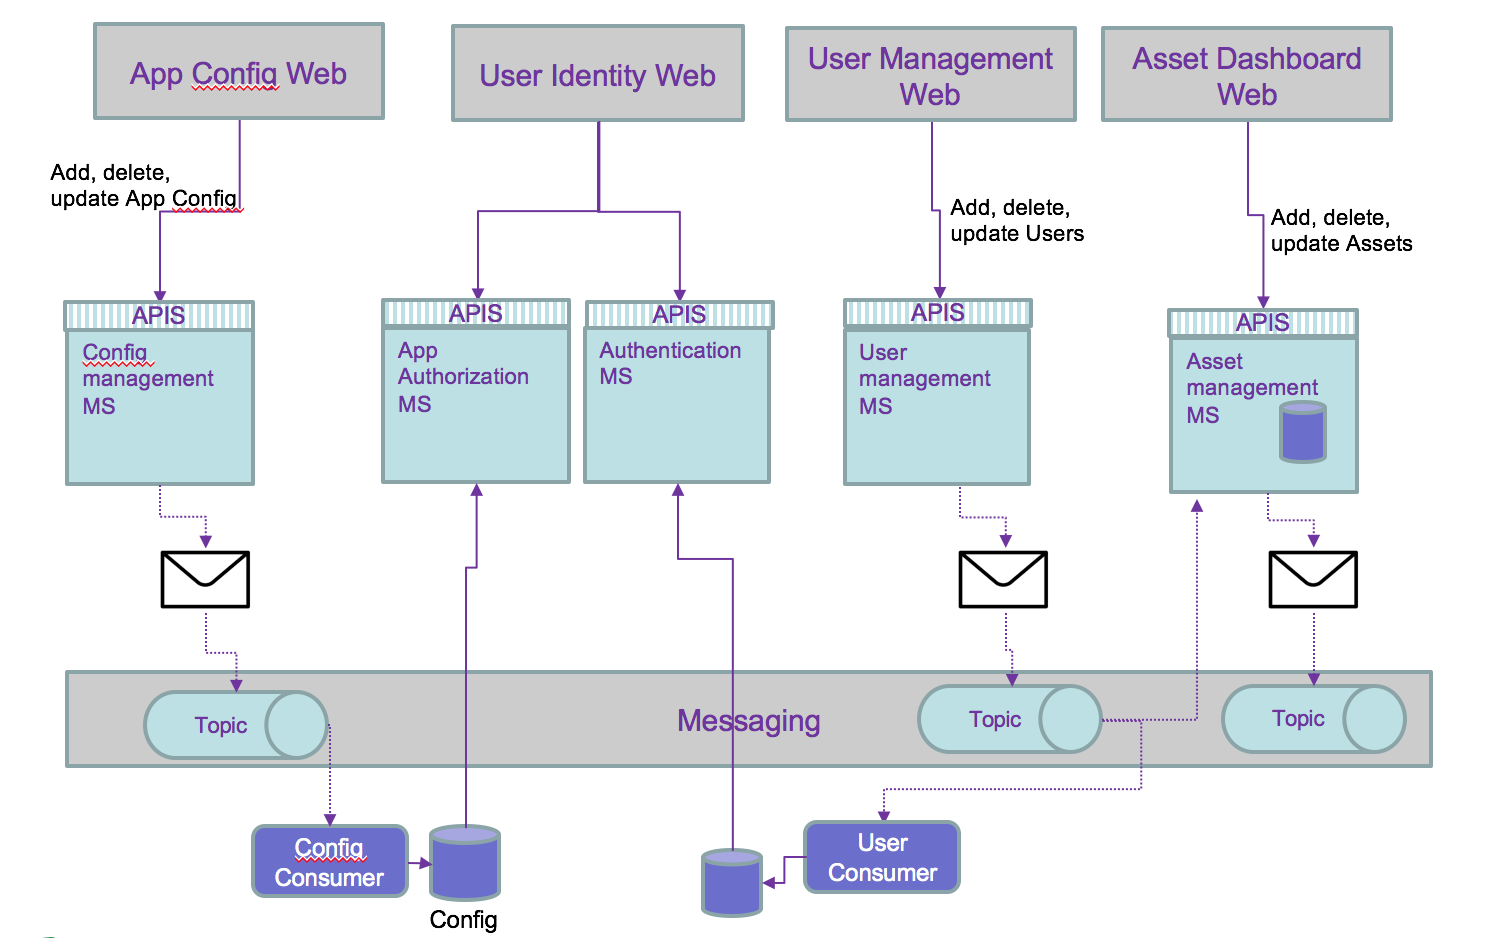
Then we can use the history of the persisted events to add features not address before, and outside of the direct scope of a microservice. For example to compute the number of users added last month, just a query on the users topic will get the answer: no or very limited coding needed.

We recommend to go deeper in event driven architecture with this site

Saturday, August 8, 2020

Angular App in Azure - Part II: Azure App Service and DevOps


Part I: Project outline

This is the second blog post in my series about taking an Angular App to Azure. In my first blog post I gave a general outline of the project, today I’d like to write about how I employed hosting in an Azure App Service and about the Azure DevOps Pipelines to build and deploy the app.

While I do have some code, yet, my backend code is nothing more than stubs that were created as examples by .NET Core. I don’t think that posting any of it here will be helpful for anyone, hence this post will still be low on code. This will probably change with the following posts.


Azure App Service

There are resources online on how to create a Azure App Service, for example here, therefor I will not explain how to create a App Service in Azure, but focus on the configuration required for this project. A little reminder: The frontend of the website will be created with Angular, the backend with .NET Core web services. Mauricio Trunfio wrote a great article (to be found here) on how to deploy an Angular app to Azure.

The web.config file

very basic Angular App would run on an Azure App Service with (virtually) no configuration. Anyway, as soon as routing comes into play, everything gets a bit more complicated. Therefor a web.config file is required for the Angular project, that will cause all routes to fallback to index.html (see here for a more detailed explanation). The web.config that will allow Angular routing has to look like this (hold on, this is not the final version, yet)

<configuration>
    <system.webServer>
      <rewrite>
        <rules>
          <rule name="Angular" stopProcessing="true">
            <match url=".*" />
            <conditions logicalGrouping="MatchAll">
              <add input="{REQUEST_FILENAME}" matchType="IsFile" negate="true" />
              <add input="{REQUEST_FILENAME}" matchType="IsDirectory" negate="true" />
            </conditions>
            <action type="Rewrite" url="/" />
          </rule>
        </rules>
      </rewrite>
    </system.webServer>
</configuration>

Where does my API go?

Since I had a hard time deploying both my API and the Angular App to the same virtual application in my Azure App Service, I decided to deploy the API to another virtual application, at /api. The virtual application can be set up in the section Settings > Application settings in the App Service, under the headline Virtual applications and directories (see Figure 1).

Set up the virtual applications in the App Service
Figure 1: Set up the virtual applications in the App Service

I’ve chosen the path site\api as the physical location of the application, but you are quite free to choose whatever you deem appropriate (1).

I assumed that this would make the API available at https://coffeefriends.azurewebsites.net/api, but due to the web.config for the Angular app, every route of the path /api was rewritten to https://coffeefriends.azurewebsites.net, which rendered the API unusable. This required another change to my web.config:

<configuration>
    <system.webServer>
      <rewrite>
        <rules>
          <rule name="Angular" stopProcessing="true">
            <match url=".*" />
            <conditions logicalGrouping="MatchAll">
              <add input="{REQUEST_URI}" pattern="^/api" negate="true" />
              <add input="{REQUEST_FILENAME}" matchType="IsFile" negate="true" />
              <add input="{REQUEST_FILENAME}" matchType="IsDirectory" negate="true" />
            </conditions>
            <action type="Rewrite" url="/" />
          </rule>
        </rules>
      </rewrite>
    </system.webServer>
</configuration>

this adds an exception to the rewrite rule, preventing /api to be rewritten.

Azure DevOps pipelines

Azure DevOps has quite a steep learning curve and is rather complex. It is, however, definitely worth it. I will elide the part about how to get started with Azure DevOps and assume that you already have an account (or know how to create one). Azure DevOps is available via https://dev.azure.com. I have created a Build Pipeline, which triggers a Deploy Pipeline to build, test and deploy everything to my App Service. Way more complex scenarios are conceivable, though.

The build pipeline

From Azure DevOps, build pipleines can be found at Pipelines > Builds. When creating a new Build pipline, first an assistant is presented to create a build pipeline with a standard configuration (see Figure 2).

The Build Pipeline Assistant
Figure 2: The Build Pipeline Assistant

Settings up the source for fetching the source code

Since I am hosting my code on GitLab, I had to create my pipeline using the visual designer (see the link in the image, just below GitHub Enterprise). This will take us to the following screen

Setting the source from the visual designer
Figure 3: Setting the source from the visual designer

For Git servers other than GitLab, External Git has to be selected. A service connection has to be created to connect to the Git server. The form to create a service connection (as presented in Figure 4) is pretty self-explanatory. Both the actual password for the server and access tokens can be set up for authentication. For security reasons I’d suggest using access tokens.

Set up the external Git repo
Figure 4: Set up the external Git repo

After the service connection is set up, the branch of the repo can be selected (see Figure 3).

Setting up the build pipeline for the .NET Core API

In the last screen the type of the pipeline can be selected. Since I am building a .NET Core API, I selected ASP.NET Core which sets up an appropriate pipeline for the API. This way, I only had to add tasks to build and deploy the Angular App.

The templates for the build pipeline
Figure 5: The templates for the build pipeline
Building the Angular App

For my project I have chosen the following folder structure (this is important for building the Angular app):

  • ./api: My .NET Core API
  • ./coffeefriends: My Angular App

In Figure 6 you see the Pipeline that was set up by Azure, just by choosing to build a .NET Core app. Running the pipeline now would check out the Git repo and perform all steps necessary to build the API.

The pristine .NET Core Build Pipeliine
Figure 6: The pristine .NET Core Build Pipeliine

To build the Angular app there are 3 futher steps to add:

  • Installing the Angular CLI
  • Restoring the packages of the app
  • Building the app via Angular CLI

To install the Angular CLI and restore the packages, two npm build steps are required. The Command for the first one is set to custom with the custom command install -g @angular/cli, this will install the Angular CLI on the build agent. The Command for the second one remains install (should be selected by default). Since the Angular App is located in ./coffeefriens/, the npm install command has to be executed in that directory (since it is looking for a packaje.json file in the directory it is executed in).

The task to build the Angular App
Figure 7: The task to build the Angular App

The task to actually build the Angular App is displayed in Figure 7. It is a Command Line task, that runs the following commands

cd coffeefriends
ng build --prod

to build the app in production configuration (2).

Packaging

The default ASP .Net Core pipeline publishes the results from building the .NET Core API to an Artifact named drop.zip. I’ve added another Publish Artifact task with the following configuration:

  • Path to publishcoffeefriends\dist (This is the folder where the built Angular App is saved to)
  • Artifact name: drop

Since the artifact name is set to drop, too, the contents from coffeefriends\dist will be added to drop.zip alongside to the API.

The contents of the <i>drop.zip</i>
Figure 8: The contents of the drop.zip

Figure 8 shows the contents of the drop.zip file. The root contains the api.zip that in turn contains the API to be deployed to the App Service. The ./coffeefriends path contains the built Angular App.

The Release Pipeline

Release pipelines are accessible via Pipelines > Releases. When creating a new release pipeline we can select Azure App Service deployment which creates a default pipeline that deploys the .NET Core API to our root application.

Before anything can be deployed, it’s necessary to set up the Azure subscription and App Service name (Figure 9).

Setting up the deployment stage.
Figure 9: Setting up the deployment stage.

Deploying the API

Since I’d like to deploy my API to the virtual application at /api, I had to select that virtual application in the deployment task (see Figure 10)

Set up the application to deploy the API to
Figure 10: Set up the application to deploy the API to

The default task is set up correctly to deploy a .NET Core app, therefor there is nothing left to do here.

Deploying the Angular app

Furthermore I had to set up another Azure App Service Deploy task to deploy the Angular app (see Figure 11 )

Azure app deploy task
Figure 11: Azure app deploy task

Since the Azure app shall be deployed to the root of the App Service, the field Virtual application has to be left empty. The folder depends on the alias we are giving the artifact (see below), the name of the artifact and the name of the angular app. Later, when the build artifact is set up, I’s also possible to browse to select the folder to deploy.

Set up the artifact

Back in the pipeline view, it’s now required to set up an artifact for the release pipeline (see Figure 12).

Add an artifact
Figure 12: Add an artifact

To use the Artifact from the build pipeline, the type Build has to be selected. The following options are configurable:

  • The project to get the artifact from (defaults to the current project)
  • The build pipeline that builds the respective artifact
  • Which version of the artifact to use
  • I’ve opted to Latest, but there are other possibilities, such as restricting the releases to certain tags, which would be useful for QA/staging environments
  • An alias for the artifact, should be safe to use the default here, unless you have more specific needs (multiple artifacts, etc.)
Artifact configuration for CoffeeFriends
Figure 13: Artifact configuration for CoffeeFriends

Making it continuous

Although the CI/CD pipelines are in place, there is nothing continuous about them, yet. They build and deploy CoffeeFriends, but only if I triggered them. Yikes! Since I’d like the CoffeeFriends website to reflect the current state of the project, I’d like to build and deploy on (virtually) every commit to master.

Disclaimer: While this is okay for a toy project like this, it would be totally unacceptable in any production website. Appropriate processes shall be employed to ensure that only appropriately tested code is deployed.

The continuous integration has to be set up in the build pipeline. When editing the build pipeline, CI triggers are available on the Triggers tab, see Figure 14

CI triggers on the build pipeline
Figure 14: CI triggers on the build pipeline

For reasons unknown, the checkbox to enable CI was checked by default for me, but the build pipeline was not triggered on new commits. After unchecking the checkbox and then checking it again, it did work, however. This is sufficient for continuous integration to run, but we’d still have to trigger the deployment manually. Hence we have to set up a trigger for the release pipeline. Triggers on the release pipeline are available form the pipeline view on the build artifact (see Figure 15).

CI triggers on the build pipeline
Figure 15: CI triggers on the build pipeline

After enabling the CD trigger the branch to build from has to be selected (master in my case). Afterwards, the website will be built and deployed after every push (3).

Wrap-up

This has been a long post on how Azure can be used to Host an Angular/.NET Core website within one App Service and how to set up Azure DevOps for the continuous integration and deployment of that website. Obviously these steps are quite specific to the way I structured my app and the way how I wanted to deploy it. Anyway, I hope that this information will help anyone that struggles to set up Azure to host an Angular app with a .NET Core API.

In my next post I will shed light on authentication/authorization with Azure AD B2C and JWTs. Since I’ll first need to write some more code, this might take some time. Check https://coffeefriends.azurewebsites.net in the meantime to check whether I made progress. If you read this I’d be happy to hear from you, wheather you liked it or you have suggestions how I can improve, please feel free to contact me (see my Twitter below).

Footnotes

  1. I would like to remind the kind reader that I do not deem my solution the best one at any rage. What I present here is what worked best for me and I sincerely hope, that my explanations might help anyone, but if there is anything that can be improved, please feel free to contact me (see the footer of this page for my Twitter). 

  2. The distiction between development and production configuration will become crucial for accessing the API and for OpenID Connect authentication. 

  3. Actually not on every push. I kept the default of 180 s, which means that it’ll check for changes every 3 minutes, but practically the pipeline will likely by ran for virtually every push. 

Cache Design and patterns

 In this article  we will look at application design and how cache design will be helping to get data from back end quickly.  scope of this ...