Sunday, August 1, 2021

Parallel jobs in Azure DevOps

This article will talk about parallel jobs in Azure Pipelines and the guidelines to determine how many jobs you need in your organization.

What is a Job?

Each pipeline in Azure DevOps starts with a trigger and is composed of one or more stages. Each stage contains one or more jobs that run multiple tasks on an agent.

With this relationship in mind, we can define a job as a set of steps that run sequentially on an agent (computing infrastructure with an installed agent software that runs a job).

Are parallel Jobs free?

By default, Azure DevOps gives one parallel job to every organization for free. However, there’s a slight difference in the free tier offering according to the types of agents being used.

Microsoft-hosted agents

  • Private projects: The build time is limited to 1800 minutes per month and it can only run one pipeline job at a time.
  • Public projects: There is no build time limit and it can run up to 10 parallel jobs at a time.

Self-Hosted agents

  • Private projects: One self-hosted parallel job at a time. You can also get an additional self-hosted parallel job for each user with an active Visual Studio Enterprise subscriber account in your organization
  • Public projects: an unlimited number of parallel jobs at a time

If you want to know more about self-hosted agents, I recommend that you read my previous article in which I explain how I created a self-hosted agent on my Raspberry Pi.

Buy parallel jobs

To buy more parallel jobs you must follow these steps:

  • Sign in to your Azure DevOps organization
  • Select Organization settings
Organization settings
  • Select Parallel jobs under Pipelines, and then select either Purchase parallel jobs for Microsoft-hosted jobs or Change for self-hosted jobs.
Parallel jobs
  • Enter the number of jobs that you want to purchase
  • Click Save

Create a pipeline with parallel jobs

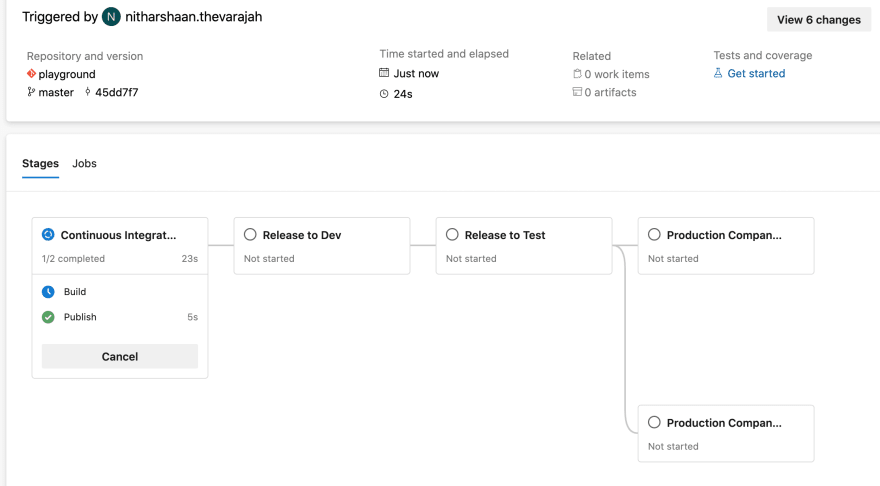
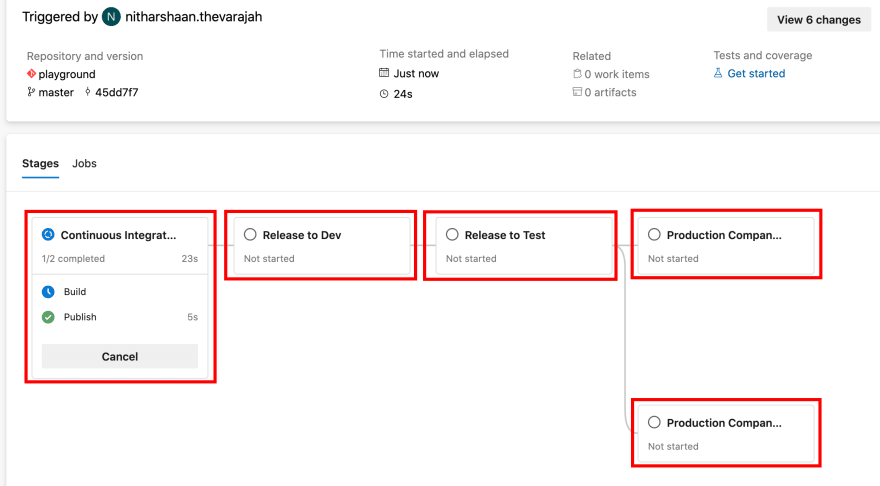
In this demo, I’m going to create a pipeline with just one stage. This stage will execute two jobs in parallel, and only when both these tasks are completed, will the pipeline move forward with a final task.

trigger:
- main
pool:
vmImage: 'ubuntu-latest'
jobs:
- job: ParallelA
steps:
- bash: sleep 25
displayName: 'Sleep for 25 seconds'
- bash: echo Hello from parallel job A
displayName: 'Run a one-line script'
- job: ParallelB
steps:
- bash: sleep 20
displayName: 'Sleep for 20seconds'
- bash: echo Hello from parallel job B
displayName: 'Run a one-line script'
- job: Final
dependsOn:
- ParallelA
- ParallelB
steps:
- script: echo Hello from final job
displayName: 'Run a one-line script'

The dependsOn key defines the jobs that must be completed before starting the execution of the final job. As you can see in the image below, the first two jobs start concurrently looking for an available agent (this doesn’t mean that they will run simultaneously) while the final agent is on standby.

Parallel jobs detail

Do you need a parallel job?

As the number of users in your organization increases, so does the frequency at which the pipelines are being used. For this reason, to avoid users ending up in a queue waiting for other jobs to complete, Microsoft recommends running one parallel job for every four to five users in your organization.

Other factors that might influence the number of parallel jobs to use are:

  • You should have a parallel job for each team that requires a CI build.
  • If a CI build trigger applies to multiple branches, You should have a parallel job for each active branch.
  • If you have multiple applications in the same organization or server, you should have a parallel job to deploy each application simultaneously.

Resources

Have you tried multi stage pipelines in Azure DevOps?

 Do you know how you could make environments look alike with less code? I would like to show you one way that I discovered recently.

I have been able to try out multi stage pipelines in Azure DevOps and I have to say that I'm pretty impressed with some of the possibilities there.
Through this post I'll be highlighting some of the features I think are really good.
I'll assume that you are somewhat familiar with Azure DevOps and pipelines in Azure DevOps.

Features I will be talking about are:

  • stages
  • conditions
  • templates

All of these features together will create a pipeline which is similar to the following multi stage pipeline:
Multi stage pipeline

What you need to create a multi stage pipeline in Azure DevOps:

  • Azure Pipelines
  • A project with your code which can be uploaded to Azure DevOps
  • Yaml files for your pipelines

How to structure your yaml file

Without a yaml file you won't be able to get multistage pipelines. Let's look at my sample file which I will use through this post.
Note: I have omitted steps in the Build and Deploy job.

#azure-pipelines.yml

# trigger for this pipeline
trigger:
  - master

# pool used in pipeline
pool:
  vmImage: 'ubuntu-latest'

# global variables
variables:
  artifactName: ReleaseArtifact
  releaseTemplate: 'templates/azure-pipelines.release.yml'

stages:
- stage: CI
  displayName: 'Continuous Integration'
  jobs:
  - job: Build
  ...
  - job: Publish
  ...

- stage: 'Dev'
  displayName: 'Release to Dev'
  dependsOn: CI
  jobs:
  - template: ${{ variables.releaseTemplate }}
    parameters:
      variableGroup: 'Dev'
      environment: 'DEV'
      artifactName: ${{ variables.artifactName }}

- stage: 'Test'
  displayName: 'Release to Test'
  dependsOn: Dev
  jobs:
  - template: ${{ variables.releaseTemplate }}
    parameters:
      variableGroup: 'Test'
      environment: 'TEST'
      artifactName: ${{ variables.artifactName }}

- stage: 'ReleaseA'
  displayName: 'Release to production for Company A'
  dependsOn: Test
  jobs:
  - template: ${{ variables.releaseTemplate }}
    parameters:
      variableGroup: 'Company_A.Release'
      environment: 'COMPANY_A-RELEASE'
      artifactName: ${{ variables.artifactName }}

- stage: 'ReleaseB'
  displayName: 'Release to production for Company B'
  dependsOn: Test
  jobs:
  - template: ${{ variables.releaseTemplate }}
    parameters:
      variableGroup: 'Company_B.Release'
      environment: 'COMPANY_B-RELEASE'
      artifactName: ${{ variables.artifactName }}

This yaml file creates and publishes an artifact in the CI stage. The same artifact is released to Dev, Test and Release environments for company A and company B. Note that the CI stage will always run, while the other stages depends on whether the CI stage succeeds or not.

azure-pipelines.yml works as our main template, while azure-pipelines.release.yml is our release template used to release to each environment.
My environments and variable groups are defined like this:
environments and variable groups

Stages

A pipeline can be divided into major blocks called stages. By default each stage is run only after the preceding stage is completed.
Each stage is highlighted by a red box in the picture below:
Stages

Conditions

Each stage or job can be triggered based on a condition. You can for instance say that a job should run only if previous job is successful and triggered by the master branch:

jobs:
- job: Foo
  steps:
  - script: echo Hello!
    condition: always() # this step will always run, even if the pipeline is canceled

- job: Bar
  dependsOn: Foo
  condition: and(succeeded(), eq(variables['Build.SourceBranch'], 'refs/heads/master')) # this job will only run if Foo succeeds and is triggered by master branch

You also have 'dependsOn' tag where you can specify which jobs or stages the current job or stage depends on.

Templates

Say you would like to do the same release to production for several environments. One way is to duplicate the release stage for each environment. The downside is that you will end up with duplicate code, which we don't want.
This is where templates comes in handy!

In my example yaml file I had this piece of code:

...

variables:
  artifactName: ReleaseArtifact
  releaseTemplate: 'templates/azure-pipelines.release.yml'

...

- stage: 'ReleaseA'
  displayName: 'Release to Production'
  dependsOn: Test
  jobs:
  - template: ${{ variables.releaseTemplate }}
    parameters:
      variableGroup: 'Company_A.Release'
      environment: 'COMPANY_A-RELEASE'
      artifactName: ${{ variables.artifactName }}

- stage: 'ReleaseB'
  displayName: 'Release to production for Company B'
  dependsOn: Test
  jobs:
  - template: ${{ variables.releaseTemplate }}
    parameters:
      variableGroup: 'Company_B.Release'
      environment: 'COMPANY_B-RELEASE'
      artifactName: ${{ variables.artifactName }}

As you can see I'm sending parameters to another file which contains the release jobs. My release template looks like this:

#azure-pipelines.release.yml
parameters:
- name: variableGroup
  type: string

- name: environment
  type: string

- name: artifactName
  type: string

jobs:
  - deployment: DeploySolution
    displayName: 'Deploy solution'
    variables:
      - group: ${{ parameters.variableGroup }} # points to variable group in Azure DevOps
    environment: ${{ parameters.environment }} # points to environments in Azure DevOps
    strategy:
      runOnce:
        deploy:
          steps:
          - task: DownloadPipelineArtifact@2
            displayName: 'Downloading artifact'
            inputs: 
              artifact: ${{ parameters.artifactName }}
              ...
          ...

A template could be seen as a function where you send in variables as paramaters. ${{ }} is in our case used as an expression used to define a variable which is evaluated at compile time or run time.

Summary

Through this post we've been looking at some features introduced with multi stage pipelines in Azure DevOps.
We looked at:

  • how to structure your yaml file
  • stages
  • dependencies
  • templates and how to send variables as parameters

By using templates, we are forcing each release stage to be equal. This is one way to have environments that do not differ from each other.

These are some of the features I've been able to explore and there are a lot more.

Saturday, July 31, 2021

Azure DevOps Multi-Stage Pipelines

Summary :  Very simple article to push docker to ACR and use in web app
1. create resource group 

az group create --name $(APP_NAME)-rg --location $(LOCATION)

2.launches an Azure Container Registry if one doesn’t exist,

az acr create --resource-group $(APP_NAME)-rg --name $(ACR_NAME) --sku Basic --admin-enabled true

3. Push image to ACR

export THETIMEANDDATE=$(date '+%Y-%m-%d-%H%M')

echo "$THETIMEANDDATE will be the point in time tag"

az acr login --name $(ACR_NAME) 

docker image build -t $(IMAGE_NAME) ./

docker image tag $(IMAGE_NAME) $(ACR_NAME).azurecr.io/$(IMAGE_NAME):latest

docker image tag $(IMAGE_NAME) $(ACR_NAME).azurecr.io/$(IMAGE_NAME):$THETIMEANDDATE

docker image push $(ACR_NAME).azurecr.io/$(IMAGE_NAME):latest 

docker image push $(ACR_NAME).azurecr.io/$(IMAGE_NAME):$THETIMEANDDATE

4 configures and launches an App Service Plan, App Service and then configures automatic deployment 

az webapp config container set --resource-group $(APP_NAME)-rg --name $(APP_NAME)

--docker-custom-image-name $(ACR_NAME).azurecr.io/$(IMAGE_NAME):latest

--docker-registry-server-url https://$(ACR_NAME).azurecr.io

az webapp deployment container config

--resource-group $(APP_NAME)-rg

--name $(APP_NAME)

--enable-cd true

 As I move into using Azure DevOps more and more, there is one thing which I really haven’t got on with and that is release pipelines. I didn’t like that I couldn’t easily define it as YAML like I could with build pipelines, even though I don’t like them, there are a few things I do like — like approval gates.


Environments

Luckily, there are ways to get around this — the most simple way is to add an Environment and then add an Approval. Adding an Environment is simple enough, just click on Environment in your Pipeline and then add one with None selected under Resource;

Adding an environment {Source: MediaGlasses}


Once you have added the Environment you can then add an approval check, to do this click on the Environment you have just created and click on the three dots in the top right-hand side of the page. From the menu select Approvals and checks;

Adding an approval {Source: MediaGlasses}


Now we have an Environment and the Approval in place we can move onto the Pipeline.


Pipeline

- stage: "SetupRG"
displayName: "Resource Group"
jobs:
- job: "CreateResourceGroup"
displayName: "Resource Group - Setup"
steps:
- task: AzureCLI@2
inputs:
azureSubscription: "$(SUBSCRIPTION_NAME)"
addSpnToEnvironment: true
scriptType: "bash"
scriptLocation: "inlineScript"
inlineScript: |
az group create --name $(APP_NAME)-rg --location $(LOCATION)
displayName: "Resource Group - Use Azure CLI to setup or check"
view raw01.yml hosted with ❤ by GitHub
- stage: "SetupACR"
displayName: "Azure Container Registry"
dependsOn:
- "SetupRG"
jobs:
- job: "SetupCheckAzureContainerRegistry"
displayName: "Azure Container Registry - Setup"
variables:
- name: "DECODE_PERCENTS"
value: true
steps:
- task: AzureCLI@2
inputs:
azureSubscription: "$(SUBSCRIPTION_NAME)"
addSpnToEnvironment: true
scriptType: "bash"
scriptLocation: "inlineScript"
inlineScript: |
ACR_ID=$(az acr show --resource-group $APP_NAME-rg --name $ACR_NAME --query "id" -o tsv)
if [ -z "$ACR_ID" ]; then
echo "There is no Azure Container Registry, we should sort that"
az acr create --resource-group $(APP_NAME)-rg --name $(ACR_NAME) --sku Basic --admin-enabled true
else
echo "There is already an Azure Container Registry, we don't need to do anything else here"
fi
displayName: "Azure Container Registry - Use Azure CLI check or setup"
view raw02.yml hosted with ❤ by GitHub
Now that we have a container registry to push our image to we can build and the push the container, this is the stage where we will be getting approval before building;
- stage: "BuildContainer"
displayName: "Build, Tag and Push the container image"
dependsOn:
- "SetupACR"
jobs:
- deployment: BuildPushImage
displayName: "Build, tag and push the image"
environment: "production"
pool:
vmImage: "Ubuntu-20.04"
strategy:
runOnce:
deploy:
steps:
- checkout: self
- task: AzureCLI@2
inputs:
azureSubscription: "$(SUBSCRIPTION_NAME)"
addSpnToEnvironment: true
scriptType: "bash"
scriptLocation: "inlineScript"
inlineScript: |
export THETIMEANDDATE=$(date '+%Y-%m-%d-%H%M')
echo "$THETIMEANDDATE will be the point in time tag"
az acr login --name $(ACR_NAME)
docker image build -t $(IMAGE_NAME) ./
docker image tag $(IMAGE_NAME) $(ACR_NAME).azurecr.io/$(IMAGE_NAME):latest
docker image tag $(IMAGE_NAME) $(ACR_NAME).azurecr.io/$(IMAGE_NAME):$THETIMEANDDATE
docker image push $(ACR_NAME).azurecr.io/$(IMAGE_NAME):latest
docker image push $(ACR_NAME).azurecr.io/$(IMAGE_NAME):$THETIMEANDDATE
displayName: "Use Azure CLI to build and push the container image"
view raw03.yml hosted with ❤ by GitHub
- stage: "SetupAppServices"
displayName: "Azure App Services"
dependsOn:
- "SetupRG"
- "SetupACR"
- "BuildContainer"
jobs:
- job: "CheckForAppServicePlan"
displayName: "App Service Plan - Check if App Service Plan exists"
steps:
- task: AzureCLI@2
inputs:
azureSubscription: "$(SUBSCRIPTION_NAME)"
addSpnToEnvironment: true
scriptType: "bash"
scriptLocation: "inlineScript"
inlineScript: |
APP_SERVICE_PLAN_ID=$(az appservice plan show --resource-group $APP_NAME-rg --name $APP_NAME-asp --query "id" -o tsv)
if [ -z "$APP_SERVICE_PLAN_ID" ]; then
echo "There is no App Service Plan, we should sort that"
echo "##vso[task.setvariable variable=appServiceExist;isOutput=true]No" # there is no app service plan so we should do stuff
else
echo "There is an App Service Plan, we don't need to do anything else here"
echo "##vso[task.setvariable variable=appServiceExist;isOutput=true]Yes" # nothing to do lets move on
fi
name: "DetermineResult"
displayName: "App Service Plan - Check to see if there App Service Plan exists"
- job: "CreateAppServicePlan"
displayName: "App Service Plan - Setup"
dependsOn:
- "CheckForAppServicePlan"
condition: "eq(dependencies.CheckForAppServicePlan.outputs['DetermineResult.appServiceExist'], 'No')"
steps:
- task: AzureCLI@2
inputs:
azureSubscription: "$(SUBSCRIPTION_NAME)"
addSpnToEnvironment: true
scriptType: "bash"
scriptLocation: "inlineScript"
inlineScript: |
az appservice plan create --resource-group $(APP_NAME)-rg --name $(APP_NAME)-asp --is-linux
displayName: "App Service Plan - Use Azure CLI to setup"
- job: "CreateAppService"
displayName: "Web App - Setup"
dependsOn:
- "CheckForAppServicePlan"
- "CreateAppServicePlan"
condition: "eq(dependencies.CheckForAppServicePlan.outputs['DetermineResult.appServiceExist'], 'No')"
steps:
- task: AzureCLI@2
inputs:
azureSubscription: "$(SUBSCRIPTION_NAME)"
addSpnToEnvironment: true
scriptType: "bash"
scriptLocation: "inlineScript"
inlineScript: |
az webapp create --resource-group $(APP_NAME)-rg --plan $(APP_NAME)-asp --name $(APP_NAME) --deployment-container-image-name $(ACR_NAME).azurecr.io/$(IMAGE_NAME):latest
displayName: "Web App - Use Azure CLI to setup"
- job: "CreateAppServiceSettings"
displayName: "Web App - Configure Settings"
dependsOn:
- "CheckForAppServicePlan"
- "CreateAppServicePlan"
- "CreateAppService"
condition: "eq(dependencies.CheckForAppServicePlan.outputs['DetermineResult.appServiceExist'], 'No')"
steps:
- task: AzureCLI@2
inputs:
azureSubscription: "$(SUBSCRIPTION_NAME)"
addSpnToEnvironment: true
scriptType: "bash"
scriptLocation: "inlineScript"
inlineScript: |
az webapp config appsettings set --resource-group $(APP_NAME)-rg --name $(APP_NAME) --settings $(APP_SETTINGS)
displayName: "Web App - Use Azure CLI to configure the settings"
- job: "CreateAppServiceID"
displayName: "Web App - Configure & Assign Managed Identity"
dependsOn:
- "CheckForAppServicePlan"
- "CreateAppServicePlan"
- "CreateAppService"
- "CreateAppServiceSettings"
condition: "eq(dependencies.CheckForAppServicePlan.outputs['DetermineResult.appServiceExist'], 'No')"
steps:
- task: AzureCLI@2
inputs:
azureSubscription: "$(SUBSCRIPTION_NAME)"
addSpnToEnvironment: true
scriptType: "bash"
scriptLocation: "inlineScript"
inlineScript: |
az webapp identity assign --resource-group $(APP_NAME)-rg --name $(APP_NAME)
displayName: "Web App - Use Azure CLI to assign an identity"
- task: AzureCLI@2
inputs:
azureSubscription: "$(SUBSCRIPTION_NAME)"
addSpnToEnvironment: true
scriptType: "bash"
scriptLocation: "inlineScript"
inlineScript: |
az role assignment create --assignee $(az webapp identity show --resource-group $(APP_NAME)-rg --name $(APP_NAME) --query principalId --output tsv) --scope /subscriptions/$(az account show --query id --output tsv)/resourceGroups/$(APP_NAME)-rg/providers/Microsoft.ContainerRegistry/registries/$(ACR_NAME) --role "AcrPull"
displayName: "Web App - Use Azure CLI to assign an identity"
- job: "EnableCD"
displayName: "Web App - Configure Azure Container Registry connedction and enable continuous deployment"
dependsOn:
- "CheckForAppServicePlan"
- "CreateAppServicePlan"
- "CreateAppService"
- "CreateAppServiceSettings"
- "CreateAppServiceID"
condition: "eq(dependencies.CheckForAppServicePlan.outputs['DetermineResult.appServiceExist'], 'No')"
steps:
- task: AzureCLI@2
inputs:
azureSubscription: "$(SUBSCRIPTION_NAME)"
addSpnToEnvironment: true
scriptType: "bash"
scriptLocation: "inlineScript"
inlineScript: |
az webapp config container set --resource-group $(APP_NAME)-rg --name $(APP_NAME) --docker-custom-image-name $(ACR_NAME).azurecr.io/$(IMAGE_NAME):latest --docker-registry-server-url https://$(ACR_NAME).azurecr.io
displayName: "Web App - Configure the App Serivce to use Azure Container Registry"
- task: AzureCLI@2
inputs:
azureSubscription: "$(SUBSCRIPTION_NAME)"
addSpnToEnvironment: true
scriptType: "bash"
scriptLocation: "inlineScript"
inlineScript: |
az webapp deployment container config --resource-group $(APP_NAME)-rg --name $(APP_NAME) --enable-cd true
displayName: "Web App - Enable continuous deployment whenever the image is updated on the WebApp"
- task: AzureCLI@2
inputs:
azureSubscription: "$(SUBSCRIPTION_NAME)"
addSpnToEnvironment: true
scriptType: "bash"
scriptLocation: "inlineScript"
inlineScript: |
az acr webhook create --name $(ACR_NAME)webhook --registry $(ACR_NAME) --scope $(IMAGE_NAME):latest --actions push --uri $(az webapp deployment container show-cd-url --resource-group $(APP_NAME)-rg --name $(APP_NAME) --query "CI_CD_URL" -o tsv)
displayName: "Azure Container Registry - Add the web hook created in the last task to the Azure Container Registry"
view raw04.yml hosted with ❤ by GitHub

A full copy of the azure-pipelines.yml file can be found in the following repo https://github.com/russmckendrick/docker-python-web-app.


Running the Pipeline

Now that we know what the pipeline looks like this what happened when it executed for the first time, first off, you (or whoever your approver is) will get an email;

The approval email {Source: MediaGlasses}


The full pipeline run {Source: MediaGlasses
A second pipeline run {Source: MediaGlasses}


Free hosting web sites and features -2024

  Interesting  summary about hosting and their offers. I still host my web site https://talash.azurewebsites.net with zero cost on Azure as ...