Summary: Very good article to understand benefits and some pitfalls of adopting cloud infrastructure or shifting to different cloud infrastructure. In this article it was compared native services to amazon AWS. But points are quite generic and useful.
Zoosk Java microservices are hosted on Amazon Elastic Container Service. In Amazon’s words, “Amazon EC2 Container Service (ECS) is a highly scalable, high performance container management service that supports Docker containers and allows you to easily run applications on a managed cluster of Amazon EC2 instances. Amazon ECS eliminates the need for you to install, operate, and scale your own cluster management infrastructure.”
 Sounds very appealing to have them manage one’s container applications with minimal effort. Since we had to migrate our services without a dedicated Ops resource we decided this service would be the best to host our services. Migration of the services to Amazon Elastic Container Service involved changing how we developed, built, and deployed services. All services that were stateful had to be refactored to be stateless to leverage autoscaling, where instances come and go. The migration process involved updating our tech stack to use the latest open source frameworks, deciding what AWS Services fit our use cases, development, coming up with a roll out strategy to prevent user disruptions, and cutting spend in the cloud. As part of the development, we migrated our services from using RabbitMQ to SQS, MySQLto Aurora, Memcached to Elasticache, and Solr to ElasticSearch. Going from nothing to running production services supporting millions of users has shown us the pros and cons of ECS.
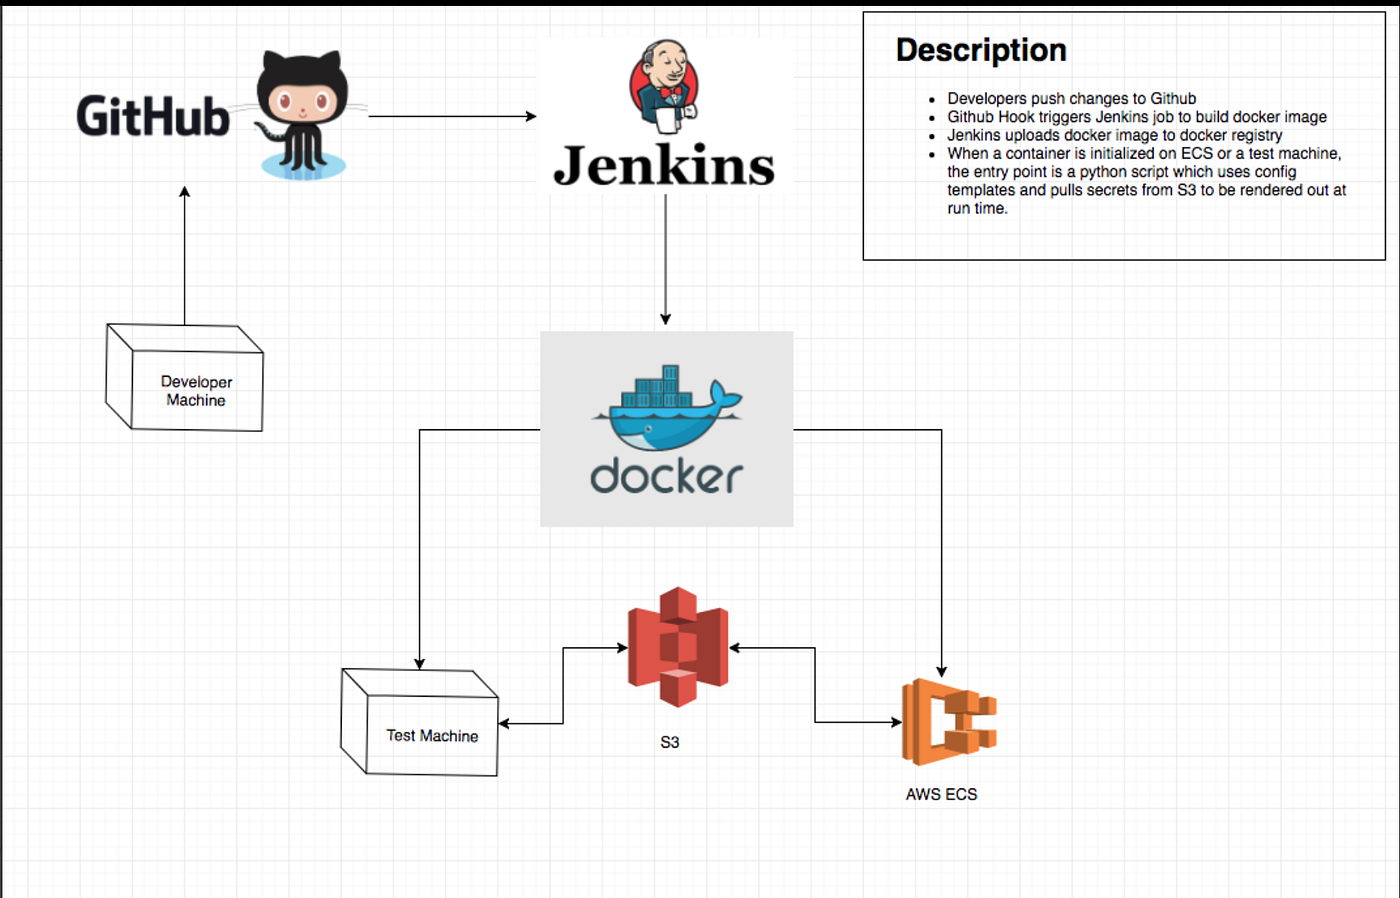
Development process for a service to be deployed to ECS
ECS Topology

The Good
Services only consume what they need — Before we had 12 servers (4 cores, intel xeon E3–1200, 32 gb ram) in our datacenter hosting the Java microservices. Some of the services consumed only 5% of the cpu and memory on the server. Hence the servers were severly underutilized and not cost effective. Migrating to ECS allowed full usage of CPU and memory by placing a service in a cluster of EC2 instances. The ECS scheduler places the service on a EC2 instance with enough CPU and memory to allocate. We reduced the instances needed to three m4.larges because of the ability to place multiple containers until an EC2 instance runs out of resources.
Scales faster than ec2 instances — Generally containers are faster to spin up than EC2 instances off of an AMI. If traffic increases to a threshold defined, ECS will create a new container and add it to the load balancer, with ECS always having enough resources in the cluster to leverage the horizontal scaling benefits. Otherwise there will be extra delay for spinning up an EC2 instance to provide the resources needed.
Orchestration of containers — ECS features handle many use cases necessary for deploying and maintaining container services in a distributed system. There is minimal set up for a private docker registry (ECR), load balancing, scheduling, and creating an orchestration server. This reduces the amount of Ops works needed to get the service up and running.
Autoscaling — During peak traffic, services scale out to handle the load and prevent down time. During off peak hours services scale in instances to save money. With AWS ECS there are two levels of autoscaling one is at the cluster (EC2 instances for providing CPU and memory resources for the cluster) and the other one at the service (docker container instances to handle traffic).
Burstable CPU — An ECS service is allocated CPU and memory from an EC2 instance. A service allocated 1024 cpu units (1024 units = 1 core) on an instance that has 4096 available (quad core) is guaranteed to have one core available for the service at all times. If no other service is using the other three cores on the EC2 instance, the service is able to use all four cores if needed.
No extra cost associated with AWS ECS — Users only pay for the used AWS resources i.e. EC2, Elastic Load balancer, etc.
Zero Downtime deployments — When deploying a new version of a service, ECS will deploy the new version onto the cluster for staging. The load balancer executes a health check to the new containers canary endpoint. If the containers pass the health check with HTTP 200, the load balancer sends traffic to the new containers and drains the old containers for deletion.
The Bad
Might accidentally bring down a service — Autoscaling allows the ability to save money by turning off instances when not in use. However scale in action at the cluster level can bring down instances running tasks. AWS auto-scaling default policies delete instances with the oldest launch configuration or instances closest to the next billing hour. This can cause a service disruption if the instances terminated contained a service and its backups. Scaling in a cluster requires adding scale in protection to the instances running tasks to prevent service disruptions. At Zoosk, we created a python script to protect or unprotect instances that have a running task. Execution of the script happens before any scale in action. Protect, then scale in. When we initially migrated our services, we over provisioned our services to give us a buffer. After running for about a week, we did cost cutting by scaling in our cluster. Since I was an ECS newbie I just thought that ECS was smart enough to not take down instances that had a service running on it. Wrong. I brought down a production service for a minute as ECS brought it back up. Not a good look for my first year at Zoosk. So learn from my mistake!
Deploys could be better — During deployments there is no phase that allows a percentage of traffic through to the new containers and if things look good then commit, else roll back. ECS commits a deploy if the containers pass the health check from the load balancer. It will drain the existing containers before allowing one to check if the new version is stable with the production traffic. To rollback in ECS one must deploy the old task definition (containers). This increases the downtime of the service compared to flipping the traffic back to the old containers. Hence creating a canary endpoint for services is crucial for ECS because this is the gatekeeper of committing a deploy. ECS has no way of stopping a deploy unless you set a deploy action of the same task definition.
Sitting idle EC2 instance — EC2 instances in the cluster might sit there with no tasks running but are needed to provide resources for scaling out when the time comes. Zero downtime deploys will not execute if you do not have at least twice as much CPU and memory for the deployed service available in the cluster.
Outdated ECS docs — Cloudformation templates AWS has around ECS create resources that are not configured properly such as cloudwatch alarms for ECS. I was a newbie at Cloudformation and the template contained unnamed resources. Resources created in the Cloudformation stack will have a hash appended to the name. Scripting for resources can be difficult if the name changes for deploys with Cloudformation. If a cluster needs to be renamed to remove the hash it requires the entire cluster to be deleted and remade. So remember to name the resources.
Stateless applications only — Services developed for ECS have to be stateless due to scale-in and scale-out possibilities. During deploys ECS brings a new set of containers and gets rid of the old thus the state of your past version is gone.
The Learnings / Gotcha’s
Warm the load balancer — The AWS Elastic Load Balancer has limitations where the load balancer needs to gradually increase the request rate to allow time to scale, otherwise requests will be dropped. If you are sending all the traffic immediately you will need to contact AWS to “pre-warm” the load balancer or run a load test to warm it up. We faced this issue were we tried to send 400k requests per minute to a fresh load balancer and the load balancer would drop requests causing a downtime with our service. The workaround was that, before sending the traffic, we ran a load test to warm up the load balancer.
Autoscaling — Implementing autoscaling correctly involves getting rid of the peaks and falls of CPU usage by reducing and increasing CPU resources for a service. For a majority of our services we aimed to have a CPU usage range of 50–70%. Thus we set the scale in trigger at 50% and scale out trigger at 70%. We set a Cloudwatch alert to be triggered if the CPU reached 85% for longer than 5 minutes.
Metrics discrepancies — Two ways of monitoring the CPU and memory of the services is running Docker stats inside the EC2 and Cloudwatch for an aggregate of usage across all containers of the service. While testing one instance of a service I noticed discrepancies on how much CPU and memory was being utilized. Docker reported higher numbers and I assumed since it was the container platform it was correct. However when running the htop command on the EC2 instance the cpu usage coincided with the reportings in Cloudwatch. Trust Cloudwatch.
Memory allocations matters — If a service consumes more than the allocated memory the container will die. I wasted a lot of time wondering why the docker container kept dying and found out it went over the memory allocated in ECS. In Java, if you allocated lots of memory to the JVM, garbage collection would be triggered less often and the service would consume more memory. We found that our services were consuming a lot of memory when they did not have to. This wasted resources on ECS, which meant wasted money. Always profile (VisualVM is great) and load test (JMeter) to get a clear idea of how much memory the service needs.
Saving logs brought down a service — Send logs and metrics to a central location for analyzing, alerting, and monitoring. Cloudwatch is a great option for that. Set up access logs for ELB for auditing and storage in S3. There was an issue at Zoosk where services would stop working because there wasn’t any more disk space in the docker container. Services wrote their application and access logs locally. Docker disk space by default allocates only 10gb. By shipping logs and metrics to external services prevention of a service going down due to full disk space is gone.
Docker SHA — Deploying with SHA of docker is mandatory in production because using tags does not guarantee that the same version will be deployed (because if a developer pushes their changes with that tag it will overwrite the previous version). If you need to rollback, there is no way to do that with a tag. Docker SHA is a unique identifier of a version of a container. Using the SHA will allow audibility because tags can be overwritten in a docker registry but SHA’s can’t.
For Java developers — Because AWS resources use DNS name entries that occasionally change, we recommend that you configure your JVM with a TTL value of no more than 60 seconds. This ensures that when a resource’s IP address changes, your application will be able to receive and use the resource’s new IP address by requerying the DNS.
Conclusion
AWS ECS is an excellent option for hosting container services in the cloud. A developer can easily deploy and maintain services on ECS with minimal Ops work needed. ECS reduces the troubles of having to manage your own container orchestration platform at zero cost. Of course we wish that the deployment process could be improved and there are many features I would like to see in the product. But, overall, we are happy about how ECS has been able to serve our millions of users the features that they love.