Saturday, January 6, 2024

Microsoft Copilot for Azure

A practical hands-on experience.

What’s the buzz all about ? Many in the industry see it as a game changer. I will share my experience with Copilot for Azure today (not to be confused with other Copilots, such as GitHub Copilot, Windows Copilot, Dynamics 365 Copilot, Microsoft 365 Copilot etc.).

At the time of writing this article, Microsoft Copilot for Azure is in public preview phase. This morning, I received a much awaited email stating : Welcome to the limited public preview of Microsoft Copilot for Azure! Congratulations! It seemed, I was the chosen one. No pun intended, I was. After all, it holds a promise to bring a paradigm shift in simplifying cloud operations. A promise which is close to my heart: pretty much the new way of working.

It also validates my own prediction on Horizon5 (H5) in my article Next Quarter Century of GenAI. H5 is about Executable AI evolution from Generative AI.

I will divide this article into two sections, Theory and Practical hands-on.

Section 1: Theory

On November 15th 2023, Microsoft announced Microsoft Copilot for Azure, an AI companion, that helps you design, operate, optimize, and troubleshoot your cloud infrastructure and services. Combining the power of cutting-edge large language models (LLMs) with the Azure Resource Model, Copilot for Azure enables rich understanding and management of everything that’s happening in Azure, from the cloud to the edge.

Azure users can gain new insights into their workloads, unlock untapped Azure functionality and orchestrate tasks across both cloud and edge. It leverages Large Language Models (LLMs), the Azure control plane and insights about a user’s Azure and Arc-enabled assets. All of this is carried out within the framework of Azure’s steadfast commitment to safeguarding the customer’s data security and privacy.

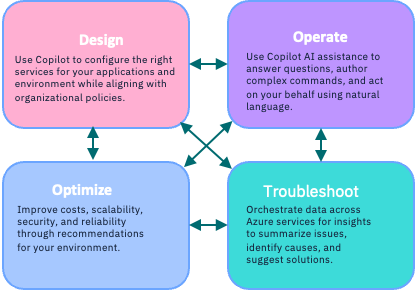
Let me provide a summary.
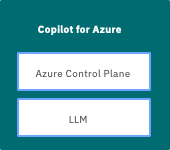
Fig. 1
  • Leverages large language model (LLM) and Azure control plane
  • Answers questions about your Azure managed environment
  • Generates queries for your Azure managed environment
  • Performs tasks and safely acts on your behalf for your managed environment
  • Makes high-quality recommendations and takes actions within your organization’s policy and privacy

So, with this, you can understand your Azure environment, work smarter with your Azure services, write and optimize code for your applications on Azure.

Section 2: Practical hands-on

I logged into Azure console. Copilot icon appeared at the top bar for me to happily click on it (and I did just that). It is provided as a sidebar on the portal itself, so as you navigate the portal services, Copilot stays with you and understands the context from your browsing as well.
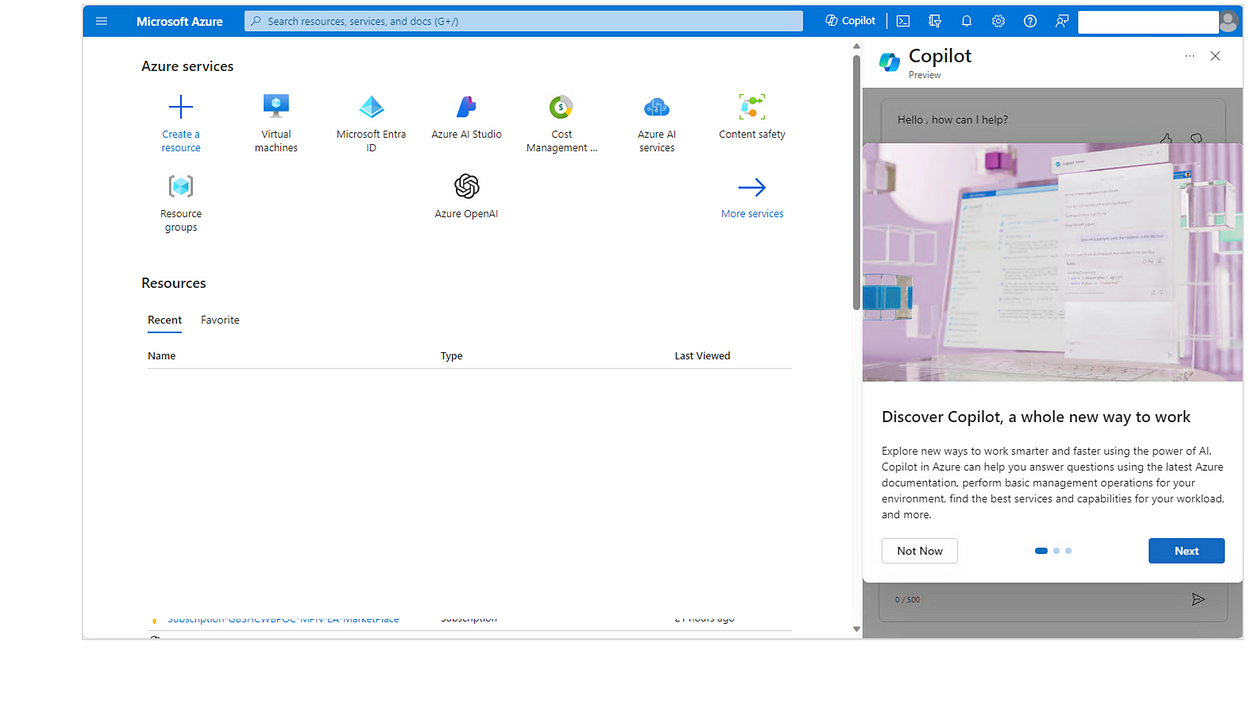
Fig. 2

To start with, I asked how many resources are running (for me). It replied accurately right there — 184 resources.

Further, I asked Copilot to list all VMs that are not running now as shown in Fig. 3. It understood the context within my resources in the subscription (tenant id).
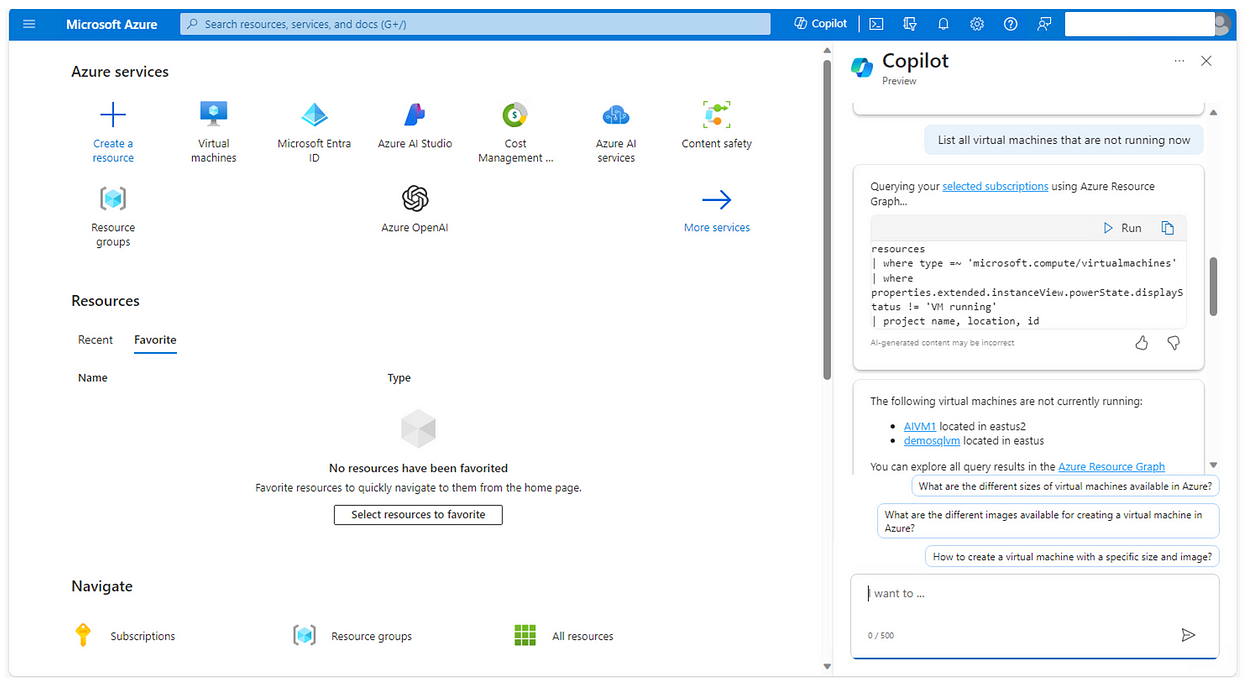
Fig. 3

Next, I asked which resources were created in the last 24 hours and it showed up those as shown in Fig. 4.
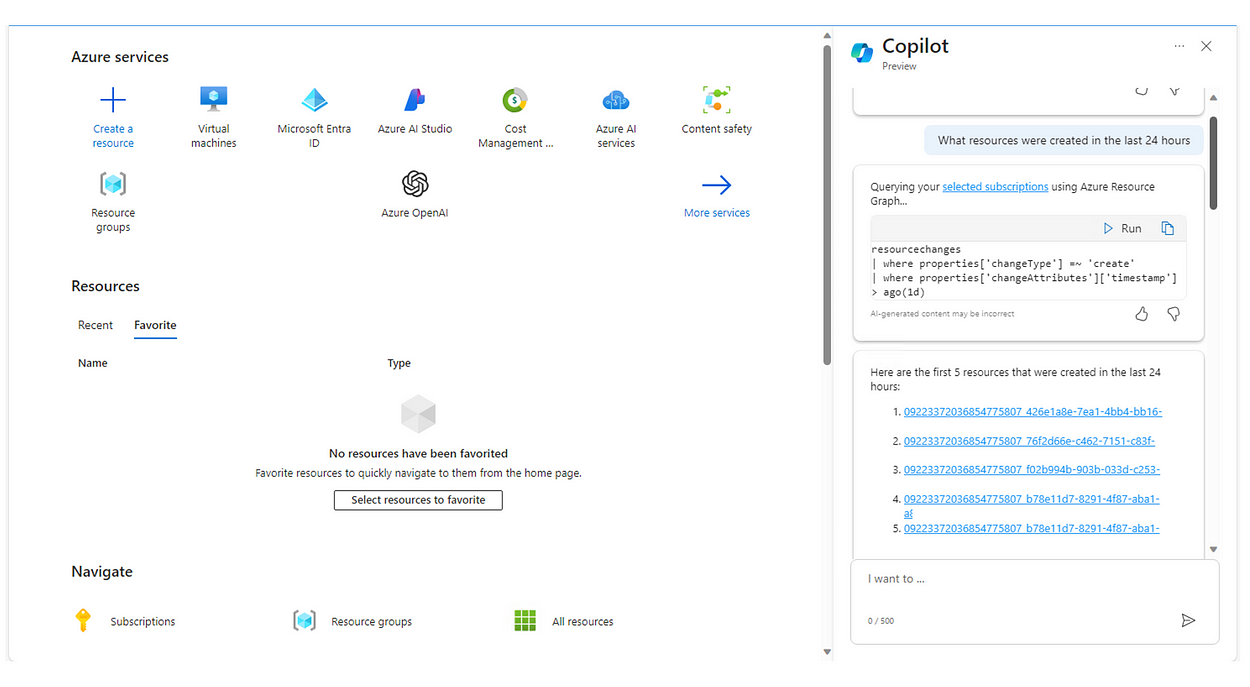
Fig. 4

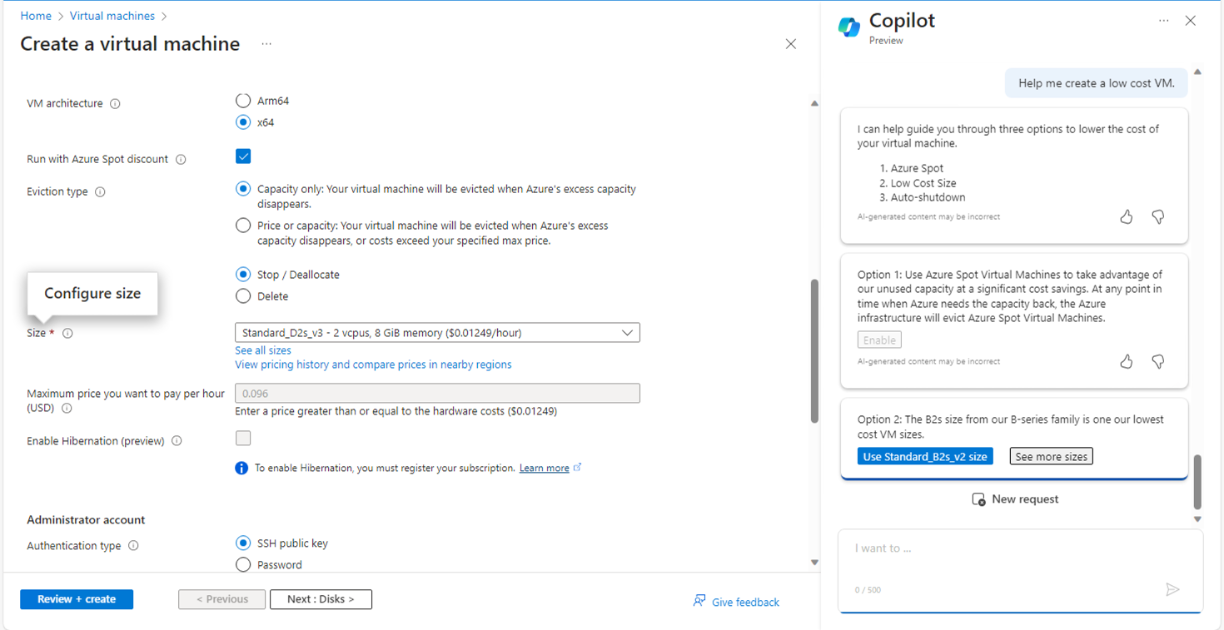
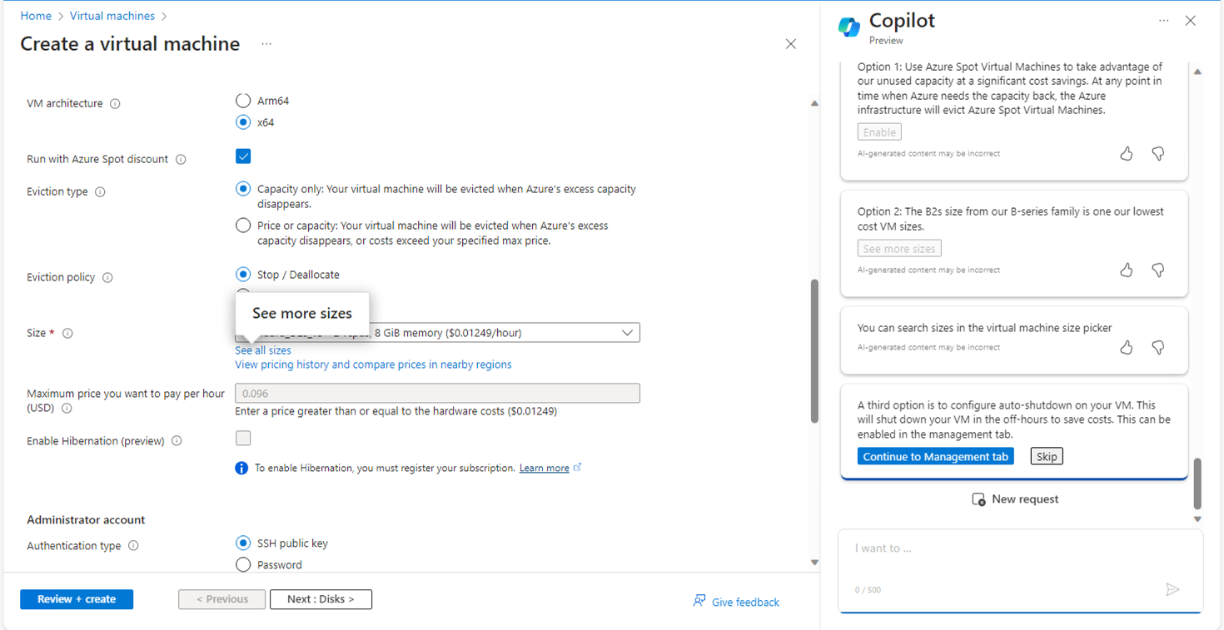
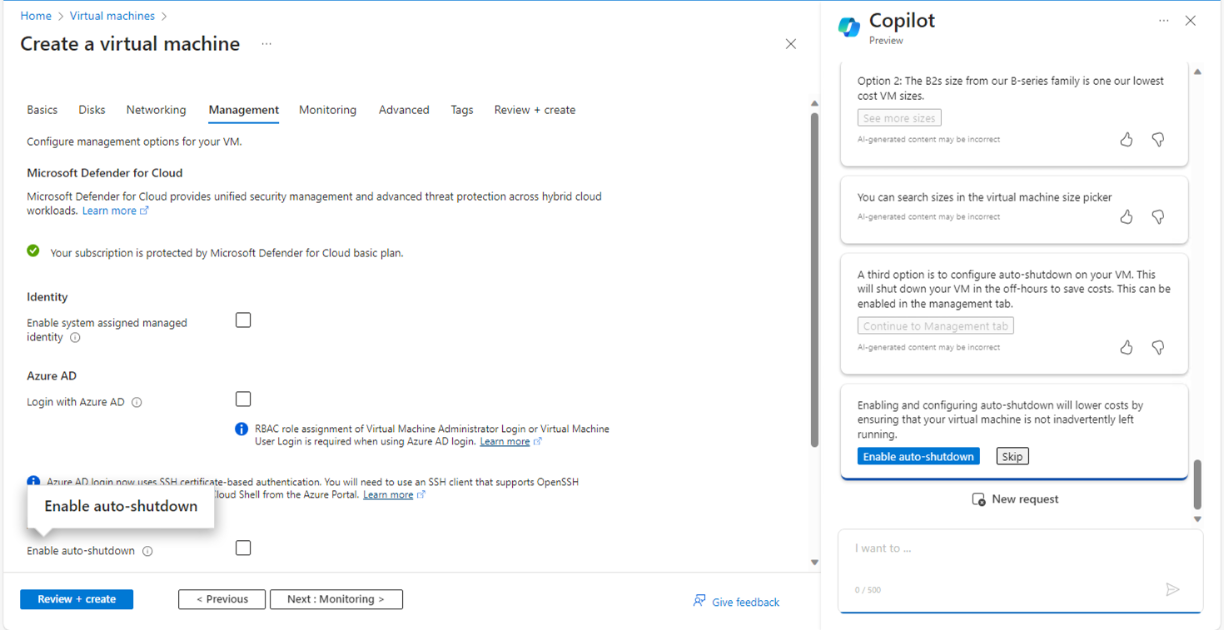
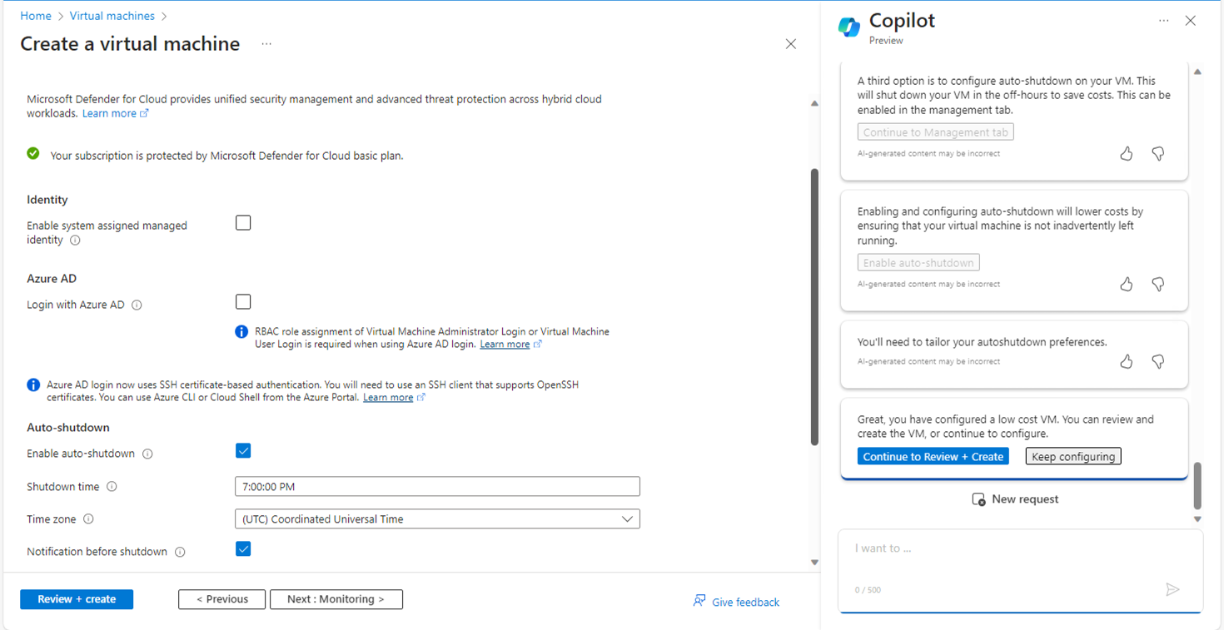
Next steps are quite more interesting. It was a real augmented experience. Copilot (digital worker) and I (human worker) worked together. I asked to help me create a low cost VM and it executed required steps one by one for the given context and gave me options to enable or skip those features. From Fig 5, to Fig 11 it executed all required steps, allowed me to check the right options and so on.
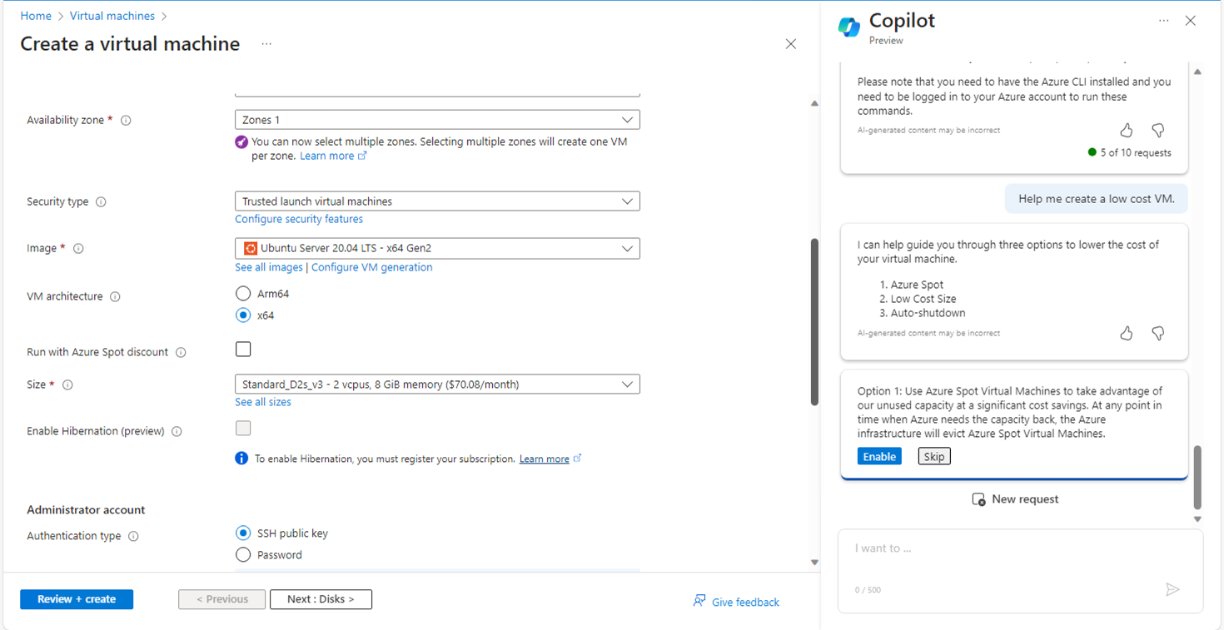
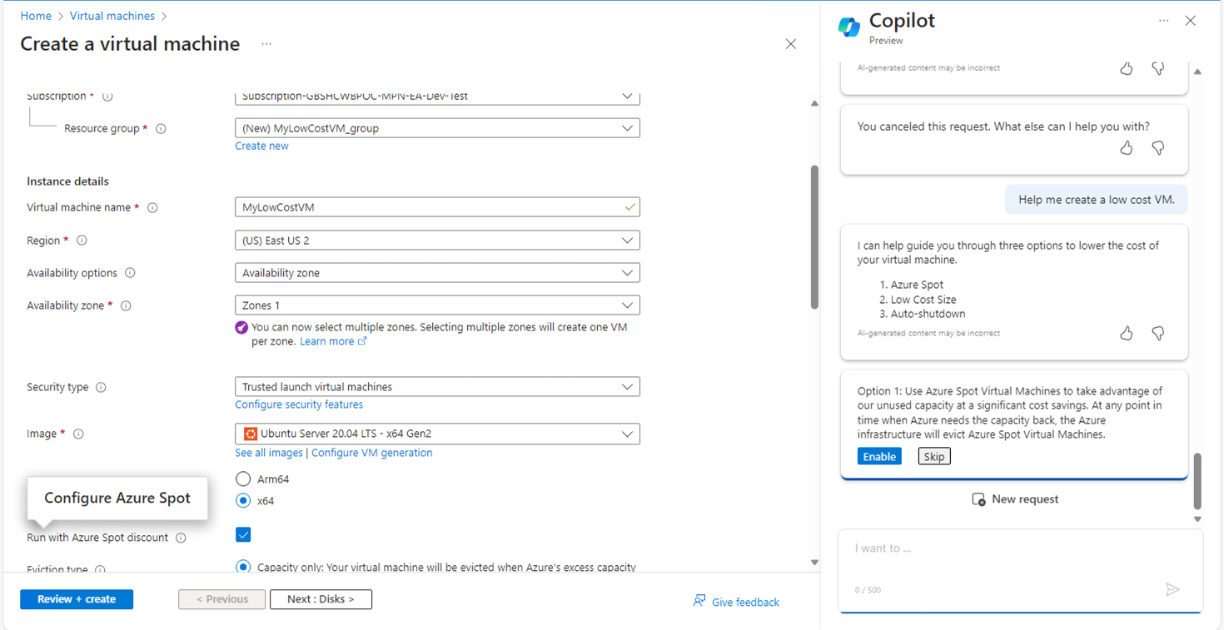
Fig. 5
Fig. 6
Fig. 7
Fig. 8
Fig. 9
Fig. 10

And here, we came to the step of final creation of VM as shown in Fig. 11.
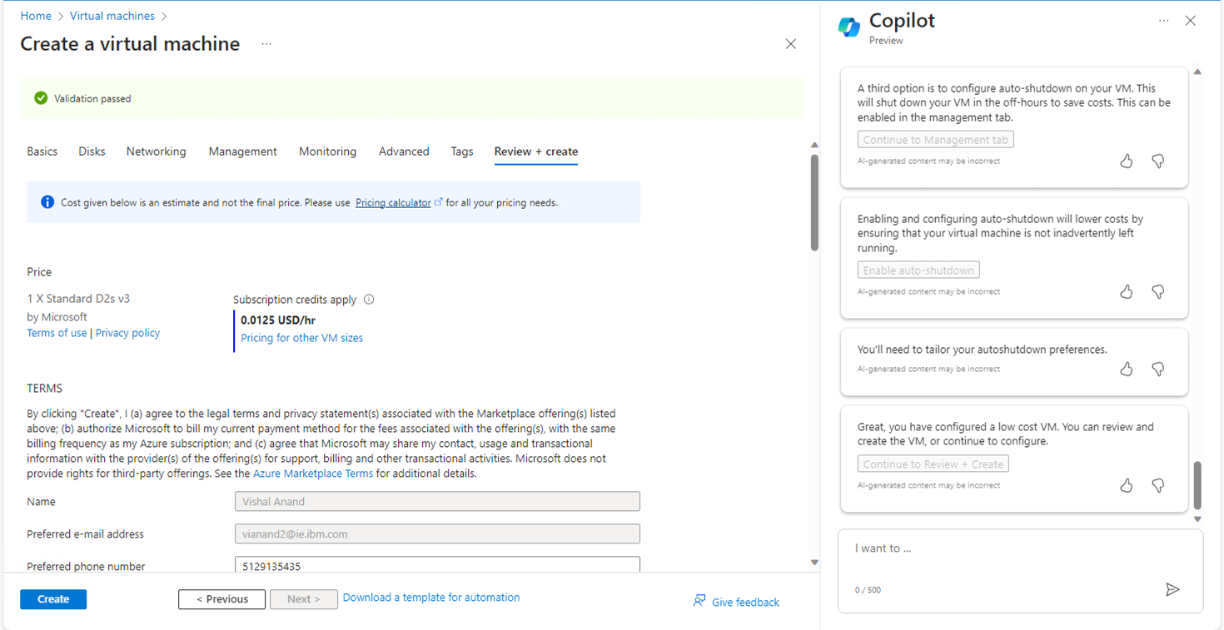
Fig. 11

In the next step, I wanted Copilot to open the ARO cluster service section. It opened it up in my second attempt as show in Fig. 12.
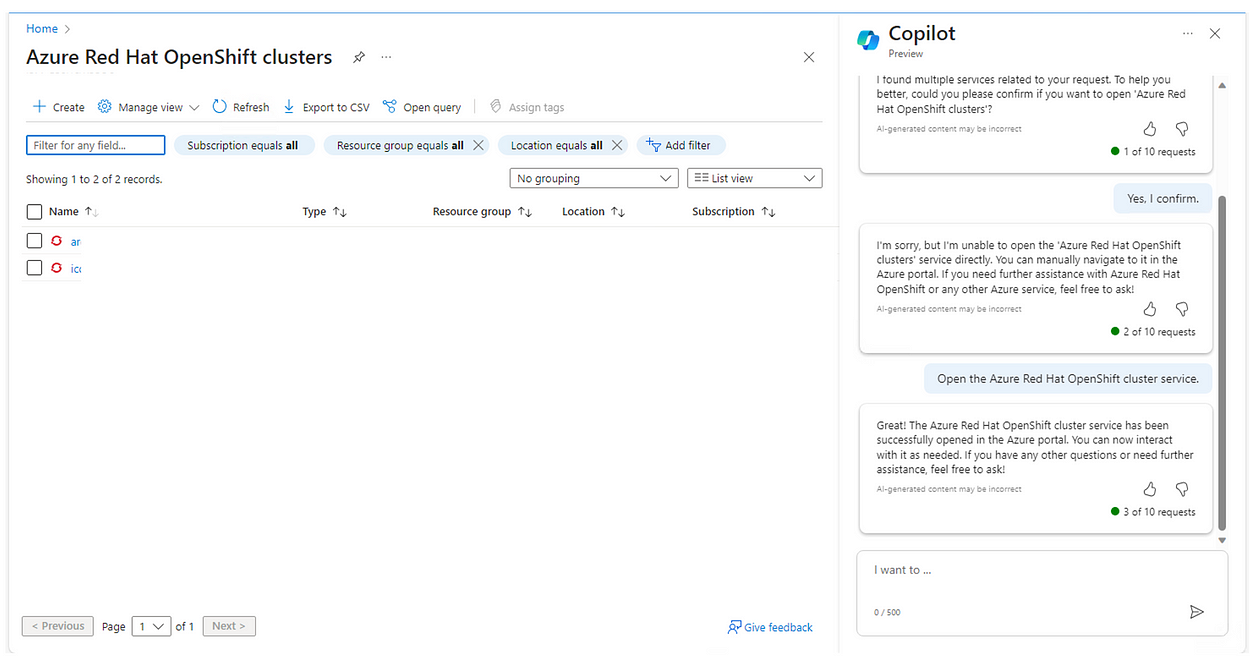
Fig. 12

Further, I asked Copilot to create a cluster. Here it gave me the required commands and steps with Run option. When I clicked on Run, it opened the command shell expecting me to run the commands as shown in Fig. 13.
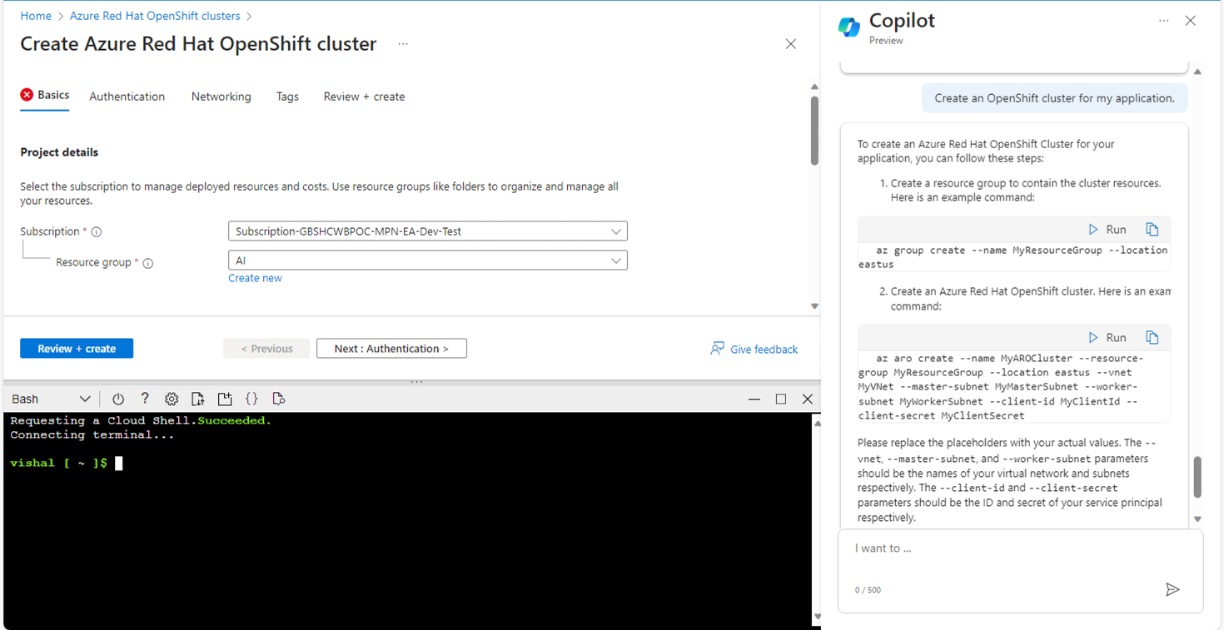
Fig. 13

Then, I wanted to validate if there any security weakness related to a storage account (in test environment, of course).

It asked me if I would like Copilot to run security checks. I clicked on Yes, and it ran the security checks for the particular storage account and listed those weaknesses straight away as shown in Fig. 14.
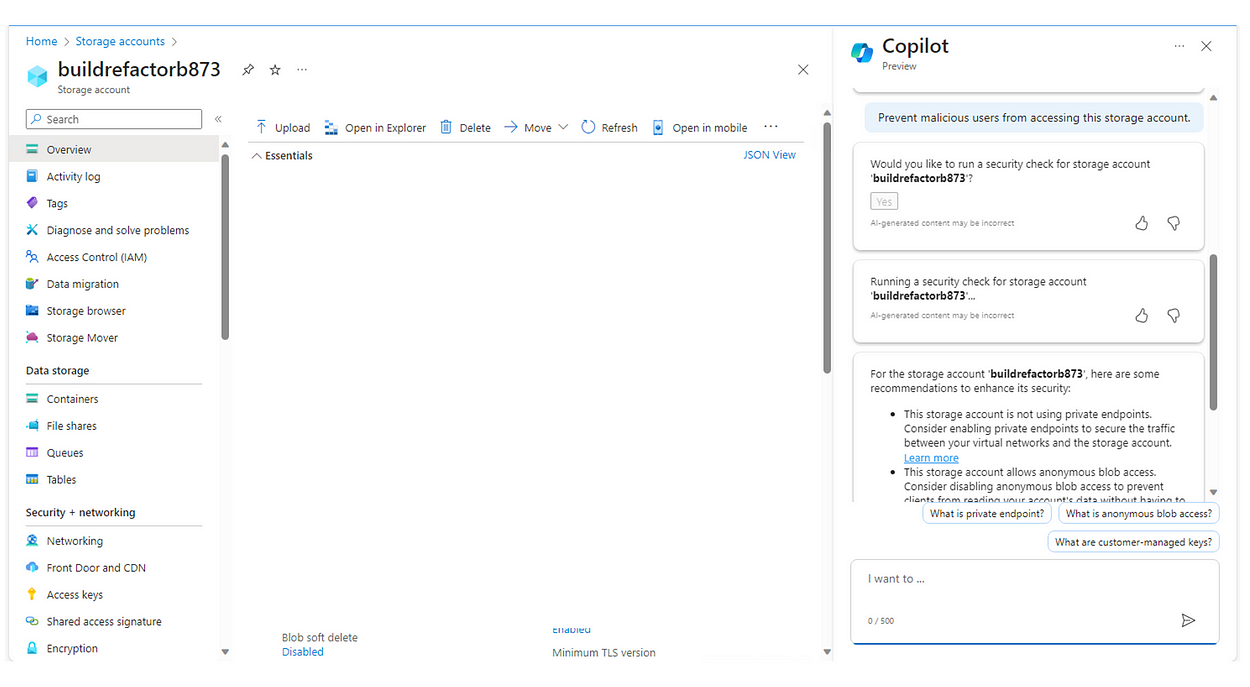
Fig. 14

Here, I wanted to find out the Service Health of all resources that belong to my tenant. As you see below in Fig. 15, I input specific prompts realted to outage, impact, health events etc. It reported the correct status on those.
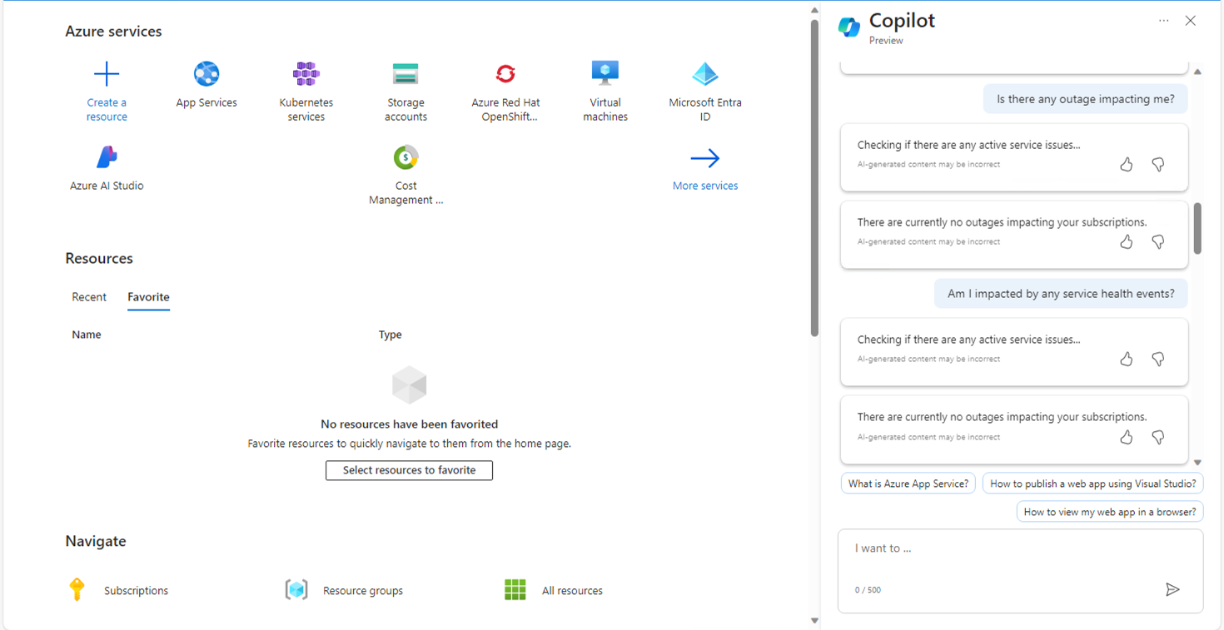
Fig. 15

In Fig.16, I learned that it did not provide any cost insights, forecast, trend etc. at the moment whereas It should have, as per the theory. I will retry. I am also sure a lot many features will be added over time. I would like to ask about any sudden cost spike with any resource during the week (will do tomorrow).
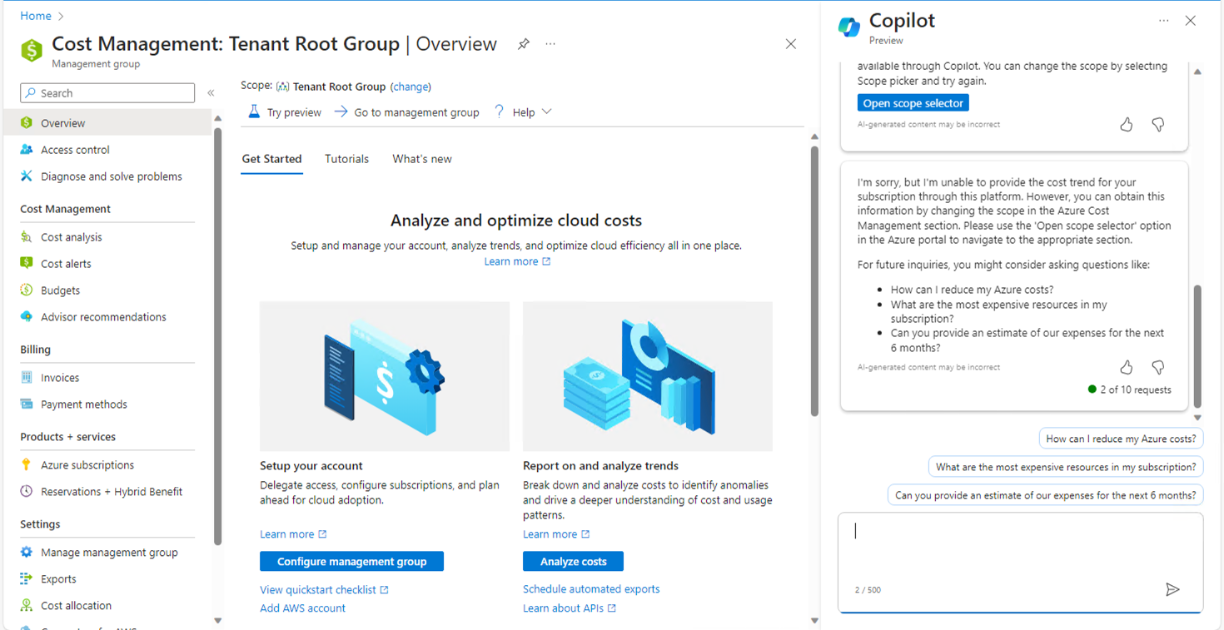
Fig. 16

Finally, it seems I ran out of the limit for my conversations with Copilot for the day as shown below.
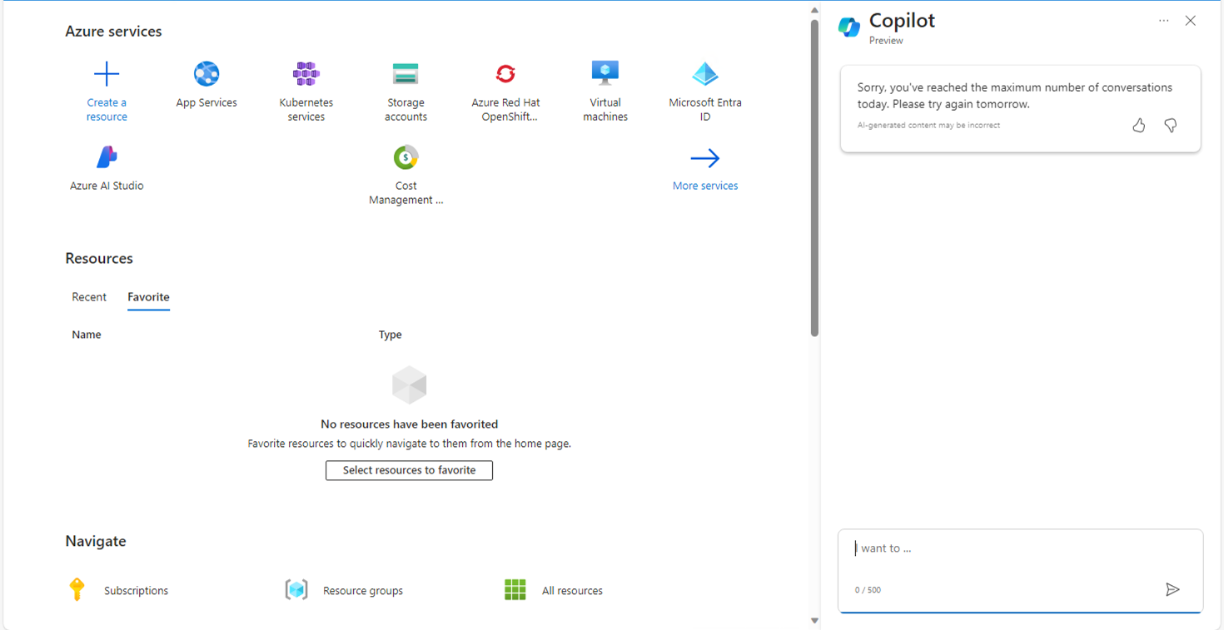
Fig. 17

In fact, the email I received did state ‘Microsoft Copilot for Azure is experiencing an overwhelming demand from Microsoft customers. As a result, we have implemented conversation and turn limits to ensure that we maintain sufficient capacity to all customers enabled with this feature.’

So, I will talk to my Copilot for My Azure Resources tomorrow evening.

Conclusion:

  • Overall, it does demonstrate a promise of AI-augmented cloud operations.
  • In public preview phase, it allows to execute a lot in terms of insights, service health, deployments, recommendations, steps, commands etc.
  • It performs output completions within the admin’s/user’s subscription or tenant id (rightly so).
  • Era has arrived where Human worker and Digital worker can collaborate in real-time to add value to cloud operations.
  • It is currently not recommended for production workloads (obviously it is in preview phase). So, we will have to wait (can we?) for its General Availability.

Disclaimer: Personal views, personal hands-on, personal understanding.

Please provide feedback and claps (if you like it). Knowledge shared is knowledge earned, so please share the article with like minded readers.

Thank you as always,

Sunday, April 2, 2023

Schedule Azure Automation Runbook with Terraform and Powershell


Source: Data Semantics

Azure Automation is a service in Azure that allows you to automate processes from within Azure.

An automation account manages several other resources in order to achieve this. I’d be going over these features in this article and how you can use them to automate a simple task.

You are managing a software that collects log files constantly. To save storage costs, you have to be cleaning the storage container regularly, let’s say once every week. How can you automate this in azure?

Everything I’d be showing can be done via the azure portal but we would instead be using Terraform.

As always with azure, first create your resource group where all related resources will reside, followed by the automation account.

I will explain the SystemAssigned Identity bit next:

We used the System Assigned Identity access above. Some older automation accounts use Service Principles, but this brings up issues such as:

  • Having to renew certificates every year to maintain access.
  • The service principle is given access to the entire subscription, whereas a managed identity can simply be given access to only what it needs.

And more…

Using managed identites to access automation accounts is a newer and very useful feature. We can either use user-assigned managed identities or system-assigned managed identities.

In this case, a system-assigned identity suffices, since we are not using it for any other resources apart from this automation account, so it will be created while deploying the automation account (in the Terraform script above).

Now all we need to do is assign it the required role, using Terraform. Here, I will simply be giving it access to the whole resource group, which is where I’d be placing all the resources involved in the task:

Note: In order for the runbook to access the storage account that contains the logging, it must also be in this resource group logging .

We need to first create this resource using Terraform, so Terraform can manage it along with others.

You would create a folder named files in the same directory your Terraform files exist, and then create the script LogCleaning.ps1 inside it.

This is what your PowerShell Workflow script would look like:

This is a very simple script, you could add extras such as a try-catch block or a way to keep a few log files. You can be as creative as you’d like!

You would notice the StorageCredentialsName in the runbook. This is used to access the storage account where the logs live. We can get these credentials using the Terraform block below.

Assuming we have already created a storage account to store these files in another Terraform block named log_storage

This is what determines how often the runbook executes. The

You would also notice the Params dictionary in the runbook. There are many ways to pass input parameters to the runbook, but I will be passing it through the schedule in this example since we already require one.

We create a schedule first and then link it to the runbook using a job schedule.

We’re again assumming a storage account was earlier created named log_container

We also need to first get your subscription ID using the snippet below:

Now we will proceed as follows:

And now you just need to run your terraform plan followed by terraform apply and you’d have your logs cleaned up every week without you doing a thing!

Saturday, July 23, 2022

Deploying Azure Automation Account and Runbooks via Terraform


Azure Automation Accounts leverage Azure Runbooks to automate processes within organizations’ Azure tenants. This process can be very powerful and help organizations effectively manage, scan, and update their environments. This post is not about Azure Automation Accounts or Azure Runbooks but rather the process by which to deploy these Accounts and their associated scripts via Terraform.

If unfamiliar, Terraform is an open-source Infrastructure as code provider. One of it’s biggest selling points is that it can be used for deploying to a plethora of providers. Since we are dealing with Azure we will be using the Azure provider. We will also assume that you are already familiar with how to deploy Terraform to Azure. If you are not here is the Terraform walkthrough for Azure.

The first step in the deployment will be creating the Azure Automation Runbook. This is done via the azurerm_automation_account resource like below:

resource "azurerm_automation_account" "aa_demo" {
  name                = 'aademo'
  location            = azurerm_resource_group.rg_automation_account.location
  resource_group_name = azurerm_resource_group.rg_automation_account.name

  sku_name = "Basic"

}

This automation account is referencing a resource group that will also be created as part of the Terraform file. Automation Accounts like any other Azure resource requires a Resource Group. The Resource Group is setup like:

resource "azurerm_resource_group" "rg_automation_account" {
  name     = 'rg-aatest-dev-eus
  location = "east us"

}

Unfortunately, the ability to create the Automation Account as a “RunAsAccount” cannot be configured at this this via Terraform. RunAsAccount is similar to a Managed Identity in Azure, aka the script will run as the resource…..thus RunAsAccount. That being said there is a github issue that outlines the steps that one could work around this. However; for initial setup it might be easier to create the Automation Account and toggle the Run. This located after the Automation Account has been created by going to “Run as Accounts”-> Create

So at this point the Terraform file will create the Resource Group and the Azure Automation Account. However, we still need to create the Runbook and upload the code that will be ran under it.

I have found the easiest way to do this is to store the script to be ran in the same project as the Terraform file. In this case we have the script in runbooks\poweshell\demo.ps1

This script will need to be imported into the Terraform file as a data reference of type local file. A block like this should do the trick:

data "local_file" "demo_ps1" {
  filename = "../runbooks/powershell/demo.ps1"
}

Once we do this Terraform is aware of the existence of the demo.ps1 file. This is important as we will pass this reference to the Runbook.

To create the Runbook we will leverage the azure_automation_runbook resource.

resource "azurerm_automation_runbook" "demo_rb" {
  name                    = "Demo-Runbook"
  location                = azurerm_resource_group.rg_automation_account.location
  resource_group_name     = azurerm_resource_group.rg_automation_account.name
  automation_account_name = azurerm_automation_account.aa_demo.name
  log_verbose             = "true"
  log_progress            = "true"
  description             = "This Run Book is a demo"
  runbook_type            = "PowerShell"
  content                 = data.local_file.demo_ps1.content
}

The content argument is key as that will pass the script that was referenced earlier and upload it’s contents as part of the deployment.

So now that the Automation Account has been created and the Runbook the demo.ps1 file can be executed in Azure. However; the need may still arise to schedule the execution of the demo.ps1 script. To do this we can leverage the azurerm_automation_job_schedule resource with first a schedule defined via azurerm_automation_schedule.

First the schedule:

resource "azurerm_automation_schedule" "sunday" {
  name                    = "EverySundayEST"
  resource_group_name     = azurerm_resource_group.rg_automation_account.name
  automation_account_name = azurerm_automation_account.aa_demo.name
  frequency               = "Week"
  interval                = 1
  timezone                = "America/New_York"
  description             = "Run every Sunday"
  week_days               = ["Sunday"]
}

This schedule is agnostic of the current Runbook and can be reused multiple times.

Next is the Terraform that links the Runbook and the schedule together:

resource "azurerm_automation_job_schedule" "demo_sched" {
  resource_group_name     = azurerm_resource_group.rg_automation_account.name
  automation_account_name = azurerm_automation_account.aa_demo.name
  schedule_name           = azurerm_automation_schedule.sunday.name
  runbook_name            = azurerm_automation_runbook.demo_rb.name
  depends_on = [azurerm_automation_schedule.sunday]
}

Now normally with Terraform the depends_on does not need to be declared as it should recognize that the sunday schedule is being reference and thus infer the demo_sched won’t run until the sunday schedule is created. However, at the time of this blog post there is an open bug on this issue. Thus, the workout is the explicitly call out the dependency.

After this everything is all done! Congratulations you should now be able to deploy an Azure Automation Account, Azure Runbooks, Schedules, and associated scripts via Terraform!

Friday, July 22, 2022

Automating Cloud Infrastructure Management for AWS Projects with Terraform


Automating infrastructure management helps to enhance control over a product’s environment, optimize resource use, and reduce spending on cloud infrastructure maintenance. With the right tool in place, you can describe infrastructure in code: create it once and simply copy it to new applications, making only a few changes.

In this article, we compare three tools that manage infrastructure as code: AWS Cloud Development Kit (CDK), AWS CloudFormation, and Terraform. We also show how to create and automate the management of cloud infrastructure in a way that we can later use on other projects.

This article will be useful for cloud infrastructure management and DevOps teams looking for a way to optimize their work as well as for those who want to learn how to use Terraform to automate infrastructure configuration.

Contents:

Why manage infrastructure as code?

3 tools for managing AWS infrastructure as code

Configuring infrastructure for an AWS project with Terraform and Terragrunt

Conclusion

Why manage infrastructure as code?

IT infrastructure management oversees the performance of infrastructure elements needed for software to deliver business value. These elements include physical equipment like endpoints, servers, and data storage as well as virtual elements like network and app configurations, interfaces, and policies.

Usually, DevOps engineers are in charge of IT infrastructure. They need to keep it flexible, easily scalable, secure, and controllable. To achieve these goals, DevOps engineers containerize applications, deploying and managing them with tools like Docker.

Containerization allows for running an application in a manageable cluster without the need to manually configure the application and follow documentation step by step. Instead, engineers can use a Dockerfile to record changes and transfer code from one environment to another.

A containerized application can be deployed on a physical server, virtual machine, or cloud service. A cloud service is the most convenient option, since it comes with much more benefits than downsides:

Pros and cons of deploying apps in the cloud

Once an application is deployed in the cloud, DevOps engineers can start working on its infrastructure. Of course, they can do it manually, but that’s a bad development practice. Automating infrastructure management processes, on the other hand, helps you to experience the following benefits:

6 reasons to automate infrastructure management

The infrastructure as code (IaC) approach allows DevOps engineers to simplify and automate the creation, management, and monitoring of software infrastructure. With IaC, DevOps engineers can describe infrastructure elements, required policies, and resources in machine-readable configuration files. These files allow engineers to streamline resource management, copy infrastructure from one project to another, and share project knowledge.

The key downside of using IaC is the risk of duplicating errors from the initial project infrastructure when reusing it. That’s why creating configuration files requires a great deal of planning and expertise working with IaC tools. And it all starts with choosing the right tool.

Related services

Cloud Infrastructure Management Services

3 tools for managing AWS infrastructure as code

In this article, we’ll talk about managing AWS-based infrastructure and some of the tools you can use for this purpose. Particularly, we’ll go over:

3 tools for AWS infrastructure management

AWS Cloud Development Kit, or CDK, is an open-source software development platform that allows you to specify resources for cloud applications. It ensures flexible management of containerized applications. It also allows DevOps engineers to write infrastructure code in JavaScript, TypeScript, Python, C#, Java, .NET, and Go.

On the downside, AWS CDK requires perfect knowledge of programming languages to be able to configure infrastructure properly. That creates an additional challenge for DevOps engineers, who usually don’t need a deep knowledge of programming languages.

AWS CloudFormation is an infrastructure as code solution that provides you with a simple way to model AWS and third-party resources, allocate infrastructure resources within minutes, and manage them during the whole lifecycle. The key benefit of AWS CloudFormation is its support of YAML configuration files. They help to easily organize infrastructure code.

The key downsides of AWS CloudFormation are that it only supports AWS cloud services and requires learning a specific syntax.

Terraform is an open-source tool that allows you to define and submit cloud infrastructure using the HashiCorp configuration language or JSON. Both have convenient and easy-to-understand syntax.

The key benefit of implementing cloud automation using Terraform is support for all major cloud computing services: AWS, Google Cloud Platform, Microsoft Azure, and DigitalOcean. Terraform also supports the Kubernetes API. Plus, it has detailed documentation and many ready-to-use modules.

For a better experience, use Terraform with Terragrunt — a wrapper that provides you with additional tools to store infrastructure configurations and allows you to use modules.

With these advantages, Terraform appears to be the most convenient choice to automate the management of cloud infrastructure. This tool is more versatile than AWS CDK or AWS CloudFormation, as it allows you to work with various cloud services and use ready-made modules. That’s why in our own cloud infrastructure management activities, we mostly rely on Terraform.

With that in mind, let’s see how to use Terraform to automate AWS cloud infrastructure configuration and management.

Configuring infrastructure for an AWS project with Terraform and Terragrunt

Configuring project infrastructure as code allows us to upload it to the repository that we’ll later use to deploy the application. Terragrunt stores temporary files and sensitive data in the cloud so we can access them from various machines and don’t have to upload them to Git.

Here’s how Terraform can automate AWS cloud infrastructure:

Configuring application infrastructure in Terraform

But first, we need to create the elements of our environment. To do it, let’s create the following files and folders at the root of our repository:

1. The terragrunt.hcl file contains most of the Terragrunt configuration information: the region, DynamoDB table for temporary variables, and bucket for status file storage.

Status files are Terraform’s artifacts that store data on created resources. At each launch, Terraform compares the current project infrastructure with the corresponding status file, applies changes, and edits this file.

terragrunt.hcl contents

Figure 1. terragrunt.hcl contents

2. The tfvars file is for creating basic variables applicable to all environments. For example, these can be SSH administrator keys.

common.tfvars contents

Figure 2. common.tfvars contents

3. The modules folder contains all the modules you use. With Terragrunt, you can use one module multiple times in different projects. You can also add third-party modules by adding a link to the corresponding repository or module branch.

ACM module that creates SSL certificates

Figure 3. ACM module that creates SSL certificates

4. The environments/qa folder contains HCL configurations for the QA environment. For example, with the following code, we can call the ACM module that creates project certificates:

Calling the ACM module

Figure 4. Calling the ACM module

5. The environments/qa/terraform.tfvars file is for all parameters that depend on the environment.

The contents of the environments/qa/terraform.tfvars file

Figure 5. The contents of the environments/qa/terraform.tfvars file

As soon as the infrastructure code is ready, we can apply it to any AWS account without the need for additional manual activities and get a consistent result:

Executing infrastructure code

Figure 6. Executing infrastructure code

After we get this result, we can start automating infrastructure deployments in the cloud no matter which cloud services our projects use.

Downsides of managing infrastructure with Terraform

Keep in mind that there are several limitations in managing cloud infrastructure using Terraform that we’ve discovered when using it in our projects:

  • Complex configuration change management. When Terraform is actively used by several engineering teams, changing the project infrastructure with this tool may take more time than doing it manually. Any change in the configuration has to be committed to HCL files, tested, and implemented.
  • Complex permission management. To be able to work with Terraform, DevOps engineers need an account with elevated access rights. It may be complicated to divide project infrastructure into several parts and configure access rights for DevOps engineers correctly and securely.
  • Out-of-time deployment of product-specific features. Terraform developers often deliver features for AWS CloudFormation and other products later than you may expect.

Related services

Cloud Computing & Virtualization Development

Conclusion

Automating cloud infrastructure management can greatly reduce the amount of time and effort DevOps engineers put into configuring the infrastructure of cloud-based projects. With the right tools and approach, you can configure infrastructure once and then reuse it in other projects, making only the necessary changes.

In this article, we showed you how to automate infrastructure deployments in the cloud with Terraform. But the skills of our DevOps and cloud infrastructure management engineers go far beyond that. Feel free to reach out if you need to leverage our expertise in your project!It was originally published on https://www.apriorit.com/

It was originally published on https://www.apriorit.com/

Free hosting web sites and features -2024

  Interesting  summary about hosting and their offers. I still host my web site https://talash.azurewebsites.net with zero cost on Azure as ...