As the web evolved over the years it proved that the traditional security options and mechanics such as client-server authentication, had several limitations and couldn’t cover (at least properly) the cases introduced by the evolution. Take for example the case where a third-party application requires access to your profile data in a different web application such as Facebook. Years ago this would require to provide your Facebook credentials to the third-party so it can access your account information. This of course, raised several problems such as:
- Third-party applications must be able to store the user’s credentials
- Servers that host the protected resources must support password authentication
- Third-party applications gain access probably to all of the owner’s protected resources
- In case the owner decides to revoke access to the third-party application, password change is required something that will cause the revocation to all other third-party apps
- The owner’s credentials are way too much vulnerable and any compromise of a third-party application would result in compromise of all the user’s data
OAuth 2.0 & OpenID Connect to the rescue
Fortunately OAuth protocol introduced and along with OpenID Connect provided a wide range of options for properly securing applications in the cloud. In the world of .NET applications this was quickly connected with an open source framework named IdentityServer which allows you to integrate all the protocol implementations in your apps. IdentityServer made Token-based authentication, Single-Sign-On, centralized and restricted API access a matter of a few lines of code. What this post is all about is to learn the basic concepts of OAuth 2.0 & OpenID Connect so that when using IdentityServer in your .NET Core applications you are totally aware of what’s happening behind the scenes. The post is a continuation of the ASP.NET Core Identity Series where the main goal is to understand ASP.NET Core Identity in depth. More specifically here’s what’s we gonna cover:
- Explain what OAuth 2.0 is and what problems it solves
- Learn about OAuth 2.0 basic concepts such as Roles, Tokens and Grants
- Introduce OpenID Connect and explain its relation with OAuth 2.0
- Learn about OpenID Connect Flows
- Understand how to choose the correct authorization/authentication flow for securing your apps
- Learn how to integrate IdentityServer to your ASP.NET Core application
It won’t be a walk in the park though so make sure to bring all your focus from now on.
The source code for the series is available here. Each part has a related branch on the repository. To follow along with this part clone the repository and checkout the identity-server branch as follow:
cd .\aspnet-core-identitygit fetchgit checkout identity-serverKeep in mind that master branch has been updated with .NET Core 3 & Angular 8!
This post is a continuation of the ASP.NET Core Identity Series:
- Part 1: Getting Started
- Part 2: Integrate Entity Framework
- Part 3: Deep Dive in authorization
- Part 4: OAuth 2.0, OpenID Connect & IdentityServer
- Part 5: External Provider authentication & registration strategy
- Part 6: Two-Factor Authentication
It is recommended (but not required) that you read the first 3 posts of the series before continue. This will help you understand better the project we have built so far.
The theory for OAuth 2.0 and OpenID Connect is also available in the following presentation.
OAuth 2.0 Framework
OAuth 2.0 is an open standard authorization framework that can securely issue access tokens so that third-party applications gain limited access to protected resources. This access may be on behalf of the resource owner in which case the resource owner’s approval is required or on its own behalf. You have probably used OAuth many times but haven’t realized it yet. Have you ever been asked by a website to login with your Facebook or Gmail account in order to proceed? Well.. that’s pretty much OAuth where you are being redirected to the authorization server’s authorization endpoint and you give your consent that you allow the third-party application to access specific scopes of your main account (e.g., profile info in Facebook, Gmail or read repositories in GitHub). We mentioned some strange words such as resource owner or authorization server but we haven’t defined what exactly they represent yet so let’s do it now.
OAuth 2.0 Participants
The following are the participants or the so-called Roles that evolved and interact with each other in OAuth 2.0.
- Resource Owner: It’s the entity that owns the data, capable of granting access to its protected resources. When this entity is a person then is referred as the
End-User - Authorization Server: The server that issues access tokens to the client. It is also the entity that authenticates the resource owner and obtains authorization
- Client: The application that wants to access the resource owner’s data. The client obtains an access token before start sending protected resource requests
- Resource Server: The server that hosts the protected resources. The server is able to accept and respond to protected resource requests that contain access tokens

OAuth 2.0 Abstraction Flow
The abstract flow illustrated in the following image describes the basic interaction between the roles in OAuth 2.0.
- The client requests authorization from the resource owner. This can be made either directly with the resource owner (user provides directly the credentials to the client) or via the authorization server using a redirection URL
- The client receives an authorization grant representing the resource owner’s authorization. OAuth 2.0 provides 4 different types of grants but can also be extended. The grand type depends on the method used by the client to request authorization and the types supported by the authorization server
- The client uses the authorization grant received and requests an access token by the authorization server’s token endpoint
- Authorization server authenticates the client, validates the authorization grant and if valid issues an access token
- The client uses the access token and makes a protected resource request
- The resource server validates the access token and if valid serves the request
Before explain the 4 different grants in OAuth 2.0 let’s see the types of clients in OAuth:
- Confidential clients: Clients that are capable to protect their credentials – client_key & client_secret. Web applications (ASP.NET, PHP, Java) hosted on secure servers are examples of this type of clients
- Public clients: Clients that are incapable of maintaining the confidentiality of their credentials. Examples of this type of clients are mobile devices or browser-based web applications (angular, vue.js, etc..)

Authorization Grants
There are 4 basic grants that clients may use in OAuth 2.0 in order to get an access token, the Authorization Code, the Implicit, Client Credentials and the Resource Owner Password Credentials grant.
Authorization Code
The authorization code grant is a redirection based flow, meaning an authorization server is used as an intermediary between the client and the resource owner. In this flow the client directs the resource owner to an authorization server via the user-agent. After the resource owner’s consent, the owner directs back to the client with an authorization code. Let’s see the main responsibilities for each role on this grant
And here’s the entire Flow
- A: The Resource owner is directed to the authorization endpoint through the user-agent. The Client includes its identifier, requested scope, local state, and a redirection URI to which the authorization server will send the user-agent back once access is granted (or denied). The client’s request looks like this:123456
GET /authorize?response_type=code&client_id=<clientId>&scope=email+api_access&state=xyz&redirect_uri=https://example.com/callbackThe response_type which is equal to code means that the authorization code grant will be used. The client_id is the client’s identifier and the scope defines what the client ask access for
- B: The authorization server authenticates the resource owner via the user-agent. The resource owner then grants or denies the client’s access request usually via a consent page
- C: In case the resource owner grants access, the authorization server redirects the user-agent back to the client using the redirection URI provided earlier in the query parameter: redirect_uri. The redirection URI includes the authorization code in a code query string parameter and any state provided by the client on the first step. A redirection URI along with an authorization code looks like this:123
- D: The client requests an access token from the authorization server’s token endpoint by including the authorization code received in the previous step. The client also authenticates with the authorization server. For verification reason, the request also includes the redirection URI used to obtain the authorization code
The request looks like this:12345678POST /token HTTP/1.1Host: auth-server.example.comAuthorization: Basic F0MzpnWDFmQmF0M2JWContent-Type: application/x-www-form-urlencodedgrant_type=authorization_code&code=SplxlOBeZQQYbYS6WxSbIA&redirect_uri=https://example.com/callback - E: The authorization server authenticates the client, validates the authorization code, and ensures that the redirection URI received matches the URI used to redirect the client in the third step. If valid, the authorization server responds back with an access token and optionally, a refresh token. The response looks like this:123456789
HTTP/1.1 200 OKContent-Type: application/json;charset=UTF-8{"access_token":"2YotnFZFEjr1zCsipAA","token_type":"bearer","expires_in":3600,"refresh_token":"tGzv3JOkF0TlKWIA"}
The Authorization Code grant is the one that provides the greater level of security since a) resource owner’s credentials are never exposed to the client, b) it’s a redirection based flow, c) client authenticates with the resource server and d) the access token is transmitted directly to the client without exposing it through the resource owner’s user-agent (implicit grant case)
Implicit Grant
Implicit grant type is a simplified version of the authorization code where the client is issued an access token directly through the owner’s authorization rather than issuing a new request using an authorization code.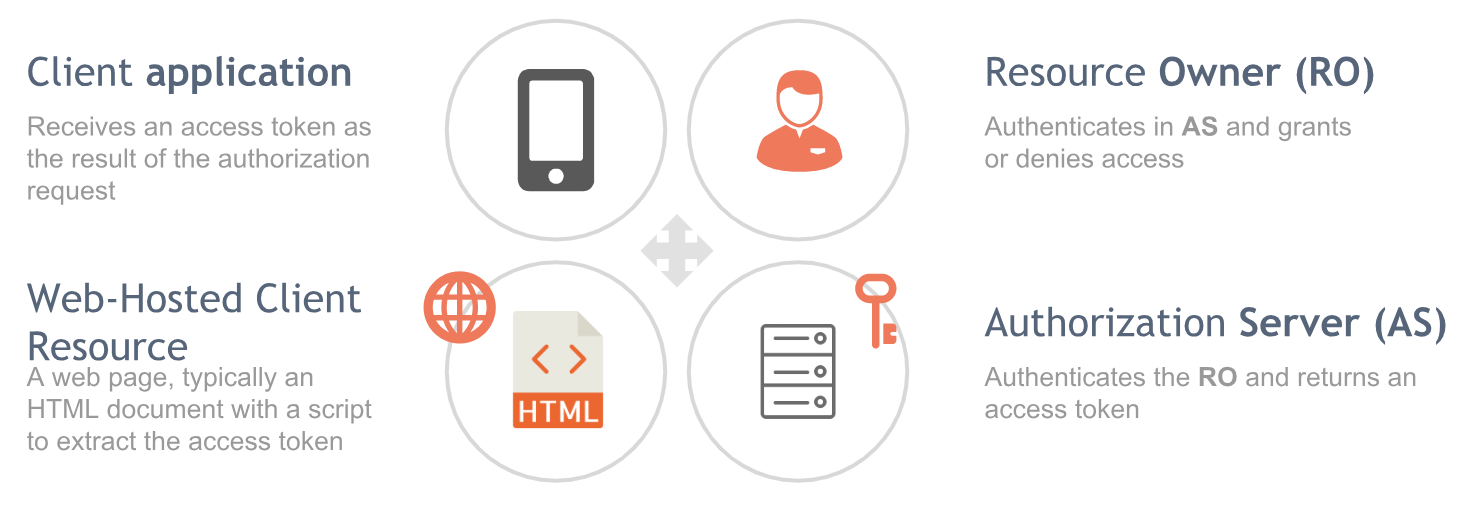
Following are the steps for the implicit grant type.
- A: Client initiates the flow and directs the resource owner’s user-agent to the authorization endpoint. The request includes the client’s identifier, requested scope, any local state to be preserved and a redirection URI to which the authorization server will send the user-agent back once access is granted. A sample request looks like this:123456
GET /authorize?response_type=token&client_id=<clientId>&scope=email+api_access&state=xyz&redirect_uri=https://example.com/callbackNote that this time the response_type parameter has the value token instead of code, indicating that implicit grant is used
- B: The authorization server authenticates the resource owner via the user-agent. The resource owner then grants or denies the client’s access request, usually via a consent page
- C: In case the resource owner grants access, the authorization server directs the owner back to the client using the redirection URI. The access token is now included in the URI fragment. The response looks like this:123456
access_token=SpBeZQWxSbIA&expires_in=3600&token_type=bearer&state=xyz - D: The user-agent follows the redirection instructions and makes a request to the web-hosted client resource. This is typically an HTML page with a script to extract the token from the URI
- E: The web page executes the script and extracts the access token from the URI fragment
- F: The user-agent finally passes the access token to the client
Implicit grant is optimized for public clients that typically run in a browser such as full Javascript web apps. There isn’t a separate request for receiving the access token which makes it a little bit more responsive and efficient for that kind of clients. On the other hand, it doesn’t include client authentication and the access token is exposed directly in the user-agent.
Resource Owner Password Credentials
The Resource Owner Password Credentials grant is a very simplified, non-directional flow where the Resource Owner provides the client with its username and password and the client itself use them to ask directly for an access token from the authorization server.
- A: The resource owner provides the client with its username and password
- B: The client requests an access token from the authorization server’s token endpoint by including the credentials provided by the resource owner. During the request the client authenticates with the authorization server. The request looks like this:12345678
POST /token HTTP/1.1Host: auth-server.example.com:443Authorization: Basic F0MzpnWDFmQmF0M2JWContent-Type: application/x-www-form-urlencodedgrant_type=password&username=chsakell&password=random_passwordNotice that the grant_type is equal to password for this type of grant
- C: The authorization server authenticates the client and validates the resource owner credentials. If all are valid issues an access token.123456789
HTTP/1.1 200 OKContent-Type: application/json;charset=UTF-8{"access_token":"2YotnFZFEjr1zCsipAA","token_type":"bearer","expires_in":3600,"refresh_token":"tGzv3JOkF0TlKWIA"}
This grant type is suitable for trusted clients only and when the other grant types are not available (e.g. not a browser based client and user-agent cannot be used)
Client Credentials Grant
The Client Credentials grant is again a simplified grant type that works entirely without a resource owner (you can say that the client IS the resource owner).
- A: The client authenticates with the authorization server and requests an access token from the token endpoint. The authorization request looks like this:1234567
POST /token HTTP/1.1Host: auth-server.example.com:443Authorization: Basic F0MzpnWDFmQmF0M2JWContent-Type: application/x-www-form-urlencodedgrant_type=client_credentials&scope=email&api_accessNotice that the grant_type parameter is equal to client_credentials
- B: The authorization server authenticates the client and if valid, issues an access token12345678
HTTP/1.1 200 OKContent-Type: application/json;charset=UTF-8{"access_token":"2YotnFZFEjr1zCsipAA","token_type":"bearer","expires_in":3600}
This grant type is commonly used when the client acts on its own behalf. A very common case is when internal micro-services communicate with each other. The client also MUST be a confidential client.
Token Types
During the description of each Grant type you may have noticed that apart of the access_token an additional refresh_token may be returned by the authorization server. A refresh token may be returned only for the Authorization Code and the Resource Owner Password Credentials grants. Implicit grant doesn’t support refresh tokens and shouldn’t be included in the access token response of the Client Credentials grant. But what is the different between an access and a refresh token anyway?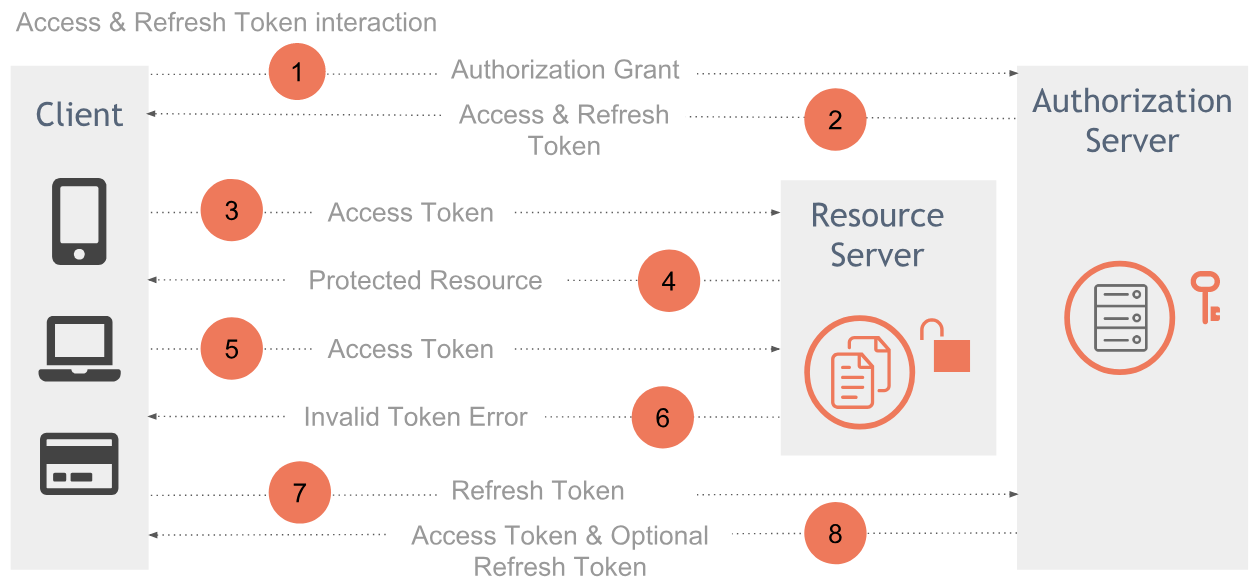
The image illustrates the different between the two token types:
- An access token is used to access protected resources and represents authorization issued to the client. It replaces different authorization constructs (e.g., username and password) with a single token understood by the resource server
- A refresh token on the other hand which is also issued to the client by the Authorization server, is used to obtain new access token when current token becomes invalid or expires. If authorization server issues a refresh token, it is included when issuing an access token. The refresh token can only be used by the authorization server
OpenID Connect
When describing OAuth 2.0 we said that its purpose is to issue access tokens in order to provide limited access to protected resources, in other words OAuth 2.0 provides authorization but it doesn’t provide authentication. The actual user is never authenticate directly with the client application itself. Access tokens provide a level of pseudo-authentication with no identity implication at all. This pseudo-authentication doesn’t provide information about when, where or how the authentication occurred. This is where OpenID Connect enters and fills the authentication gap or limitations in OAuth 2.0.OpenID Connect is a simple identity layer on top of the OAuth 2.0 protocol. It enables clients to verify the identity of the End-User based on the authentication performed by an authorization server. It obtains basic profile information about the End-User in an interoperable and REST-like manner (introduction of new REST endpoints). It uses Claims to communicate information about the End-User and extends OAuth in a way that cloud based applications can:
- Get identity information
- Retrieve details about the authentication event
- Allow federated Single Sign On
Let’s see the basic terminology used in OpenID Connect.
- End-User: Human participant – in OAuth this refers to the resource owner having their own identity as one of their protected resources
- Relying Party: OAuth 2.0 client application. Requires End-User authentication and Claims from an OpenID Provider
- Identity Provider: An OAuth 2.0 Authorization Server that authenticates the End-User and provides Claims to the Relying Party about the authentication event and the End-User
- Identity Token: A JSON Web Token (JWT) containing claims about the authentication event. It may contain other claims as well

As OpenID Connect sits on top of OAuth 2.0, it makes sense if we say that it uses some of the OAuth 2.0 flows. In fact, OpenID Connect can follow the Authorization Code flow, the Implicit and the Hybrid which is a combination of the previous two. The flows are exactly the same with the only difference that an id_token is issued along with the access_token. Whether the flow is a pure OAuth 2.0 or an OpenID Connect is determined by the presence if the openid scope in the authorization request.
OAuth 2.0 & OpenID Connect Terminology
Don’t get confused by the different terminology that OpenID Connect uses, they are just different names for the same entities
- End User (OpenID Connect) – Resource Owner (OAuth 2.0)
- Relying Party (OpenID Connect) – Client (OAuth 2.0)
- OpenID Provider (OpenID Connect) – Authorization Server (OAuth 2.0)
Identity Token & JWT
The identity token contains the information about the authentication performed and is returned as a JSON Web Token. But what is a JSON Web Token anyway? JSON Web Tokens is an open standard method for representing claims that can be securely transferred between two parties. They are digitally signed meaning the information is verified and trusted that there is no alteration of data during the transfer. They are compact and can be send via URL, POST request or HTTP header. They are Self-Contained meaning they are validated locally by resource servers using the Authorization Server signing key. This is very important to remember and understand it – the token is issued from the authorization server and normally, when sent to the resource server would require to send it back to the authorization server for validation!
JWT Structure
A JWT is a encoded string that has 3 distinct parts: the header, the payload and the signature:
- Header: A Base64Url encoded JSON that has two properties: a) alg – the algorithm like HMAC SHA256 or RSA used to generate the signature and b) typ the type of the JWT token
- Payload: A Base64Url encoded JSON that contains the claims which are user details or additional metadata
- Signature: It ensures that data haven’t changed during the transfer by combining the base64 header and payload with a secret

Claims and Scopes
Claim is an individual piece of information in a key-value pair. Scopes are used to request specific sets of claims. OpenId scope is mandatory scope to specify that OpenID Connect should be used. You will see later on when describing the OpenID Connect flows, that all scopes will contain the openid word, meaning this is an OpenID Connect authorization request. OpenID Connect defines a standard set of basic profile claims. Pre-defined sets of claims can be requested using specific scope values. Individual claims can be requested using the claims request parameter. Standard claims can be requested to be returned either in the UserInfo response or in the ID Token. The following table shows the association between standard scopes with the claims provided.
If you add the email scope in an OpenID Connect request, then both email and email_verified claims will be returned.
OAuth 2.0 & OpenID Connect Endpoints
OAuth 2.0 provides endpoints to support the entire authorization process. Obviously, these endpoints are also used by OpenID Connect which in turn adds a new one named UserInfo Endpoint.
- Authorization endpoint: Used by the client to obtain
authorization from the resource owner via user-agent redirection. Performs Authentication of the End-User which is directed through User-Agent. This is the endpoint where you directed when you click the Login with some-provider button - Token endpoint: Used by the client to exchange an authorization
grant for an access token. It returns an access token, an id token in case it’s an OpenID Connect request and optionally a refresh token - UserInfo endpoint: This is an addition to OAuth 2.0 by the OpenID Connect and its purpose is to return claims about the authenticated end-user. The request to this endpoint requires an access token retrieved by an authorization request
- Client endpoint: This is actually an endpoint that belongs to the client, not to the authorization server. It is used though by the authorization server to return responses back to the client via the resource owner’s user-agent
OpenID Connect Flows
Let’s see how Authorization Code and Implicit flows work with OpenID Connect. We ‘ll leave the Hybrid flow out of the scope of this post.
Authorization Code

Generally speaking the flow is exactly the same as described in the OAuth 2.0 authorization code grant. The first difference is that since we need to initiate an OpenID Connect flow instead of a pure OAuth flow, we add the openid scope in the authorization request (which is sent to the authorization endpoint..). The response_type parameter remains the same, code
1 2 3 4 5 6 | GET /authorize? response_type=code& client_id=<clientId>& scope=openid profile email& state=xyz& redirect_uri=https://example.com/callback |
The response is again a redirection to the client’s redirection URI with a code fragment.
1 2 3 |
Following is the request to the token endpoint, same as described in the OAuth 2.0.
1 2 3 4 5 6 7 8 | POST /token HTTP/1.1Host: auth-server.example.comAuthorization: Basic F0MzpnWDFmQmF0M2JWContent-Type: application/x-www-form-urlencodedgrant_type=authorization_code&code=SplxlOBeZQQYbYS6WxSbIA&redirect_uri=https://example.com/callback |
The difference though is that now we don’t expect only an access_token and optionally a refresh_token but also an id_token.
1 2 3 4 5 6 7 8 9 10 | HTTP/1.1 200 OKContent-Type: application/json;charset=UTF-8{ "access_token":"2YotnFZFEjr1zCsipAA", "id_token":"2YotnFZFEjr1zCsipAA", "token_type":"bearer", "expires_in":3600, "refresh_token":"tGzv3JOkF0TlKWIA"} |
The id_token itself contains basic information about the authentication event along with a subject identifier such as the user’s id or name. For any additional claims or scopes that are added in the initial authorization request (e.g. email, profile) the client sends an extra request to the authorization endpoint. This request requires the access token retrieved in the previous step.
1 2 3 | GET /userinfo HTTP/1.1Host: auth-server.example.comAuthorization: Bearer F0MzpnWDFmQmF0M2JW |
Notice that the access token is sent as a bearer token. The UserInfo response contains the claims asked on the initial request
1 2 3 4 5 6 7 8 9 | HTTP/1.1 200 OKContent-Type: application/json;charset=UTF-8{ "sub":"12345”, "name":"Christos Sakellarios", "given_name":”Christos”, "picture":"http://example.com/chsakell/me.jpg"} |
Implicit Flow
Recall from the implicit flow described in the OAuth 2.0 that this is a simplified version of authentication flow where the access token is returned directly as the result of the resource owner’s authorization.
In the OpenID Connect implicit flow there are two cases:
- Both ID Token and Access Token are returned: In this case the access token will be used to send an extra request to the UserInfo endpoint and get the additional claims defined on the scope parameter. In this case you set the response_type authorization’s request parameter to id_token token meaning you expect both an id_token & an access_token The authorization’s request in this case looks like this:123456
GET /authorize?response_type=id_token token&client_id=<clientId>&scope=openid profile&state=xyz&redirect_uri=https://example.com/callback - Only ID Token is returned: In this case you have no intentions to make an extra call to the UserInfo endpoint for getting additional claims but you want them directly on the id token. To do this you set the response_type equal to id_token123456
GET /authorize?response_type=id_token&client_id=<clientId>&scope=openid profile&state=xyz&redirect_uri=https://example.com/callbackID Token will contain the standard claims along with those asked in the scope
IdentityServer 4
It would take a lot of effort to implement all the specs defined by OAuth 2.0 and OpenID Connect by yourself, luckily though, you don’t have to because there is IdentityServer. All that IdentityServer does is adds the spec compliant OpenID Connect and OAuth 2.0 endpoints to an ASP.NET Core application through middleware. This means that by adding its middleware to your application’s pipeline you get the authorization and token endpoints we have talked about and all the core functionality needed (redirecting, granting access, token validation, etc..) for implementing the spec. All you have to do is provide some basic pages such as the Login, Logout and Logout views. It the IdentityServer4 you will find lots of samples which I recommend you to spend some time and study them. In this post we will use the project we have built so far during the series and cover the following scenario:
- AspNetCoreIdentity web application will play the role of a third-party application or a
Relying partyif you prefer - There will be a hypothetical Social Network where you have an account. This account of course is an entire different account from the one you have in the AspNetCoreIdentity web application
- There will be a SocialNetwork.API which exposes your contacts on the Social Network
- The SocialNetwork.API will be protected through an IdentityServer for which will be a relevant project in the solution
- The idea is to share something with your SocialNetwork contacts through the AspNetCoreIdentity web app. To achieve this, the AspNetCoreIdentity web app needs to receive an access token from IdentityServer app and use it to access the protected resource which is the SocialNetwork.API

As illustrated on the previous image, our final goal is to send a request to the protected resource in the SocialNetwork.API. We will use the most secure flow which is the Authorization Code with OpenID Connect. Are you ready? Let’s see some code!
Authorization Server Setup
The IdentityServer project in the solution was created as an empty .NET Core Web Application. Its role is to act as the Identity Provider (or as the Authorization Server if you prefer – from now on we will use Identity Provider when we refer to this project). The first thing you need to do to integrate IdentityServer in your app is to install the IdentityServer4 NuGet package. This will provide the core middleware to be plugged in your pipeline. Since this series are related to ASP.NET Core Identity we will also use the IdentityServer4.AspNetIdentity and the IdentityServer4.EntityFramework integration packages.
IdentityServer4.AspNetIdentity provides a configuration API to use the ASP.NET Identity management library for IdentityServer users. IdentityServer4.EntityFramework package provides an EntityFramework implementation for the configuration and operational stores in IdentityServer. But what does this mean anyway? IdentityServer uses some type of infrastructure in order to provide its functionality and more specifically:
- Configuration data: Data for defining resources and clients
- Operational data: Data produced by the IdentityServer, such as tokens, codes and consents
When you integrate EntityFramework it means that the database will contain all the required tables for IdentityServer to work. Let’s see how this looks like.
Keep in mind that they are handled by two different DbContext classes, PersistedGrantDbContext and ConfigurationDbContext. Now let’s switch to the Startup class and see how we plug IdentityServer into the pipeline. First we add the services for ASP.NET Identity in the way we have learned through the series, nothing new yet..
1 2 3 4 5 6 7 8 9 10 11 12 13 14 15 | services.AddDbContext<ApplicationDbContext>(options =>{ if (useInMemoryStores) { options.UseInMemoryDatabase("IdentityServerDb"); } else { options.UseSqlServer(connectionString); }});services.AddIdentity<IdentityUser, IdentityRole>() .AddEntityFrameworkStores<ApplicationDbContext>() .AddDefaultTokenProviders(); |
Next thing we need to do is to register the required IdentityServer services and DbContext stores.
1 2 3 4 5 6 7 8 9 10 11 12 13 14 15 16 17 18 19 20 21 22 23 24 25 26 27 28 29 30 31 32 33 34 35 36 37 38 39 40 41 | var builder = services.AddIdentityServer(options =>{ options.Events.RaiseErrorEvents = true; options.Events.RaiseInformationEvents = true; options.Events.RaiseFailureEvents = true; options.Events.RaiseSuccessEvents = true;})// this adds the config data from DB (clients, resources).AddConfigurationStore(options =>{ options.ConfigureDbContext = opt => { if (useInMemoryStores) { opt.UseInMemoryDatabase("IdentityServerDb"); } else { opt.UseSqlServer(connectionString); } };})// this adds the operational data from DB (codes, tokens, consents).AddOperationalStore(options =>{ options.ConfigureDbContext = opt => { if (useInMemoryStores) { opt.UseInMemoryDatabase("IdentityServerDb"); } else { opt.UseSqlServer(connectionString); } }; // this enables automatic token cleanup. this is optional. options.EnableTokenCleanup = true;}).AddAspNetIdentity<IdentityUser>(); |
AddAspNetIdentity may take a custom IdentityUser of your choice, for example a class ApplicationUser that extends IdentityUser. ASP.NET Identity services needs to be registered before integrating IdentityServer because the latter needs to override some configuration from ASP.NET Identity. In the ConfigureServices function you will also find a call to builder.AddDeveloperSigningCredential() which creates a temporary key for signing tokens. It’s OK for development but you need to be replace it with a valid persistent key when moving to production environment.
We use a useInMemoryStores variable read from the appsettings.json file to indicate whether we want to use an actual SQL Server database or not. If this variable is false then we make use of the EntityFramework’s UseInMemoryDatabase functionality, otherwise we hit an actual database which of course needs to be setup first. IdentityServer also provides the option to keep store data in memory as shown below:
1 2 3 4 | var builder = services.AddIdentityServer() .AddInMemoryIdentityResources(Config.GetIdentityResources()) .AddInMemoryApiResources(Config.GetApis()) .AddInMemoryClients(Config.GetClients()); |
But since we use EntityFramework integration we can use its UseInMemoryDatabase in-memory option
Next we need to register 3 things: a) Which are the API resources needs to be protected, b) which are the clients and how they can get access tokens, meaning what flows they are allowed to use and last but not least c) what are the OpenID Connect scopes allowed. This configuration exists in the Config class as shown below.
1 2 3 4 5 6 7 8 | public static IEnumerable<IdentityResource> GetIdentityResources(){ return new List<IdentityResource> { new IdentityResources.OpenId(), new IdentityResources.Profile(), };} |
Scopes represent something you want to protect and that clients want to access. In OpenID Connect though, scopes represent identity data like user id, name or email address and they need to be registered.
1 2 3 4 5 6 7 | public static IEnumerable<ApiResource> GetApis(){ return new List<ApiResource> { new ApiResource("SocialAPI", "Social Network API") };} |
1 2 3 4 5 6 7 8 9 10 11 12 13 14 15 16 17 18 19 20 21 22 23 24 25 | public static IEnumerable<Client> GetClients(){ return new List<Client> { new Client { ClientId = "AspNetCoreIdentity", ClientName = "AspNetCoreIdentity Client", AllowedGrantTypes = GrantTypes.Code, RequirePkce = true, RequireClientSecret = false, AllowedScopes = { IdentityServerConstants.StandardScopes.OpenId, IdentityServerConstants.StandardScopes.Profile, "SocialAPI" } } };} |
We register the AspNetCoreIdentity client and we defined that it can use the authorization code flow to receive tokens. The redirect URIs needs to be registered as it has to match the authorization’s request redirect URI parameter. We have also defined that this client is allowed to request the openid, profile OpenID Connect scopes plus the SocialAPI for accessing the SocialNetwork.API resources. Client will be hosted in http://localhost:5000. The AllowedGrantTypes property is where you define how clients get access to the protected resources. Intellisense shows that there are several options to pick.
Each option will require the client to act respectively and send the appropriate authorization request to the server for getting access and id tokens. Now that we have defined IdentityServer configuration data we have to load them. You will find a DatabaseInitializer class that does this.
1 2 3 4 5 6 7 8 9 10 11 12 13 14 15 16 17 18 19 20 21 22 23 24 25 26 27 28 29 30 | private static void InitializeIdentityServer(IServiceProvider provider){ var context = provider.GetRequiredService<ConfigurationDbContext>(); if (!context.Clients.Any()) { foreach (var client in Config.GetClients()) { context.Clients.Add(client.ToEntity()); } context.SaveChanges(); } if (!context.IdentityResources.Any()) { foreach (var resource in Config.GetIdentityResources()) { context.IdentityResources.Add(resource.ToEntity()); } context.SaveChanges(); } if (!context.ApiResources.Any()) { foreach (var resource in Config.GetApis()) { context.ApiResources.Add(resource.ToEntity()); } context.SaveChanges(); }} |
This class also registers a default IdentityUser so that you can login when you fire up the application. You will also find a register link in case you want to create your own user.
1 2 3 4 5 6 7 8 9 10 11 12 13 14 15 16 17 18 19 20 21 22 23 24 25 26 27 | var userManager = provider.GetRequiredService<UserManager<IdentityUser>>();var chsakell = userManager.FindByNameAsync("chsakell").Result;if (chsakell == null){ chsakell = new IdentityUser { UserName = "chsakell" }; var result = userManager.CreateAsync(chsakell, "$AspNetIdentity10$").Result; if (!result.Succeeded) { throw new Exception(result.Errors.First().Description); } chsakell = userManager.FindByNameAsync("chsakell").Result; result = userManager.AddClaimsAsync(chsakell, new Claim[]{ new Claim(JwtClaimTypes.Name, "Chris Sakellarios"), new Claim(JwtClaimTypes.GivenName, "Christos"), new Claim(JwtClaimTypes.FamilyName, "Sakellarios"), new Claim(JwtClaimTypes.Email, "chsakellsblog@blog.com"), new Claim(JwtClaimTypes.EmailVerified, "true", ClaimValueTypes.Boolean), new Claim(JwtClaimTypes.Address, @"{ 'street_address': 'localhost 10', 'postal_code': 11146, 'country': 'Greece' }", IdentityServer4.IdentityServerConstants.ClaimValueTypes.Json) }).Result; // code omitted |
Notice that we assigned several claims for this user but only a few belongs to the open id profile scope that the AspNetCoreIdentity client can get access to. We ‘ll see in action what this means.
SocialNetwork.API
SocialNetwork.API is a simple .NET Core Web application exposing the api/contacts protected endpoint.
1 2 3 4 5 6 7 8 9 10 11 12 13 14 15 16 17 18 19 20 21 22 23 24 25 26 27 28 29 | [HttpGet][Authorize]public ActionResult<IEnumerable<Contact>> Get(){ return new List<Contact> { new Contact { Name = "Francesca Fenton", Username = "Fenton25", Email = "francesca@example.com" }, new Contact { Name = "Pierce North", Username = "Pierce", Email = "pierce@example.com" }, new Contact { Name = "Marta Grimes", Username = "GrimesX", Email = "marta@example.com" }, new Contact{ Name = "Margie Kearney", Username = "Kearney20", Email = "margie@example.com" } };} |
All you have to do to protect this API using the OpenID Provider we described, is define how authorization and authentication works for this project in the Startup class.
1 2 3 4 5 6 7 8 9 10 | services.AddAuthorization();services.AddAuthentication("Bearer") .AddJwtBearer("Bearer", options => { options.RequireHttpsMetadata = false; options.Audience = "SocialAPI"; }); |
Here we define that Bearer scheme will be the default authentication scheme and that we trust the OpenID Provider hosted in port 5005. The Audience must match the API resource name we defined before.
Client setup
The client uses a javascript library named oidc-client which you can find here. You can find the same functionality for interacting with OpenID Connect flows written in popular client side frameworks (angular, vue.js, etc..). The client needs to setup its own configuration which must match the Identity Provider’s setup. There is an openid-connect.service.ts file that does this.
1 2 3 4 5 6 7 8 9 10 11 12 13 14 15 16 17 18 19 20 21 22 23 24 25 26 27 28 29 30 31 32 33 34 35 | declare var Oidc : any;@Injectable()export class OpenIdConnectService { config = { client_id: "AspNetCoreIdentity", response_type: "code", scope: "openid profile SocialAPI", }; userManager : any; constructor() { this.userManager = new Oidc.UserManager(this.config); } public getUser() { return this.userManager.getUser(); } public login() { return this.userManager.signinRedirect();; } public signinRedirectCallback() { return new Oidc.UserManager({ response_mode: "query" }).signinRedirectCallback(); } public logout() { this.userManager.signoutRedirect(); }} |
The library exposes an Oidc object that provides all the OpenID Connect features. Notice that the config object matches exactly the configuration expected by the authorization server. The response_type is equal to code and along with the openid scope means that the authorization response result is expected to have both an access token and an id token. Since this is an authorization code flow, the access token retrieved will be used to send an extra request to the UserInfo endpoint and get the user claims for the profile scope. The share.component angular component checks if you are logged in with your Social Network account and if so sends a request to the SocialNetwork.API by adding the access token in an Authorization header.
1 2 3 4 5 6 7 8 9 10 11 12 13 14 15 16 17 18 19 20 21 22 23 24 25 26 27 28 29 30 31 32 33 34 35 36 37 38 39 40 41 42 43 | export class SocialApiShareComponent { public socialLoggedIn: any; public contacts: IContact[] = []; public socialApiAccessDenied : boolean = false; constructor(public http: Http, public openConnectIdService: OpenIdConnectService, public router: Router, public stateService: StateService) { openConnectIdService.getUser().then((user: any) => { if (user) { console.log("User logged in", user.profile); console.log(user); this.socialLoggedIn = true; const headers = new Headers(); headers.append("Authorization", `Bearer ${user.access_token}`); const options = new RequestOptions({ headers: headers }); this.http.get(socialApiContactsURI, options).subscribe(result => { this.contacts = result.json() as IContact[]; }, error => { if (error.status === 401) { this.socialApiAccessDenied = true; } }); } }); } login() { this.openConnectIdService.login(); } logout() { this.openConnectIdService.logout(); }} |
Now let’s see in action the entire flow. In case you want to use SQL Server database for the IdentityServer make sure you run through the following steps:
Using Visual Studio
- Open the Package Manager Console and cd to the IdentityServer project path
- Migrations have already run for you so the only thing you need to do is update the database for the 3 db contexts. To do so, change the connection string in the appsettings.json file to reflect your SQL Server environment and run the following commands:1
Update-Database -Context ApplicationDbContext1Update-Database -Context PersistedGrantDbContext1Update-Database -Context ConfigurationDbContext
Without Visual Studio
- Open a terminal and cd to the IdentityServer project path
- Migrations have already run for you so the only thing you need to do is update the database for the 3 db contexts. To do so, change the connection string in the appsettings.json file to reflect your SQL Server environment and run the following commands:1
dotnet ef database update -Context ApplicationDbContext1dotnet ef database update -Context PersistedGrantDbContext1dotnet ef database update -Context ConfigurationDbContext
Fire up all the projects and in the AspNetCoreIdentity web application click the Share from the menu. The oidc library will detect that you are not logged in with your Social Network account and present you with the following screen.
Click the login button and see what happens. The first network request is the authorization request to the authorization endpoint:
1 2 3 4 5 6 7 8 | client_id=AspNetCoreIdentity& redirect_uri=http://localhost:5000& response_type=code& scope=openid profile SocialAPI& state=be1916720a2e4585998ae504d43a3c7c& code_challenge=pxUY7Dldu3UtT1BM4YGNLEeK45tweexRqbTk79J611o& code_challenge_method=S256 |
You need to be logged in to access this endpoint and thus you are being redirected to login with your Social Network account.
Use the default user credentials created for you chsakell – $AspNetIdentity10$ and press login. After a successful login and only if you haven’t already grant access to the AspNetCoreIdentity client you will be directed to the Consent page.
There are two sections for granting access, one for your personal information which asked because of the openid and profile OpenID Connect scopes and another one coming from the Social.API scope. Grant access to all of them to continue. After granting access you will be directed to the initial request to the authorization endpoint. IdentityServer created a code for you and directed the user-agent back to the client’s redirection URI by appending the code in the fragment.
1 2 3 4 | code=090c6f68783c5b5fc267073990417c82ebfa01c1b70bc6107002ab0ae919dd8a &scope=openid profile SocialAPI&state=be1916720a2e4585998ae504d43a3c7c &session_state=7wBKoHgC7ld3_oO9e9wx-v_BfUa_mz9y6YDfwLKBhIQ.d0c4ee7f77d5da232806e05613067915 |
As we described the next step in the authorization code flow is to use this code and request for an access token from the token endpoint. The client though doesn’t know exactly where that endpoint resides so it makes a request to the http://localhost:5005/.well-known/openid-configuration. This is an IdentityServer’s configuration endpoint where you can find information about your Identity Provider setup.
The client reads the URI for the token endpoint and sends a POST the request:
1 2 3 4 5 6 7 8 | Request URL: http://localhost:5005/connect/tokenRequest Method: POSTclient_id: AspNetCoreIdentitycode: 090c6f68783c5b5fc267073990417c82ebfa01c1b70bc6107002ab0ae919dd8aredirect_uri: http://localhost:5000code_verifier: ad55ea0f077249ac99e190f576babb7bb9d14dcb229f4c1bb2fe1d0f87dc93d601374a833e4640f0b035c55a87d27a4dgrant_type: authorization_code |
Identity provider returns both an access_token and a id_token
1 2 3 4 5 6 | { "id_token":"<value-stripped-for-displaying-purposes>", "access_token":"<value-stripped-for-displaying-purposes>", "expires_in":3600, "token_type":"Bearer" } |

Are you curious to find out what those JWT token say? Copy them and paste to jwt.io debugger. Here’s the header and payload for the access token.
1 2 3 4 5 6 7 8 9 10 11 12 13 14 15 16 17 18 19 20 21 22 23 24 25 26 27 28 29 | // HEADER{ "alg": "RS256", "kid": "cbd3483398a40cf777e490cd2244deb3", "typ": "JWT"}// PAYLOAD{ "nbf": 1552313271, "exp": 1552316871, "aud": [ "SocialAPI" ], "client_id": "AspNetCoreIdentity", "sub": "09277cac-422d-43ee-b099-f99ff76bceda", "auth_time": 1552312960, "idp": "local", "scope": [ "openid", "profile", "SocialAPI" ], "amr": [ "pwd" ]} |
1 2 3 4 5 6 7 8 9 10 11 12 13 14 15 16 17 18 19 20 21 22 23 | // HEADER{ "alg": "RS256", "kid": "cbd3483398a40cf777e490cd2244deb3", "typ": "JWT"}// PAYLOAD{ "nbf": 1552313271, "exp": 1552313571, "aud": "AspNetCoreIdentity", "iat": 1552313271, "at_hash": "AM-fvLMnrmHCFu9nGDmY3Q", "sid": "aa8df27adf631604d855533b67c307ea", "sub": "09277cac-422d-43ee-b099-f99ff76bceda", "auth_time": 1552312960, "idp": "local", "amr": [ "pwd" ] } |
What’s interesting is that the id token doesn’t contain the claims that belongs to the profile scope asked in the authorization request and this is of course the expected behavior. By default you will find a sub claim which matches the user’s id and some other information about the authentication event occurred. As described in the theory, the client in this flow uses the access token and sends an extra request to the UserInfo and point to get the user’s claims.
1 2 3 4 | Request URL: http://localhost:5005/connect/userinfoRequest Method: GETAuthorization: Bearer <access-token> |
And here’s the response..
1 2 3 4 5 6 7 8 | { "sub":"09277cac-422d-43ee-b099-f99ff76bceda", "name":"Chris Sakellarios", "given_name":"Christos", "family_name":"Sakellarios", "preferred_username":"chsakell" } |
Let me remind you that we have added a claim for address for this user but we don’t see it on the response since address doesn’t belong to the profile scope nor is supported by our IdentityServer’s configuration. Last but not least you will see the request to the SocialNetwork.API protected resource.
1 2 3 4 5 | Request URL: http://localhost:5010/api/contactsRequest Method: GETAccept: application/json, text/plain, */*Authorization: Bearer </access-token> |
If all work as intended you will see the following view.
Discussion
I believe that’s more than enough for a single post so we ‘ll stop here. The idea was to understand the basic concepts of OAuth 2.0 and OpenID Connect so that you are aware what’s going on when you use IdentityServer to secure your applications. No one expects from you to know by the book all the protocol specifications but now that you have seen a complete flow in action you will be able to handle any similar case for your projects. Any time you need to implement a flow, read the specs and make the appropriate changes in your apps.
Now take a step back and think outside of the box. What does OAuth 2.0, OpenID Connect and IdentityServer provide us eventually? If you have a single web app, (server side or not, it doesn’t matter..) and the only thing required is a simple sign in, then all these you ‘ve learnt might not be a good fit for you. On the other hand, in case you go big and find yourself having a bunch of different clients, accessing different APIs which in turn accessing other internal APIs (micro-services) then you must be smart and act big as well. Instead of implementing a different authentication method for each type of your clients or reinventing the wheal to support limited access, use IdentityServer.
Orange arrows describe getting access tokens for accessing protected APIs while gray arrows illustrate communication between different components in the architecture. The IdentityServer will play the role of the centralized security token service which provides limited access per client type. This is where you define all of your clients and the way they are authorized via flows while each client requires a minimum configuration to start an authorization flow. Protected resources and APIs, regardless their type all they need is to handle bearer tokens and that’s all.
In case you find my blog’s content interesting, register your email to receive notifications of new posts and follow chsakell’s Blog on its Facebook or Twitter accounts.


