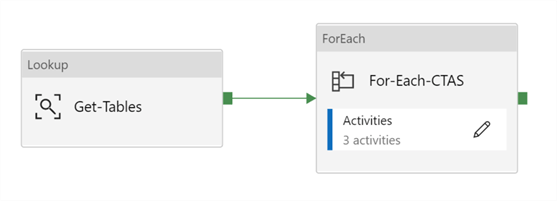
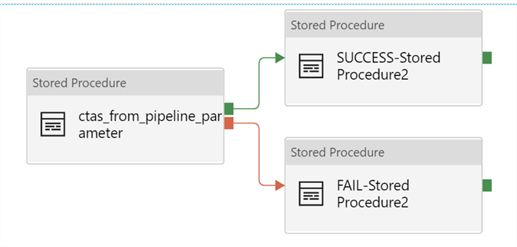
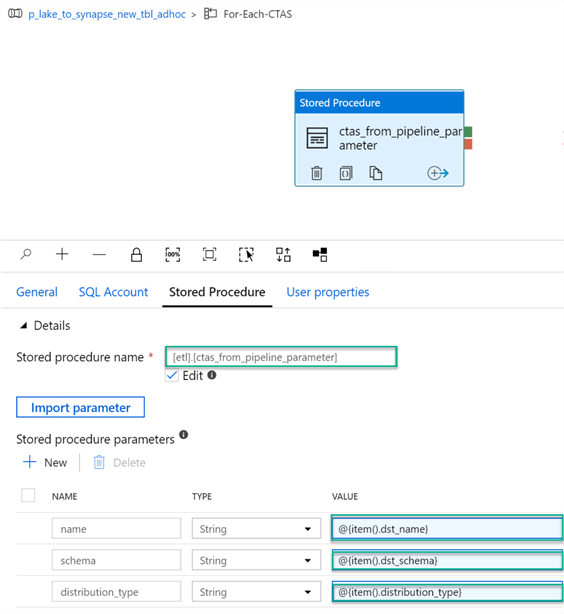
With the increased adoption of Massively Parallel Processing (MPP) solutions like Azure SQL Data Warehouse, now known as Azure Synapse Analytics, the process has evolved to take advantage of the additional compute resources available at the destination.
It's important to understand that data is primarily stored in Azure Synapse Analytics in columnstore format. As such, you ideally want to bulk load your data versus any kind of smaller transactional or trickle load method, as this helps maximize data compression and segment quality in columnstore.
As moving large amounts of data can take a fair amount of time, you can reduce costs by pausing or keeping your data warehouse scaled down until the data has been uploaded to Azure storage and ready to load. Then, scale up for the final load and transform step to complete the process quickly and efficiently. You'll find that moving from ETL to ELT can be a much more efficient use of resources in this architecture.
With the move to an ELT process, how is it performed in Azure SQL Data Warehouse?
- The first step is to extract the source data into the optimal format for landing in Azure. Typically, this could be a CSV or delimited text file.
- Next, land the data in Azure Blob Storage or Azure Data Lake. The ultimate selection on which location and which loading method you choose, such as Azure Data Factory (ADF), etc., depends on your needs and resources. Remember, since Azure Synapse Analytics is a PaaS offering that can be paused and resumed, the task of loading into Azure can be done while the data warehouse is paused or running in a lower service tier, reducing costs until you’re ready to move it in.
Now you're ready to load data into your data warehouse. What follows is a series of commands using Polybase to connect your data warehouse to your uploaded data now that it’s in Azure storage.
- CREATE EXTERNAL DATA SOURCE: This essentially lets Polybase know the location of your external data. You specify the path, credential, and type of data. The type will be HADOOP when using Blob Storage or Data Lake.
- CREATE EXTERNAL FILE FORMAT: Once you’ve pointed Polybase to the location of your data, you need to describe the data and how it should be read from the external location, specifying field terminators, delimiters, etc.
- CREATE EXTERNAL TABLE: Now that you’ve told Polybase where the data is and how it’s organized, it can be presented to Azure Analytics as a recognizable and query-able table. This is akin to creating a View in SQL Server. No actual table is created in the data warehouse at this point. When querying the external table, Polybase may generate a temporary table to materialize the data, but then deletes it once the query completes.
You should run a quick SELECT TOP n statement against the external table just to take a look and verify everything appears as expected before loading it into the warehouse.
While you can now query this external table directly, doing so typically will not provide optimal performance of your distributed queries. Ultimately, you want to integrate it with the rest of your data internal to the data warehouse. What follows are the steps to do that.
Once you’ve validated your data in the external table, you can load the data into a staging table in the data warehouse.
- CREATE TABLE AS SELECT (CTAS): This statement creates the new table as well as provides a fully parallelized operation to load the external data into the data warehouse. For maximum performance of this step, here is where you would scale up your data warehouse resources to take full advantage of these parallelized operations.
I have the data loaded into a staging table, now what?
Remember you are performing ELT. You’ve done the “E” and the “L.”
After the first load, the expectation is that you will have a pre-existing table where you want to insert this new data.
- But first, the staging table is where you can perform any needed final transformations before moving the new data into your production table. This allows you to take advantage of your MPP resources to quickly transform large amounts of data, without risking the introduction of any errors into your production tables.
- Now you can move the data into those production tables. Essentially you would run a CTAS that would UNION the existing table with the staging table of new data, creating another table with both your existing and newly loaded data. There’s even an example using UPSERT behavior in the CTAS link above.
- Finally, you need to perform a metadata rename of the production table to something new, then rename this newly created table to the name of the original. For example:
RENAME OBJECT dbo.[DimSales] TO [DimSales_old];
RENAME OBJECT dbo.[DimSales_upsert] TO [DimSales];
Now your production table has been updated with your latest data. Once you’re confident in the quality of your new production table, you can clean up and drop the other tables we’ve worked with.
How does the new COPY statement help me?
There are actually a few different benefits to using the new COPY statement for loading data into Azure Synapse Analytics.
One benefit is the saving of multiple steps in the data load itself. Essentially, you can skip steps three through six above, handling it all through one COPY statement. This also reduces the number of database objects you must create and manage.
In fact, if you didn’t need to transform, and were confident of the data and format, you technically could directly COPY INTO your final table. The most basic example of this command, as provided in the Microsoft Docs linked below, is:
COPY INTO dbo.[lineitem] FROM 'https://unsecureaccount.blob.core.windows.net/customerdatasets/folder1/lineitem.csv’However, best practices suggest you should still stage your data first, to ensure there are no issues before loading into a production table. The bottom line is you specify the data location, format, and destination table, all from one command. Note the table needs to be created before you can copy into it.
Another big advantage of COPY is you don’t need to grant CONTROL permissions on the database to use it, as is required with Polybase. Instead, INSERT and ADMINISTER DATABASE BULK OPERATIONS permissions are required. These advantages can simplify the setup and automation of your Azure Synapse Analytics data loading.
As of this writing, the COPY command is still in preview. More details are available here.
What’s to come?
According to Microsoft, the performance of the COPY command will be better than Polybase by the time it becomes generally available in early 2020, so note your mileage may vary today. LOB support is also not available as of this writing but should be in early 2020 as well.
Once you’ve loaded your data into the production table, don’t forget to create new statistics. Bad statistics can be a common source of poor query performance in Azure Synapse Analytics. They can lead to sub-optimal MPP plans that result is inefficient data movement.
If you’re interested in gaining better visibility into your data warehouse performance, check out a free trial of the SentryOne DW Sentry monitoring solution with support for Azure Synapse Analytics.

SentryOne DW Sentry
You might also be interested in another post where I’ve written some Advisory Conditions you can import for specialized alerting around MPP performance problems, such as those outdated statistics, along with several other common issues often seen in this platform.
