Saturday, July 18, 2020

CI/CD using Azure DevOps to run Dot Net Core Based Docker Containers


Recently I started exploring Pipelines in Azure DevOps (previously VSTS) to build a Continuous Integration and Continuous Deployment process. The main idea was to trigger an automated Build and Release for an application which would then run inside a Docker Container in Azure. The following setup was used in the process:
  • ASP.NET Core Web API
  • GitHub
  • Azure Container Registry: To store Docker Images inside a Repository
  • Web App for Container: To run the Docker Image as an App Service
  • Azure Pipelines: Setup Automated Build & Release

An Azure subscription is required for using Container Registry and AppService and an Azure DevOps account is required for Azure Pipelines.

Web App for Containers allow you to run App Service on Linux natively, thus enabling you to run Dot Net Core applications inside a Linux Container. This is an important factor, as when building Docker Images for Dot Net Core the underlying platform contributes to the size of your Docker Image. A windows environment based Docker Image typically has a higher memory footprint than a Linux based image.

Setting up Azure Services

We start off by creating a Container Registry in Azure which will later be used in Build Pipeline.

Image for post

Creating your Dockerfile

Next we create the Dockerfile for the ASP.NET Core Application. I have used multi stage build which allows us to create smaller images using caching and layers.

FROM microsoft/dotnet:sdk AS build
WORKDIR /app

COPY *.csproj ./
RUN dotnet restore

COPY . ./
RUN dotnet publish -c Release -o publishdir

FROM microsoft/dotnet:aspnetcore-runtime AS runtime
EXPOSE 5555
WORKDIR /app
COPY --from=build /app/publishdir .
ENTRYPOINT ["dotnet", "WebAppContainer.dll"]

Writing Build Pipeline in Azure DevOps

The Web API project is hosted in GitHub and hence we choose GitHub as source and connect to the repository for which we want to setup the build. Azure DevOps would require an authorization with the GitHub account.

Image for post

Next we would need a Docker Container Template to build and push the Docker Image to Azure Container Registry

Image for post

In “Build an image” step we connect to Container Registry created in Azure, which will be storing our Docker images. We also select the Dockerfile from our solution. The docker image name includes the Build Id. We change this in the next step.

Image for post

In “Push an image” step we push the Docker Image to ACR. Note we include the latest tag in the image name which would allow us to store a single image every time the build is run.

Image for post

Finally we set the trigger for the Build and enable Continuous integration, so every time we make a change to our Git repo a build gets triggered.

Image for post

We are all set for CI and once we make a code push in GitHub, a build is automatically triggered. Once a build succeeds we will be able to see the repository created in Azure Container registry.

Image for post

Creating Web App Container for running our Docker Image

We then create a Web App for Container within the same resource group and configure the Web App to use the image from the repository, created as part of the Build process.
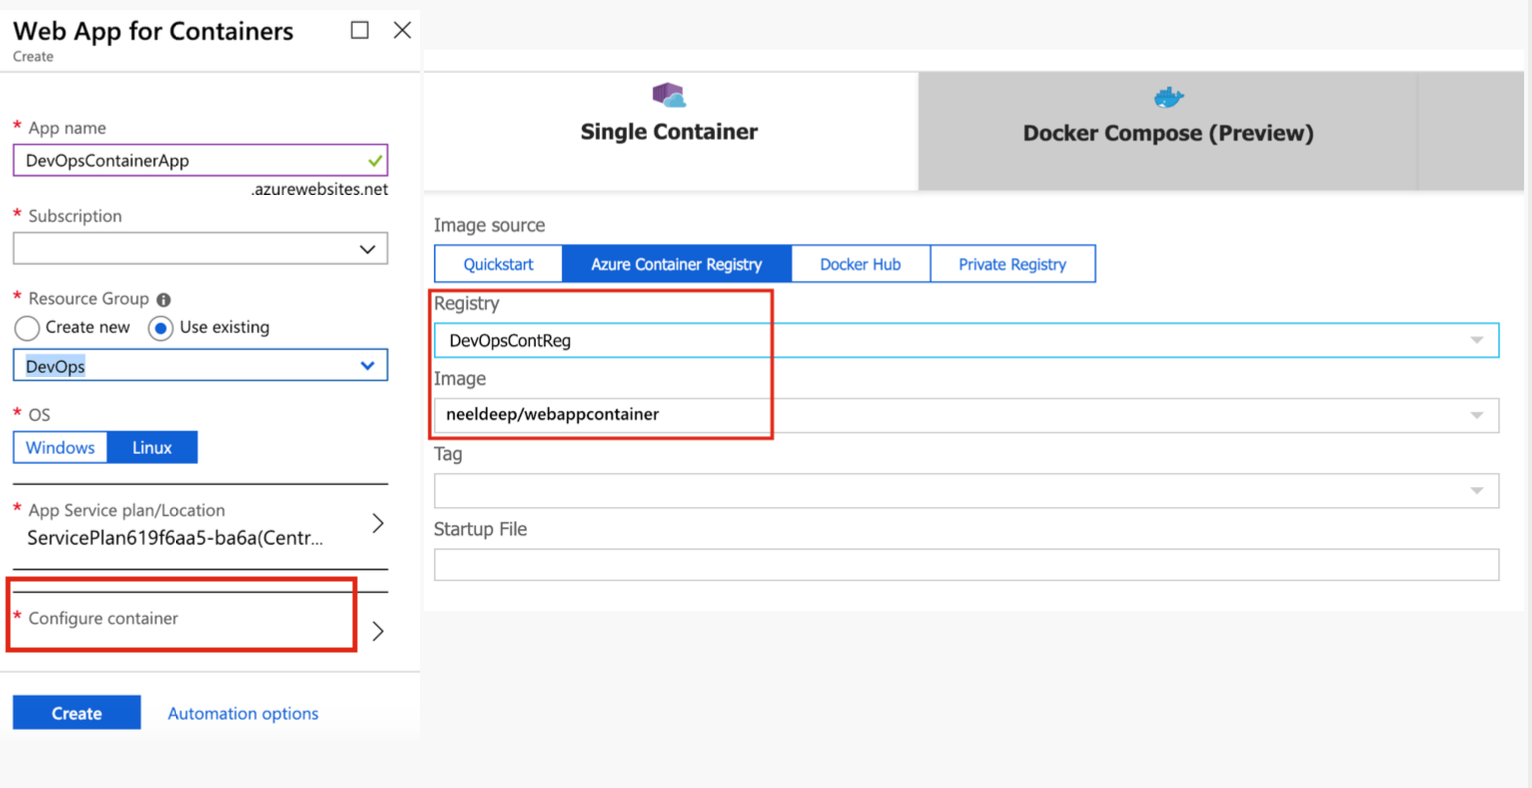
Image for post

Once the Web App is created we just need to configure the Release process with the Web App container.

Setting up your Release Pipeline

We start by creating a new Release pipeline. We will need to define an artifact and a continuous deployment trigger. Note we connect to the Container registry and repository for our Docker Image.

Image for post

Finally we add a Task for Stage 2. We use an Azure App service deploy Task which points to the App service created earlier and the ACR server name and Image repository name.

Image for post

We enable the trigger for the Release pipeline and are all set with our Continuous Deployment.

Image for post

With the pipelines setup in Azure DevOps, every time a code push happens in GitHub the build process would be triggered which would update the Docker Image in ACR, followed by release process which would run the Web App Container with the latest image from Container Registry.

This includes the basic steps on how we can get started on setting up a CI/CD pipeline with Azure DevOps and deploy our applications inside a Docker Container.

In case we want to use AWS services we have to replace Container Registry in Azure with ECR or Elastic Container Registry and use Elastic Container Service or ECS to manage our containers.

Friday, July 17, 2020

Web application development with .NET Core and Azure DevOps


Initial setup of the environment

In my previous post “Azure DevOps Services – cloud based platform for collaborating on code development from Microsoft” I presented the basic information about Azure DevOps capabilities. Now, I will focus on the details. Mainly, I will build together a full CI/CD pipeline for automated builds and deployments of sample .NET Core MVC web application to Azure App service.

I assume that based on my previous post, a new project in Azure DevOps is created and you have access to it :). Before the fun begins, let’s setup a service connection between our CI/CD server and the Azure Portal. Navigate to the Azure portal. Service connections can be limited to subscription or resource group level. In our sample case we will set scope to the resource group. First, create a new resource group in Azure:

Azure DevOps


Ok, the resource group is ready, navigate now to the settings panel in Azure DevOps, then select the “Service connection” sub-category, and add a new “Azure Resource Manager” service connection:

Azure DevOps

After the confirmation, the provided values will be validated. If everything was provided correctly, the newly created service connection will be saved and ready to use in CI/CD pipelines configuration.

First important thing is ready, now let’s focus on accessing to the Azure Repos GIT repository. In the Azure DevOps user profile you can easily add your existing SSH public key. To do this, navigate to the “SSH public keys” panel in your profile and add your SSH key:

Azure DevOps


Later on, clone our new empty repository to the local computer. In the “Repos” section in Azure DevOps portal you can find the “Clone” button which shows a direct link dedicated for cloning. Copy the link to the clipboard and run your local GIT bash console, and run “git clone” command:


Azure DevOps


One warning occurs, but it is ok – our repository is new and empty 🙂 Now, our environment is ready, then we will create a new project and its code will be committed to our repo.


Creation of a development project and repository initialization

I will use the Visual Studio 2017 but here we do not have a limitation to a specific version. When IDE will be ready, navigate to the project creation action, then select “Cloud” and “ASP.NET Core Web application”:

Azure DevOps


In next the step, we can specify the framework version and target template. I will base on the ASP.NET Core 2.1 Framework and MVC template:

Azure DevOps

After a few seconds a new sample ASP.NET Core MVC project will be generated. For our purpose it is enough to start the fun with Ci/CD pipeline configuration on the Azure DevOps side. This application will be used as a working example. Dealing with code and implementation of magic stuff inside the application is not a purpose of this post. When the project will be ready, you can run it locally, and after testing commit the code to our repository:

Azure DevOps

Build the pipeline (CI) by visual designer

Our source code is in the repository, so let’s create a build pipeline for our solution. Navigate to the “Pipelines” section, next “Builds” and click “Create new”. In this example we will create our build pipeline from scratch with visual designer. If the pipeline would be committed to the repo in a YAML file (Pipeline as a code) then we have a possibility to load the ready pipeline from the file as well.


Azure DevOps


The full process contains three steps. At the beginning, we must specify where our code is located. The default option is the internal GIT repository in our project in the Azure DevOps. In our case this selection is correct. In second step, we can use one of the pre-defined build templates. Our application is based on the .NET Core framework, so I will select the ASP.NET Core template. After that the pre-defined agent job will be created for us. The job will contains steps like NuGet packages restoring, building of our solution, testing (in our app test doesn’t exist) and final publishing of the solution to package which will be used in the release pipeline. Here we can also export our pipeline to a YAML file:

Azure DevOps


On the “Triggers” tab the “Continuous integration” feature is not activated by default. Let’s enable them manually:


Azure DevOps


After saving all changes in the pipeline, our setup CI build pipeline is ready. Below you can see the sample action triggered by committing new changes in the repository. The new “CI build” runs immediately after new changes in the application code have been committed. Also email notifications will be sent to all subscribers. In the reason field, we can see “Continuous integration”. The icons in the email and in the build panel in the portal are an easy way to show the status of the build:

Azure DevOps


Release pipeline (CD)

Now we will take care of the automatic release of our application to App Service on Azure. At the beginning, we need to create an App Service instance in the resource group, which has been selected to the service connection:


Azure DevOps

Ok, when the deployment is finished, we can start the creation process of the release pipeline in Azure DevOps. First we have to decide which template from the pre-defined list we will use. For our solution the “Azure App Service deployment” will be a good choice:


Azure DevOps

Next we must specify the source of artifacts. In our case, we will use the results of our build pipeline created in the previous steps:

Azure DevOps


Stages in the pipeline can be also renamed. This is a good practice in huge pipelines. We can observe what’s happened in each stage:

Azure DevOps


In the general settings for our new stage-agent, we must fill three very important parameters. First one is to specify which service connection the release pipeline will use, secondly, we must select the type of the application deployed to the  App Service. In the third parameter, we must put in the name of the existing App Service instance. We already created one at the beginning of this part of post.


Azure DevOps


Next in the configuration is to select the localization of the published application package. In our case this localization looks like this:

Azure DevOps


In a similar way like in the CI pipeline we need to enable the trigger in our newly created CD pipeline. To do that, we must click on the light icon on the artifact source and enable the trigger for the build:

Azure DevOps


It was the last step in the configuration. Looks like we are ready to commit some changes and check the final functionality 🙂


Final check

Let’s test our new full CI/CD pipeline then:

1. Add the new code in the application:

In the controller:

Azure DevOps

In the view:

Azure DevOps

2. Commit the changes to the repository:

Azure DevOps


3. Our CI build pipeline started automatically and is ready:

Azure DevOps


4. I received an email with confirmation of the correct building:

Azure DevOps


5. The release CD pipeline started automatically after success. The build from the CI pipeline and deployment is ready:

Azure DevOps


6. Changes have been deployed to Azure App Service and are visible:

Azure DevOps


As we can observe, the configuration of the full CI/CD pipeline for ASP.NET Core MVC web application is pretty easy. However, you must have some knowledge related to the configuration this stuff on the Azure DevOps side.

We hope you will enjoy this post and this step-by-step guide will be useful for your future experience with Azure DevOps!

***

This post is the 2nd part in our Azure DevOps series. Check out the other posts:

#1: Azure DevOps Services – cloud based platform for collaborating on code development from Microsoft

#3: Azure Cosmos DB – Multi model, Globally Distributed Database Service

Thursday, July 16, 2020

Using docker compose in azure devops pipeline


In this blog post, I’ll show how to use docker-compose in azure DevOps pipeline for building and publishing your containers to ACR (azure container registry).
I am using an ASP.Net core project which uses SQL server as database. My asp.net core web application runs in one container and SQL server database is hosted in another container. Below is how the docker-compose file looks like.

image

This docker-compose YAML file is generated automatically as part of the asp.net core docker-compose project and is used to create required containers locally during development using docker desktop.

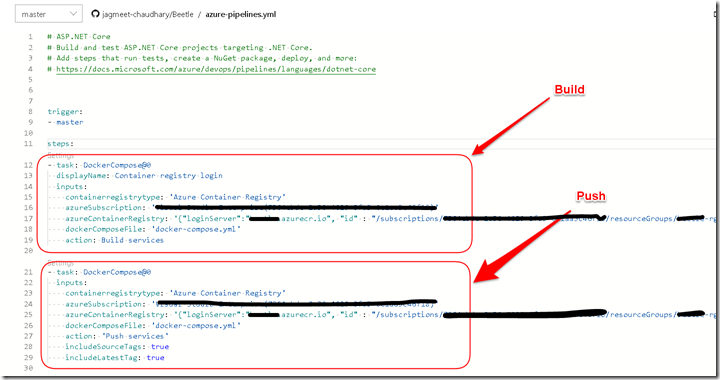
Similarly while deploying this to my azure environment I can use the same docker-compose file in docker-compose task in the azure pipeline to build and publish the image to ACR. Once the image is a container registry it can be deployed, for example, to an azure web app for containers. Below is how this sample YAML pipeline looks like.

ScreenClip

The first task is essentially a docker-compose build command and second task is a docker-compose push command.You can use these to push images to any of the existing container registry (need not to be only azure container registry) private or public.

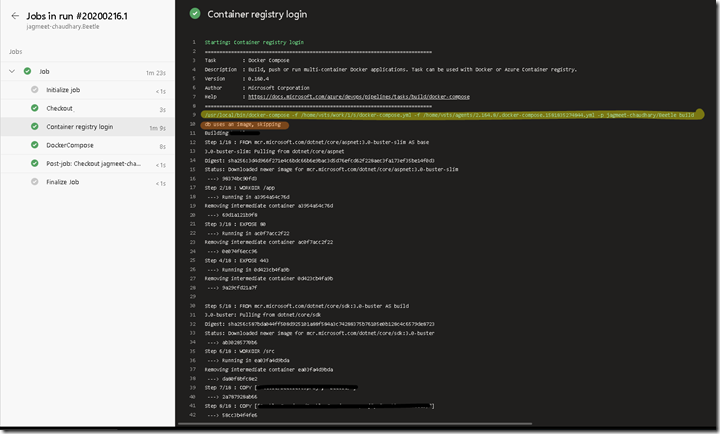
Below is the screenshot for first docker-compose build task running. The yellow highlight shows the actual command that is run and the rest of the logs show how the dockerfile is used to build the image. Another interesting part is the text highlighted in orange which says “DB uses an image, skipping” which indicates an important point here that since for DB container we don’t build anything and just pull an image, there is nothing required to be done for DB. Which means that wherever the DB deployment is done we can directly pull that image from the public docker registry.

ScreenClip

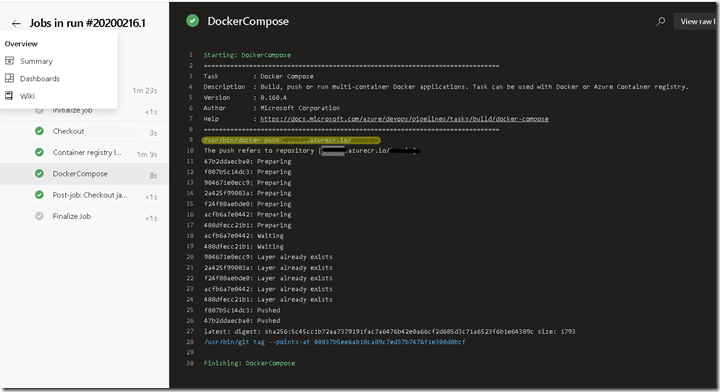
In the end, the image which is built is tagged with azure container registry (i.e. myapp.azurecr.io/myap:latest) and in the next step, it will be pushed to the same.2nd step is shown below.

ScreenClip

This docker image will now be available in the Azure container registry.
To learn more on building deployment pipelines for asp.net core applications using docker refer to this pluralsight course.

Free hosting web sites and features -2024

  Interesting  summary about hosting and their offers. I still host my web site https://talash.azurewebsites.net with zero cost on Azure as ...