Single Page Applications (SPAs) have been around ever since the advent of AJAX combined with JavaScript and browser advances, made them possible. Today, they have become one of the most common ways of building web applications, using frameworks like Angular, React or Vue.
It comes as no surprise that ASP.NET Core shipped with SPA templates in its very first release. Since then, new ASP.NET Core releases have maintained and adapted these templates, in no small part, due to the fast evolution of the SPA frameworks. These frameworks now provide their own development workflow with CLI (command line interface) tools, build processes and development servers.
During this article, we will take a look at the common basic ideas behind any SPA project template, followed by an overview of the templates provided out of the box in ASP.NET Core 3.0. We will finish demonstrating that you can apply the same ideas with any other SPA framework not supported out of the box, for which we will use two additional frameworks: Svelte and Vue.
Understanding SPA projects
SPA web frameworks have come a long way. They have evolved from “simple” JavaScript libraries into fully-fledged frameworks that provide their own tooling and development workflow.
When developing a SPA using frameworks like Angular, React, Vue or Svelte, the framework provides you with the tools that you need to develop, build or configure your SPA. This way, SPA frameworks decouple your client side from any server-side technology like an ASP.NET Core application.
Most SPA projects are structured as the union of two distinct applications:
- A client-side SPA that is responsible for the code shipped to the browsers, a combination of HTML, CSS and JS
- A server-side application that provides the API through which the client-side communicates, retrieving and sending back data
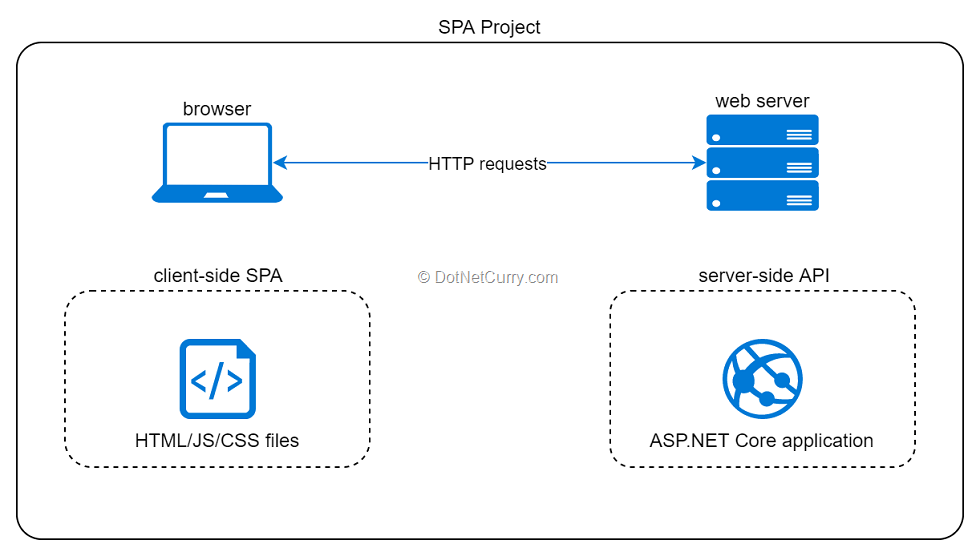
Figure 1, Simplified view of the two applications that make a typical SPA project with ASP.NET Core
For the purposes of this article, we will stick with ASP.NET Core as the server-side application. However, the same ideas can be followed with any other server-side framework like Flask, Django or Express or even with serverless architectures.
Nothing prevents you from treating both the SPA and ASP.NET Core applications in a completely separate manner, with their own development workflow, build process, release cycle, tooling, teams, etc. However, there are situations and/or teams which might prefer a closer integration between these two applications. This is what the SPA project templates are designed for.
In the following sections, we will take a deeper look at how SPA project templates typically integrate these two distinct applications.
As you are all aware, Microsoft now offers Blazor as a C# full-stack SPA alternative. For the purposes of this article, we will stick with traditional web SPA frameworks, but feel free to consider and investigate Blazor. You can read more in one of my previous articles about Blazor.
Are you a .NET, C#, Cloud or Web Developer looking for a resource covering New Technologies, in-depth Tutorials and Best Practices?
Well, you are in luck! We at DotNetCurry release a FREE digital magazine once every few months aimed at Developers, Architects and Technical Managers. This magazine covers ASP.NET Core, Xamarin, C#, Patterns and Practices, .NET Core, ASP.NET MVC, Azure, DevOps, ALM, TypeScript, Angular, React, Vuejs and much more.
Subscribe to this magazine for FREE and receive the current and upcoming editions, right in your Inbox. No Spam Policy.
SPA Development setup
As we have already mentioned, SPA frameworks provide their own tooling and development workflow independent of server-side technologies like ASP.NET Core.
The reason behind is that SPAs have evolved into complex applications that need a build process of their own. They let you structure your SPA modularly into small components which have at its disposal, a number of modern technologies like TypeScript, CSS preprocessors, template engines, linters and many others; attempting to increase developer productivity.
However, the source code of these applications isn’t something you can directly execute in the browser. Instead it needs to be transpiled into vanilla HTML, JavaScript and CSS understandable by the browsers, and bundled into a small number of files optimized for browser performance.
In a way, it is as if you had to compile the SPA source code into a number of artifacts (the bundled HTML/JS/CSS files) that your browser can execute. This is where webpack comes into play, letting SPA frameworks define the build process necessary to generate the bundled files. This build process is typically invoked by a CLI tool provided by the SPA frameworks, which will configure and execute webpack under the hood.
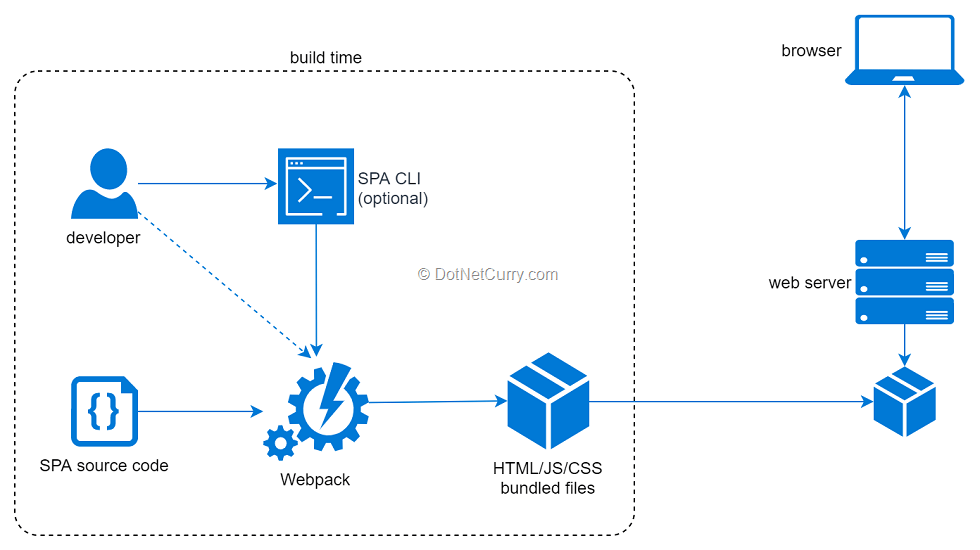
Figure 2, Building the SPA source code into bundles that can be served to the browser
While there are alternatives to webpack like parcel and rollup (with their own advantages and downsides), webpack is the one most widely used as of today. It is also the one chosen by most official SPA tooling like the Angular CLI, the Vue CLI and create-react-app.
As anyone who has worked with compiled languages knows, the build process can get very tedious during development. Having to re-run the build process after each code change in order to test the updated code, is not fun!
Luckily, SPA frameworks provide a development server that will automatically run the build process and refresh the bundles as soon as the source code is modified. The development server also acts as a web server that serves the generated bundles, giving you a localhost URL on which you can access the application in the browser.
Since they use webpack to build your code, it is no surprise then that they use the webpack-dev-server for these purposes.
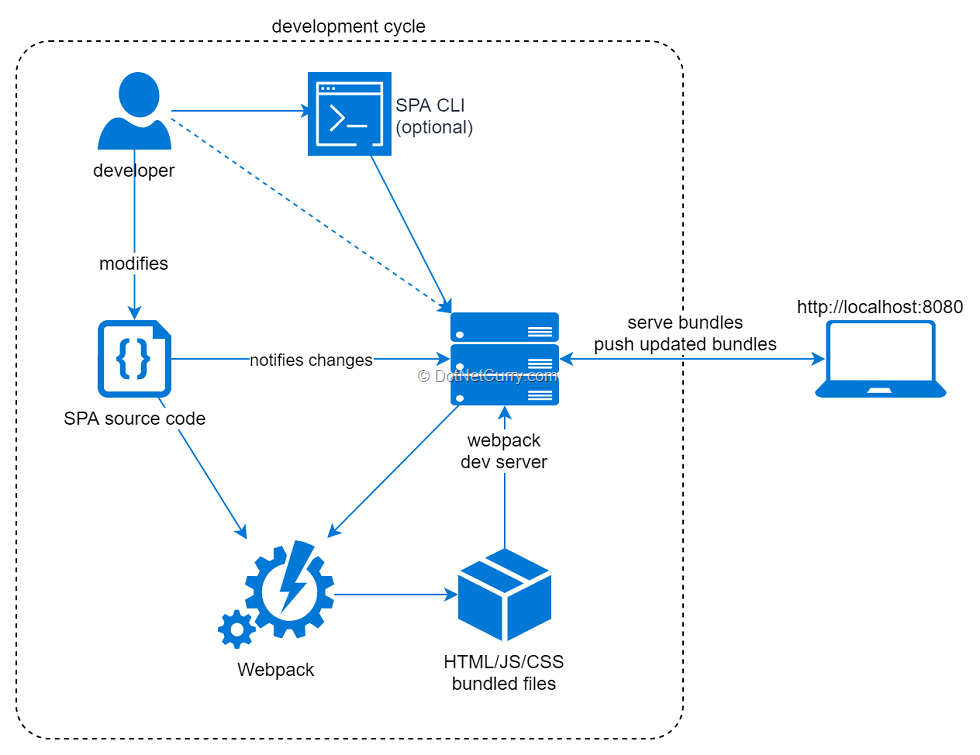
Figure 3, SPA development server during the development cycle
Thus, SPA frameworks pre-configure webpack and the webpack-dev-server in order to provide two different workflows for building your code:
- During development, they offer a development server which generates initial bundles, then monitors your source code for changes, automatically updating the bundles. It provides a localhost URL which you can open in the browser to run the SPA, including a websocket used to notify the browser of bundle updates. These are loaded without requiring a full reload of the page, a feature called hot module replacement.
- During the build process, they use webpack to generate the final, optimized bundles. It is up to you to host these bundles in any web server of your choice. All the webpack-based build process does is to generate these HTML/JS/CSS bundle files. The next section Hosting SPAs will look at this in more detail.
Webpack and webpack-dev-server are tools built with Node.js, meaning you need to have Node.js installed on your machine in order to run these commands. In general, SPA frameworks rely on Node.js for their tooling. While having Node.js installed is a must, getting familiar with it is a pretty good idea!
Each SPA framework provides a CLI command to invoke each of the 2 processes. The following table compares the most popular frameworks:

Now let’s add a server-side application into the mix, in our case an ASP.NET Core web application.
The ASP.NET Core application also provides its own development server, so we now have each application (client-side SPA and server-side ASP.NET Core) being served by its own development server.
- The SPA development server (let’s assume its running on localhost:8080) provides the index.html page and the necessary JS/CSS bundles. This is the URL that you would load in the browser
- The ASP.NET Core application (let’s assume its running on localhost:5000) provides the REST API used by the SPA
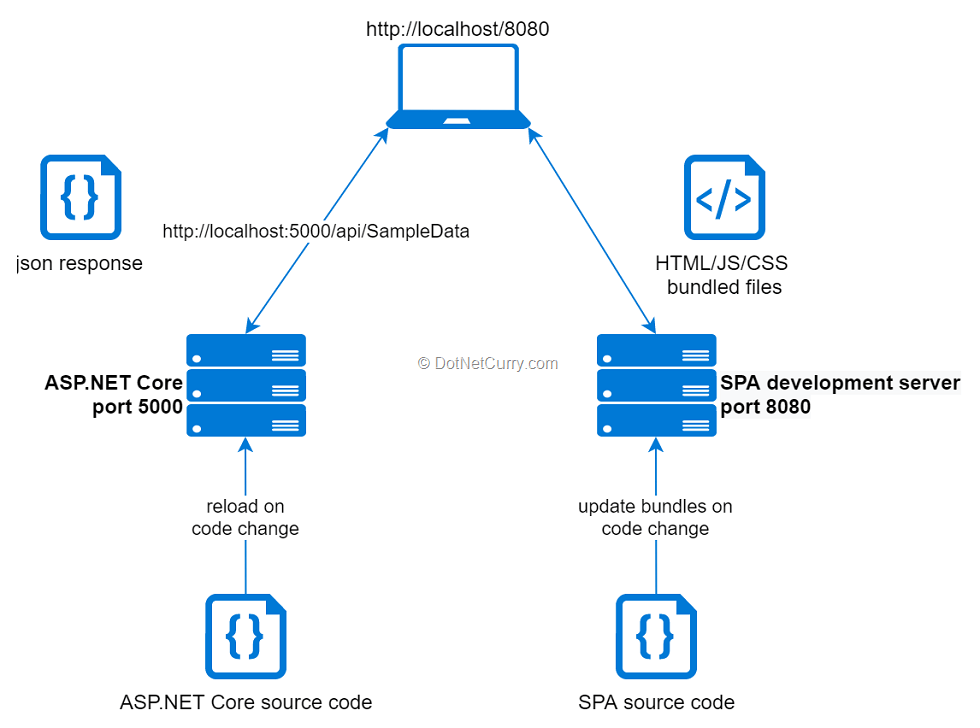
Figure 4, SPA and ASP.NET Core being run as independent applications during development
This setup completely separates each application during development, even from the browser perspective. Each has its own development server that automatically reloads when the code changes. It works well for teams that like to treat client and server-side applications completely independent from each other, especially if these are also hosted independently in production.
HTTP requests from the SPA at localhost:8080 to the ASP.NET Core server at localhost:5000 are considered cross-origin requests by the browsers due to the different port, and so CORS support needs to be added. If deployed to different domains like my-site.com api.my-site.com, CORS also needs to be enabled in production.
A slightly more integrated setup can be achieved by proxying one of the two development servers, in either direction. This way, from the browser perspective, there is a single server that serves the HTML/JS/CSS files and the REST API.
- A proxy from the SPA development server to the ASP.NET Core server can be established through the webpack development server’s proxy option. This is exposed by all SPA frameworks as part of its options for the development server (See Angular, React, Vue)
- A proxy from the ASP.NET Core server to the SPA development server can be established through the UseProxyToSpaDevelopmentServer utility.
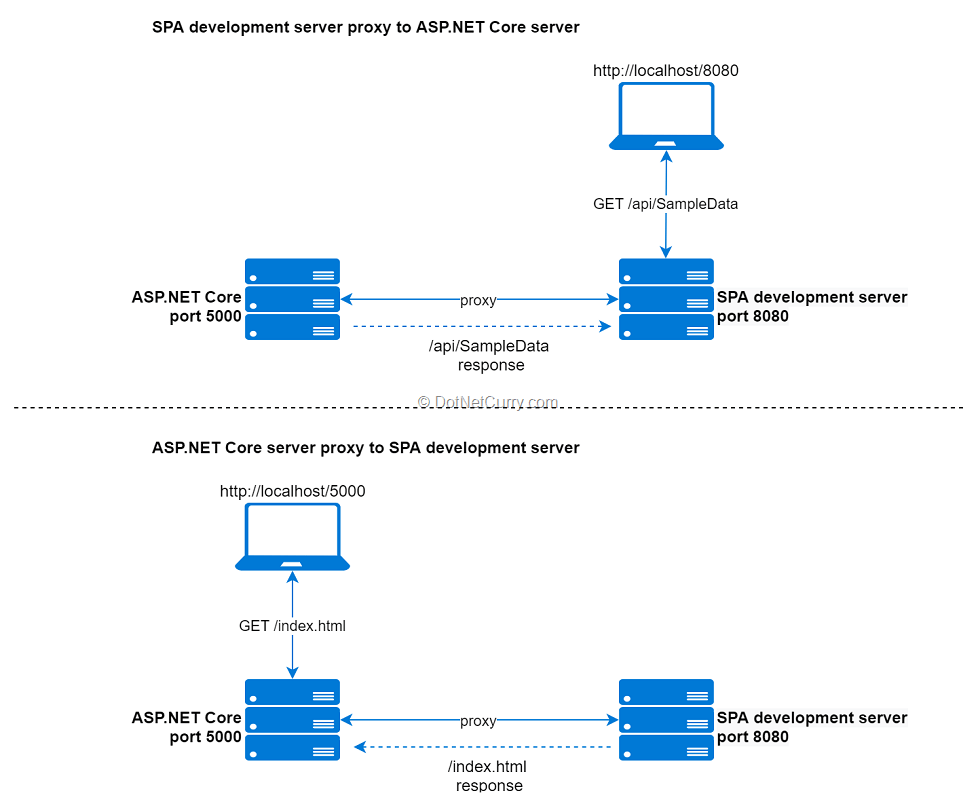
Figure 5, Setting up a proxy between the development servers
This is a good idea when the SPA application bundles will be hosted in production alongside the ASP.NET Core server from the same domain. This way your development setup reflects the production setup, simulating the same domain.
The two applications can even be further integrated during development by not just proxying from one of the applications to the other, but also making it responsible for starting the proxied development server. No SPA framework provides such an option, but the ASP.NET Core templates do.
- From the developer point of view, this almost feels like there is a single application. However, there is an important downside in making the ASP.NET Core server responsible for starting the SPA development server. If the ASP.NET Core source code changes, the server will be restarted which means the SPA development server also has to be restarted. If you are making frequent changes to the server-side code, this negates the benefits of the hot module replacement features of the SPA development server, apart from being slow, since bundles are regenerated from scratch on each server-side code change.
Regardless of which of these approaches you take, it is very likely that you will want to use specific tools and editors to develop each of the applications. A common situation is using Visual Studio Code with various plugins for developing the SPA, and Visual Studio for developing the ASP.NET Core API.
Hosting SPAs in production
So far, we have discussed how SPA web applications can be run during the development process. Let’s now take a brief look at the different options to host them in production.
No matter which hosting option you end up choosing, you will always need to invoke the SPA build process. This way you will generate a set of static files from the SPA source code, the bundled HTML/JS/CSS files. Now we need a way to host and serve these files.
Once you have the bundles generated, you basically have two choices for hosting and serving them:
- Host the static bundles alongside the ASP.NET Core server-side application. This is the simplest approach, which works well in many situations where the same team is in charge of both client and server-side applications. During the build process, the bundles are generated and copied to a preconfigured folder inside the ASP.NET Core application.
- Host the static bundles on its own web server (for example a simple NGINX one), independent of the ASP.NET Core one. While more complex, this frees up the ASP.NET Core application from having to serve the static files, which can now concentrate on simply serving API requests. It also lets you choose the best web server technology for serving those static files, including any cloud offerings.
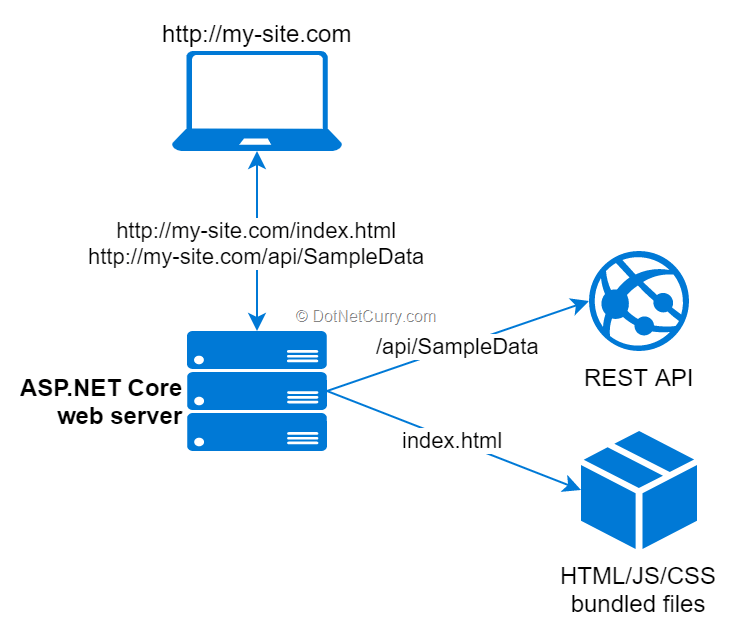
Figure 6, Hosting the SPA generated bundles within the ASP.NET Core server
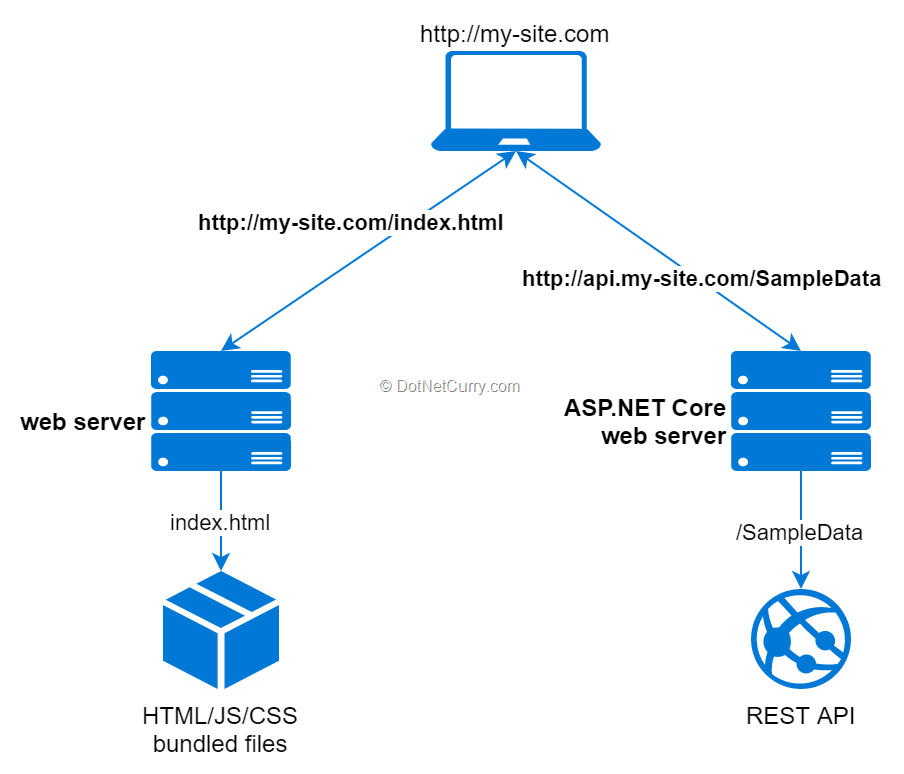
Figure 7, Hosting the SPA generated bundles on its own web server
Note how in the second approach, the SPA and ASP.NET Core applications are served from different domains. However, a reverse proxy can be configured in front of both servers, giving the illusion of a single domain for both applications:
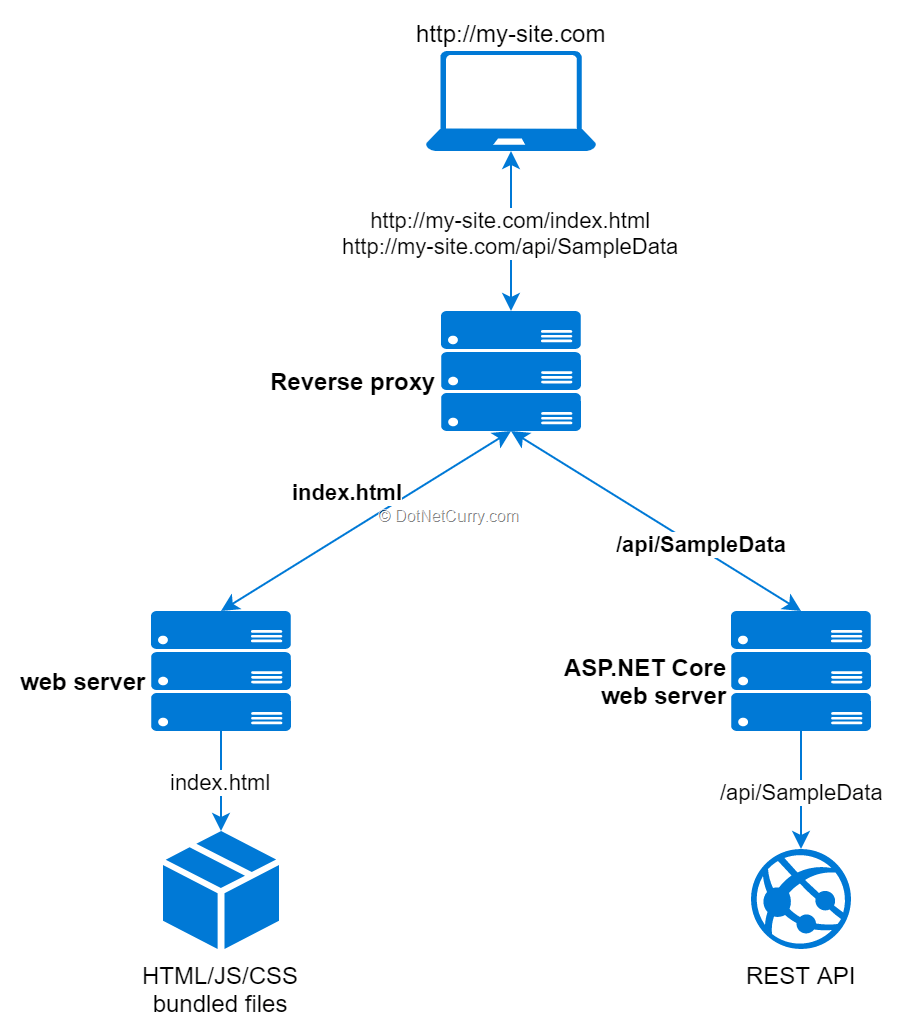
Figure 8, Reverse proxy in front of both web servers
Of course, you could combine the reverse proxy with the SPA web server into a single reverse proxy that both serves the static bundles and proxies API requests to the ASP.NET Core web server, a typical setup with NGINX:

Figure 9, Reverse proxy that directly serves static bundles and proxies API requests
Now that we have seen our options, both during deployment and production, let’s take a look at the specific templates provided by ASP.NET Core.
ASP.NET Core official SPA templates
ASP.NET Core 3.0 provides SPA templates for Angular and React, with an extra variant of React with Redux. As we will see in this section, they all follow a similar approach.
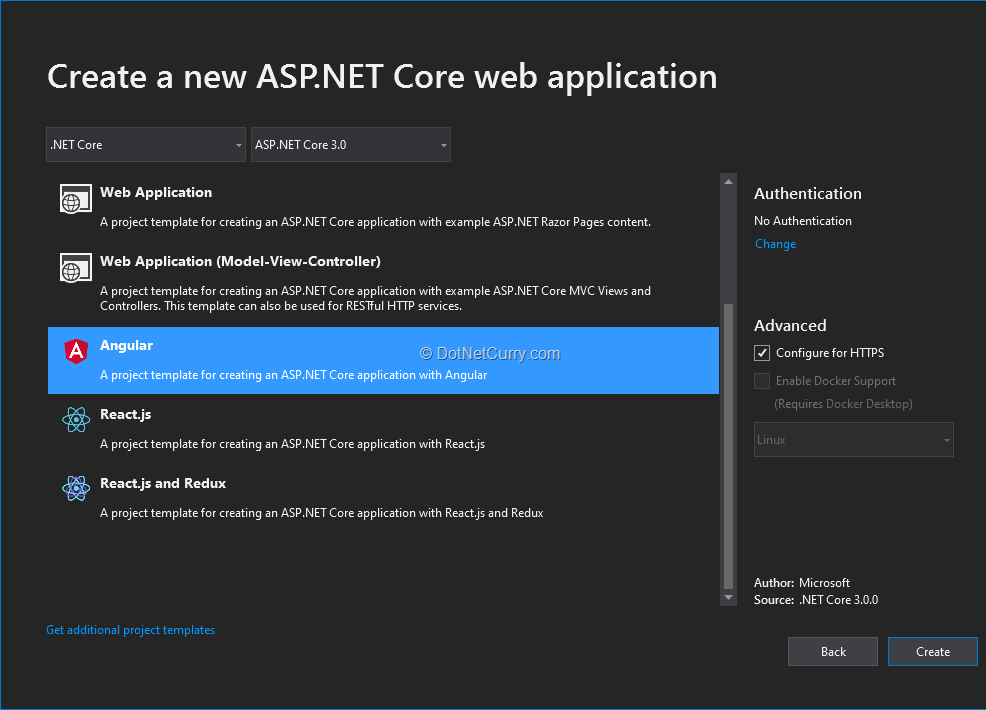
Figure 10, SPA templates in ASP.NET Core 3.0
Angular Template for ASP.NET Core apps
When generating a new project using the Angular SPA template, we get the expected client and server-side applications:
- The project structure is the expected one for an ASP.NET Core application and provides the REST API used by the client-side Angular application
- The ClientApp folder contains an Angular application created using the Angular CLI. This is a standard Angular CLI application, that can be treated like any other Angular CLI application. Any ng/npm/yarn command you are used to, will work. You could even delete the contents of the folder and create a new Angular application from scratch using ng new.
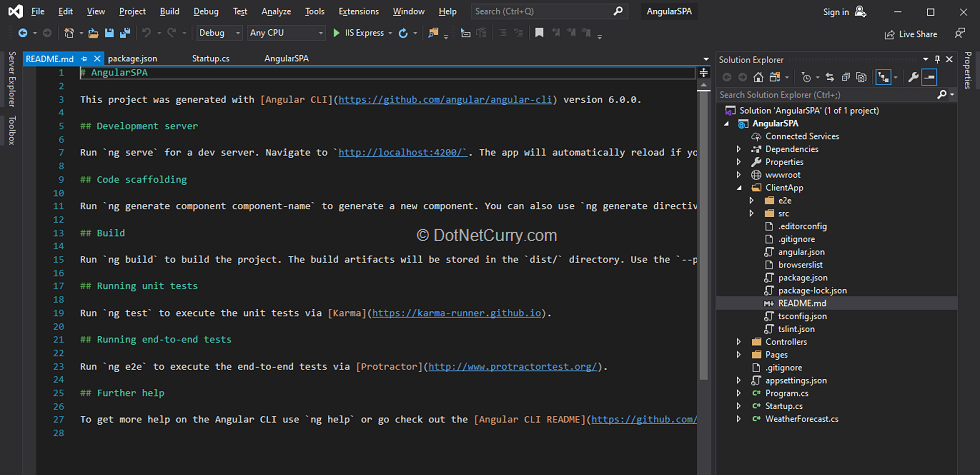
Figure 11, The ClientApp folder contains an Angular CLI application
Development setup
If you inspect the contents of the Startup class, you will see the following lines at the end of the Configure method:
As you can see, during development, the spa.UseAngularCliServer middleware is added. What this middleware does is setup the project so:
- The ASP.NET Core development server automatically starts the Angular development server
- A proxy is established between the ASP.NET Core development server and the Angular development server
That lets you press F5 to debug the project, starting both development servers. Visual Studio is also configured to open the URL of the ASP.NET Core application in the browser. When SPA files like index.html or JS/CSS bundles are requested, the ASP.NET Core application defers to the Angular development server through the established proxy.
If you run the application, you will notice it takes a while to load, that is because the Angular development server is being started and the bundles are being generated for the first time. This can be seen in the output window in Figure 12:

Figure 12, ASP.NET Core starts the Angular development server and proxies requests to it
You can even see the proxying in action. The output shows the Angular development server running at http://localhost:60119, while ASP.NET Core is running at https://localhost:44373. The browser is requesting SPA files like https://localhost:44373/main.js, which ASP.NET Core internally proxies to the Angular development server.
You can make a change to the SPA source code (like the home.component.html template). The Angular development server will update the bundles and the browser is automatically updated.
However, let’s change the ASP.NET Core source code (like the WeatherForecastController). Since you need to restart the ASP.NET Core server in order to try the changes, you will have to wait again for a full generation of the bundles. On my laptop, this takes more than 20s, so the convenience of starting both servers automatically can become a burden very quickly if you make frequent changes to the server-side code.
Updated development setup
Let’s instead update the project so both development servers are started independently and a proxy is simply established between them (so from the browser point of view there is still a single server in charge of both the API and SPA files).
Open the ClientApp folder in your preferred terminal and execute ng serve (or npm start if you don’t have the Angular CLI installed). This will start the Angular development server; you will notice a message at the end that notifies on which port it is listening to:
** Angular Live Development Server is listening on localhost:4200, open your browser on http://localhost:4200/ **

Figure 13, Running the Angular development server
All we have to do now is replace the call to spa.UseAngularCliServer in the Startup class with spa.UseProxyToSpaDevelopmentServer, specifying the URL where the Angular development server is listening:
If you run the ASP.NET Core project again, everything will work as before. However, if you have to restart the project, the Angular development server is unaffected, resulting in a much faster restart process.
Inverting the roles of the Angular development server and the ASP.NET Core server
An interesting alternative you might want to consider, is to let the Angular CLI and its development server in control of the client-side and the browser. After all, this is what these tools are designed for.
Note with this approach, you lose the ability to debug the client-side SPA code from within Visual Studio. In my opinion, browsers in general and Chrome in particular provide a superior debugging experience, particularly when combined with specific extensions for debugging each SPA framework. However, I understand this won’t be the case for everyone, so be aware of the fact and decide for yourself!
First, stop Visual Studio from opening the browser window (since it gets closed whenever the ASP.NET Core server is stopped/restarted). Either manually open the browser window or invoke the Angular development server with the open option (as in ng serve -o or npm start — -o).
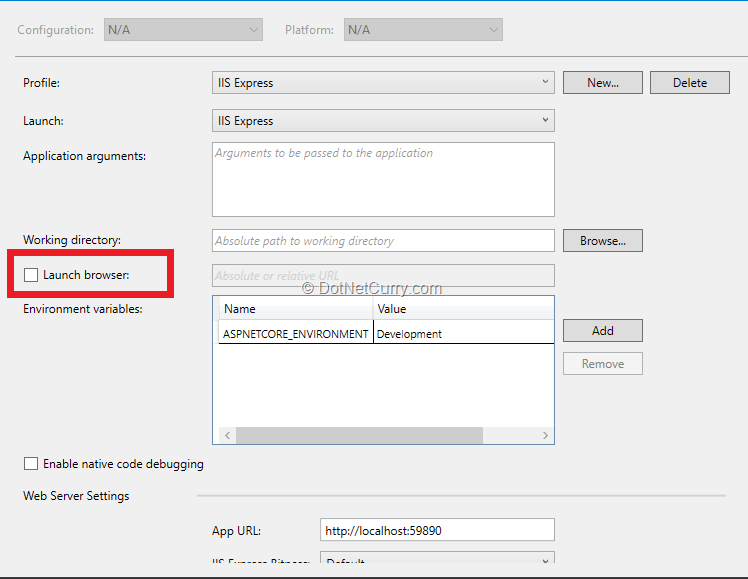
Figure 14, Disabling browser launch from the project options
Next, we can stop establishing a proxy from the ASP.NET Core server to the Angular development server. Simply remove the spa.UseProxyToSpaDevelopmentServer line from your Startup class.
Finally, we will setup the proxy from the Angular development server to the ASP.NET Core server.
· Add a new proxy.conf.json file inside the ClientApp/src folder. We need to setup the underlying webpack-dev-server so it sends all requests it cannot understand to the URL where the ASP.NET Core server will be listening:
· Then update the ClientApp/angular.json file, adding the proxyConfig option to the server command:
Make sure the URL matches the one where your ASP.NET Core application listens to. This might change depending on whether it is run from Visual Studio with IISExpress or from the command line with Kestrel.
That’s it, we have now inverted the roles during development of each application. The Angular development server is now fully responsible for the browser and client-side, while the ASP.NET Core application is responsible for serving the REST API.
Build and production setup
The project template is configured so the production bundles of the Angular application are generated during the publish process and hosted alongside the ASP.NET Core project.
If you inspect the generated project file, you will see that:
· It has been configured to run the Angular build process whenever the project is built
· The Angular build output (ClientApp/dist) is included within the published project files
The only extra bit needed is for these files to be served by the ASP.NET Core application. You can see how this is configured if you inspect the ConfigureServices method of the Startup class:
In summary, the project template follows the first alternative discussed during the Hosting SPAs in production section.
React Template for ASP.NET Core apps
This project template follows exactly the same approach as the Angular one, replacing the contents of the ClientApp folder with a React application generated using the create-react-app CLI.
- The same ASP.NET Core application providing the same REST API is included.
- The ClientApp folder contains the create-react-app React application. Any ng/npm/yarn command you are used to, will work. You could even delete the contents of the folder and recreate them from scratch using create-react-app.
Development setup
The default development setup is exactly the same as in the Angular case. If you inspect the Configure method of the Startup class, you will notice a familiar setup, this time using spa.UseReactDevelopmentServer instead of spa.UseAngularCliServer:
Since it uses the same approach as the Angular template, the same caveats discussed there apply. Modifying server-side code requires restarting the server, which will cause the webpack development server to be restarted as well, resulting in a very slow restart cycle.
Fortunately, we can modify the default setup in the same way we did in the Angular case. Open the ClientApp folder in your favorite terminal and type npm start to get the react development server started independently of the ASP.NET Core server

Figure 15, Running the React development server independently of the ASP.NET Core server
By default, the react development server will open the URL in the browser. To disable this, setup a BROWSER=none environment variable as per the advanced options of create-react-app.
Updating the default setup to simply establish a proxy to the react development server (without starting it) is as simple as replacing spa.UseReactDevelopmentServer with:
Now you can launch the project, which will open the browser with the URL where the ASP.NET Core application is listening. The browser is still able to download the SPA files because of the established proxy.
Inverting the roles of the webpack development server and ASP.NET Core server
You might also be interested in applying the same idea we discussed in the Angular case, leaving the React development server in charge of the browser and the client side, while the ASP.NET Core server is only responsible for the REST API.
The first steps are the same as in the Angular case. Update the project options in Visual Studio, removing the option to open a browser window. Then remove the spa.UseProxyToSpaDevelopmentServer line from the Startup class.
The only difference is that we need to setup the proxy for the create-react-app. This is as simple as adding the following setting to the ClientApp/package.json file:
Make sure the URL matches the one where your ASP.NET Core application listens to. This might change depending on whether it is run from Visual Studio with IISExpress or from the command line with Kestrel.
As simple as that, you can now start the React development server from the command line independently of the ASP.NET Core application, proxying any requests other than bundle files to the ASP.NET Core application.
Build and production setup
This follows exactly the same setup as in the Angular case. When publishing the project, the webpack bundles for the React application are generated using npm run build, and the bundles included within the rest of the project files:
The project is then configured to serve these files from the ClientApp/dist folder in the same way as in the Angular case.
React and Redux
This is simply a variant of the React template where the React SPA has been updated and is integrated with Redux out of the box.
The development and production setups are exactly the same as in the React template. (And the same tweaks and modifications can be applied)
Creating your own templates
After going through the Angular and React templates, you might start getting the idea on how the approach can work for any client-side SPA as long as it:
- Exposes a command to start a development web server which generates the initial bundles and updates them whenever the source code changes
- Exposes a command to generate the production bundles which can then be hosted alongside the ASP.NET Core application.
Since most SPA frameworks today use webpack and webpack-dev-server, all we need to know is the command to start the development server and the command to run the production build of the bundles.
We can demonstrate how easy it is by adapting the React template for two other different frameworks, Vue and Svelte.
Vue.js Template for ASP.NET Core Apps
Before we begin, make sure you have installed the Vue CLI. We will use the commands it provides to create our Vue project, start the development server and generate the production bundles
Now create a new project using the React SPA template. Once the new project is generated, remove the ClientApp folder. Open your favorite terminal and navigate to the project root, then execute the command “vue create client-app”

Figure 16, creating a new Vue application with the Vue-CLI
This will generate a new Vue project in the current folder, letting you customize different aspects along the way. Once the generation process has finished, make sure to rename the client-app folder as ClientApp (The Vue CLI does not accept capital letters in project names, which it also uses as the root folder name)
Once finished, cd into the ClientApp folder and use the npm run serve command to start the Vue development server:

Figure 17, Running the Vue development server
Let’s update the HelloWorld.vue component to retrieve and display data from the ASP.NET Core API, so we can test the integration between the two applications. Add a new data property and a created method like the following:
..and update the template to display them. For example, simply format as a code block:
Now all we need to do is decide how to setup the proxy between the two applications:
· If you want to proxy from the ASP.NET Core server, replace the spa.UseReactDevelopmentServer line with:
spa.UseProxyToSpaDevelopmentServer(“http://localhost:8080/”);
· If instead you want to setup the proxy from the Vue development server, first disable the ASP.NET Core project option to open the browser on debug. Then completely remove any of the spa.UseReactDevelopmentServer or spa.UseProxyToSpaDevelopmentServer lines. Then add a new vue.config.js file inside the ClientApp folder with the following contents and restart the Vue development server:
Make sure the URL matches the location where the ASP.NET Core development server is listening.
Any of the two proxy setups will let you independently start each development server (Vue and ASP.NET Core), which will appear as a single location from the browser perspective:

Figure 18, Running the Vue application with a proxy between the 2 development servers
If you prefer a setup like the one you get out of the box with the Angular/React templates, where ASP.NET Core is responsible for starting the Vue development server (with the caveats we already discussed), it is still possible. All you need is to create your own version of spa.UseAngularDevelopmentServer/spa.UseReactDevelopmentServer. You can find more info in one of my previous articles in DotNetCurry.
Regarding the production setup, the command to generate the production bundles is the same as in React (npm run build). However, the bundles are generated inside the ClientApp/dist folder instead of ClientApp/build as in the React template. We can fix this with a couple of changes:
· Update the SPA RootPath defined in the ConfigureServices of the Startup class
· Update the DistFiles element of the PublishRunWebpack target inside the project file:
After these changes, publishing the project will build and host the production bundles of our Vue application alongside the ASP.NET Core application.
Svelte Template for ASP.NET Core Apps
We can further prove how the approach works for most SPAs by modifying the React project template once more, this time replacing the React SPA with a Svelte SPA.
We will use a Svelte template that uses webpack and the webpack-dev-server, which gives us the commands npm run dev to start the development server and npm run build to generate the production bundles.
As we did with Vue, start by creating a new ASP.NET application using the React template. Once generated, remove the ClientApp folder. Then open your favorite terminal, navigate to the project root and execute the following commands to generate the Svelte client-side application.
Once they are run, you will have a Svelte application instead of a React application as the client-side SPA. If you execute npm run dev, you will get the Svelte development server started.
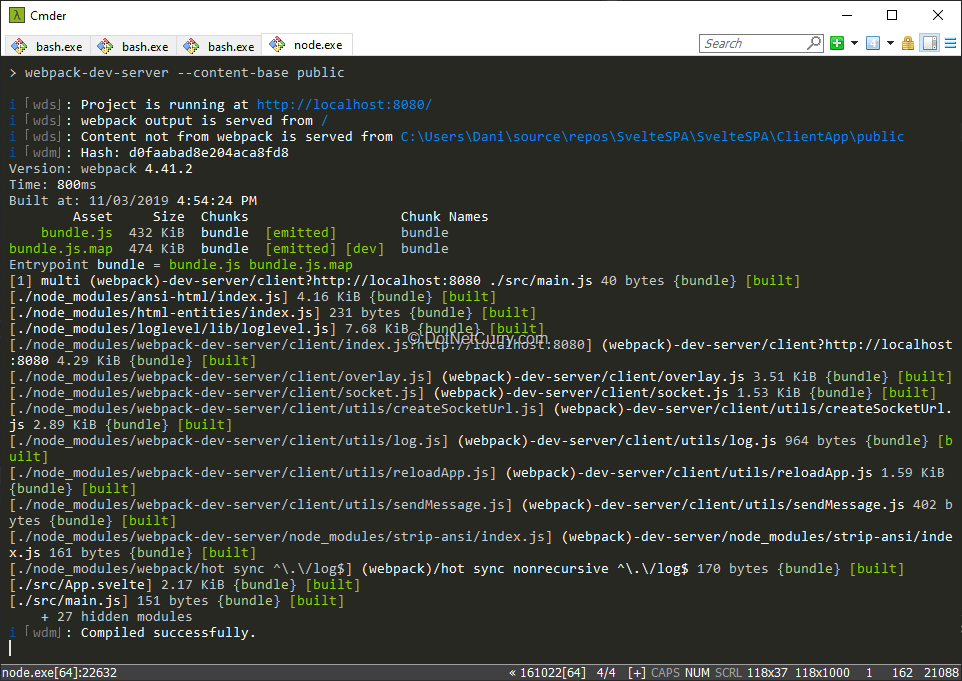
Figure 19, Running the Svelte development server
Let’s also modify this application so it fetches data from our ASP.NET Core API. Replace the contents of the App.svelte file with:
All we need to do now is decide how we want to proxy the two applications, same as we did in the Vue case.
– If you want to proxy from the ASP.NET Core server, replace the spa.UseReactDevelopmentServer line with:
– If instead you want to setup the proxy from the Svelte development server, we will need to manually configure the webpack-dev-server settings since Svelte does not provide a CLI which such a proxy option. Start by disabling the ASP.NET Core project option to open the browser on debug. Then completely remove any of the spa.UseReactDevelopmentServer or spa.UseProxyToSpaDevelopmentServer lines. Then add the following properties at the end of the webpack.config.js file:
Where mayProxy is a function defined as:
Make sure the URL matches the location where the ASP.NET Core development server is listening.
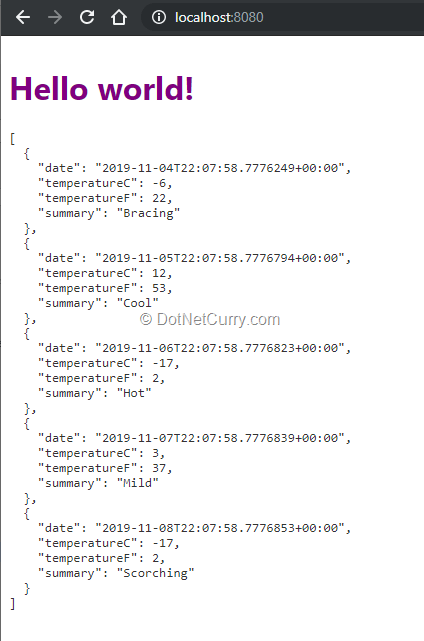
Figure 20, Running the Svelte application with a proxy between the two development servers
Any of the two proxy setups will let you independently start each development server (Svelte and ASP.NET Core), which will appear as a single location from the browser perspective. This example was also interesting because it makes obvious tools such as webpack and webpack-dev-server that other SPA frameworks “hide” behind their CLI.
Regarding the production setup, the command to generate the production bundles is the same as in the React and Vue cases (npm run build). However, we have a very similar problem as the one we saw with Vue. The bundles are generated inside the ClientApp/public instead of ClientApp/build, where the React template expects them. We need to apply the same fixes to correct the path:
– Update the SPA RootPath defined in the ConfigureServices of the Startup class
– Update the DistFiles element of the PublishRunWebpack target inside the project file:
After these changes, publishing the project will build and host the production bundles of our Svelte application alongside the ASP.NET Core application.
Conclusion
There has been a lot covered in the article, considering how to integrate four different SPA frameworks within ASP.NET Core. A considerable size of the article was dedicated to the first section, in order to understand the basic ideas behind any project template combining a SPA framework and ASP.NET Core. The rest of the article basically demonstrates how these same basic ideas can be applied with Angular, React, Vue and Svelte.
Having a good understanding of these basic concepts, and a minimum understanding of tooling such as webpack enabling the SPA frameworks, lets us easily use any other SPA framework like Vue and Svelte even when there are no official templates for them.
Deciding how each application will be run during development and whether any proxy will be established between the two applications, has a great impact on your developer experience. The default Angular/React templates insist on taking control over the SPA development server. While it might seem convenient, there are downsides that can cause a much slower experience. However, we have seen how easy it is to modify this initial setup, so you can decide for yourself which approach to follow.
Finally, we have seen how all these templates will generate the production bundles from the SPA source code and host them alongside the ASP.NET Core application. While we haven’t seen an example of the alternative hosting models described in the initial section, I hope the article gave you enough information to find your way!
