Saturday, May 23, 2020

Streamlining a search experience with ASP.NET Core and Azure Search

TL;DR: In this article, we'll delve into Azure's search-as-a-Service solution, understand its core features and benefits, and finally, integrate it with Auth0 and Azure DocumentDB on a custom database implementation. A full working application sample is available as a GitHub repository.


Whether you are a start-up with a great app or a company with established products on the market, you will face the complexity of providing a search experience for your users. There are plenty of options available that require expensive infrastructure, continuous maintenance, a lengthy ramp up process to achieve a working and efficient solution, and a dedicated team to keep it working afterward.

But what if you could achieve the same or even better results in a matter of minutes, with zero maintenance and much lower costs? What if I told you there is a solution that will let you to stop wasting time on maintaining infrastructure and focus on what really matters: creating and enhancing the best possible products for your clients.

Azure Search is a managed cloud search-as-a-service engine that fits your business' budget and can scale easily as your data grows, with just a few clicks. It's a service that provides a full-text search experience in more than 70 languages, with features such as faceting and filtering, stemming, real-time geolocation, and auto-suggestion support with a latency in the order of milliseconds---even when dealing with millions and millions of records. If you add complete reporting support on Microsoft PowerBI, customizable business logic, and phonetic analysis, all without ever needing to worry about infrastructure maintenance or platform updates, it's a no-brainer.

Azure Search's engine is not only fast---it will enable you to get things done faster and save you countless of implementation hours in the process. You can have a working production-proof scenario in a matter of minutes.

Data in, results out

Azure Search stores data in indexes and performs searches on them. Much like your beloved SQL indexes, they are meant to store key information for your search logic. Each index contains fields and each field has a type (according to the Entity Data Model.aspx)) and a set of attributes.

Supported types are Edm.String, Edm.Boolean, Edm.Int32, Edm.Int64, Edm.Double, Edm.DateTimeOffSet, Edm.GeographyPoint, and Collection(Edm.String).

Available attributes applicable to fields are:

  • Retrievable: Can be retrieved among the search results.
  • Searchable: The field is indexed and analyzed and can be used for full-text search.
  • Filterable: The field can be used to apply filters or be used on Scoring Functions (next section)
  • Sortable: The field can be used to sort results. Sorting results overrides the scoring order that Azure Search provides.
  • Facetable: The field values can be used to calculate Facets and possibly used for Filtering afterward.
  • Key: The primary unique key of the document.

A simple and visual representation of these Types and Attributes are visible during the Azure Portal index creation experience:

Index fields and attributes

Alternatively, you can use the REST API to achieve the same result.

Now that our index is ready, we need to load in data; we have several options:

  • Push data: Sending your data programmatically to Azure Search's indexes can be achieved using the REST API or through the .NET SDK. This option provides very low synchronization latency between the contents of your database and the index and lets you upload information regardless of where the data is.
  • Pull data: In this model, Azure Search is capable of pulling data from a wide variety of data sources including: Azure SQL DatabaseAzure DocumentDBAzure Blob storageSQL Server on Azure VMs, and Azure Table Storage. The service will poll the data source through Indexers on a configurable interval and use time stamp and soft-delete detection to update or remove documents from the index. Indexers can be created using the API or using the Portal. They can be run once or assigned a schedule, and they can track changes based on SQL Integrated Change Tracking or a High Watermark Policy (an internal mark that tracks last-updated time stamps).

Once your data is in, you can start by doing some searches. You can do it using the .NET SDK or REST API we mentioned before, but you can also do it directly from inside the Azure Portal without a single line of code through the Search Explorer:
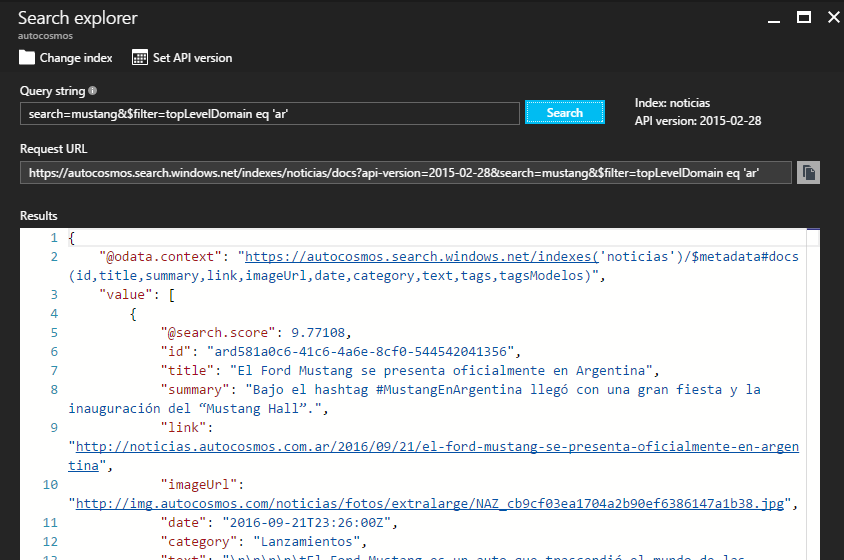
Azure Search Explorer on the Azure Portal

You can even use any of the query parameters specified on the documentation when you use the Explorer.

By default, Azure Search applies the TF-IDF algorithm on all attributes marked as Searchable and calculates order by the resulting score. We can customize this behavior with Custom Scoring Profiles in the next section.

The search experience

Azure Search has a very powerful set of features that will empower you to create the ultimate search experience, among the most used ones:

  • Facets and filters let you create drill-down navigation experiences like thos proficed by the most popular e-commerce sites by providing real-time statistics on result filters and enabling your users to apply them to further narrow their searches.
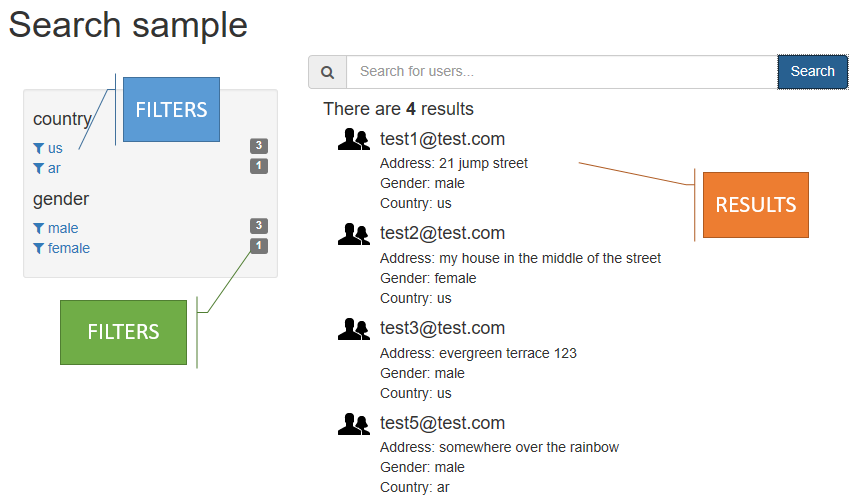
Visual example of faceting and filteringSearch Suggestions that cover auto-complete scenarios from within the search box. - Advanced querying for complex scenarios by supporting Lucene query syntax, including Fuzzy SearchProximity SearchTerm boosting, and Regular expressions.

As we mentioned earlier, results are treated with the TF-IDF algorithm to calculate the result score. But what if we don't want the default behavior? What if our documents have attributes that are more relevant than others, or if we want to provide our users with geo-spatial support?

Fortunately, we can do this with Custom Scoring Profiles. A scoring profile is defined by:

  • A name (following Naming Rules).
  • A group of one or more searchable fields and a weight for each of them. The weight is just a relative value of relevance among the selected fields. For example, in a document that represents a news article with a title, summary, and body, I could assign a weight of 1 to the body, a weight of 2 to the summary (because it's twice as important), and a weight of 3.5 to the title (weights can have decimals).
  • Optionally, scoring functions will alter the result of the document score for certain scenarios. Available scoring functions are:
    • "freshness": For boosting documents that are older or newer (on an Edm.DataTimeOffset field). For example, raising the score of the current month's news above the rest.
    • "magnitude": For boosting documents based on numeric field (Edm.Int32, Edm.Int64, and Edm.Double) values. Mostly used to boost items given their price (cheaper items are ranked higher) or number of downloads, but can be applied to any custom logic you can think of.
    • "distance": For boosting documents based on their location (Edm.GeographyPoint fields). The most common scenario is the "Show the results closer to me" feature on search apps.
    • "tag": Used for Tag Boosting scenarios. If we know our users, we can "tag" them with (for example) the product categories they like more, and when they search, we can boost the results that match those categories, providing a personalized result list for each user.

Custom Scoring Profiles can be created through the API or on the Portal.

The big picture

After creating our service and consuming it for some time, we may be wondering: Can I see how frequently the service is being used? What are the most common queries? Are users searching for something I can't provide answers for?

Fortunately, we can! We only need to have an Azure Storage account on the same region and subscription as our Azure Search service and use the Azure Portal to configure it. Afterward, we can either download the data or consume it with another service, such as Microsoft PowerBI, with a content pack.
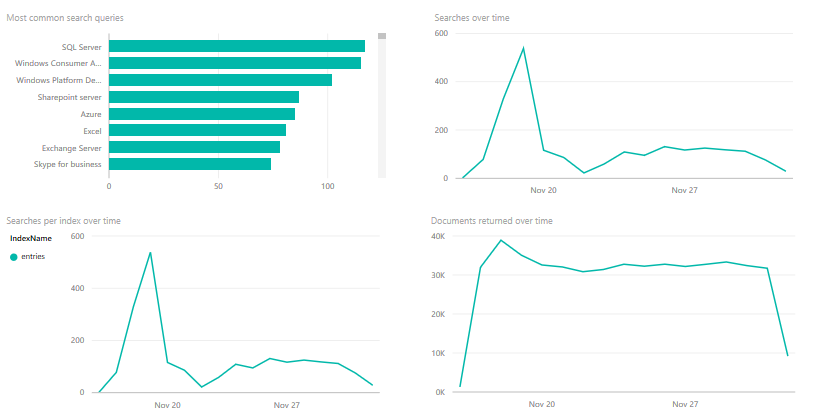
PowerBI graphs

Mixing it all together

Tools of the trade

If you followed our previous post (if you didn't, I recommend you do), you already integrated Auth0 with Azure DocumentDB as a custom database provider to store your users.

Since we will be working on ASP.NET Core (you can obtain the Runtime and Client tools here for any platform), everything I mention in this article will be open-source and cross-platform, and at the end, all the code will be available in the Github repository.

We'll start with a base template by running dotnet new -t web on our command line. This will create a basic ASP.NET Core web app on our current folder. Another alternative is to use the widely known Yeoman's ASP.NET generator.

To install Yeoman, you need an environment that has npm (Node.js Package Manager), which comes with the Node.js runtime. Once that npm is available, installing Yeoman is as simple as:

npm install -g yo

And installing ASP.NET generator with:

npm install --global generator-aspnet

Once the generator is installed, we can create our basic app by running:

yo aspnet

And picking Web Application Basic:
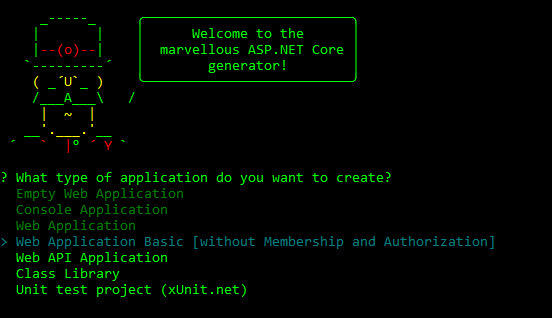
Yeoman menu creating a web app

This creates a simple ASP.NET Core MVC Web application that you can try by running dotnet restore and dotnet run on the created folder (you can also follow the next steps with a preexisting ASP.NET Core application).

Continuing after this groundwork, we will create a personalized Auth0 sign-up page, store our users’ information on DocumentDB, leverage Azure Search’s indexers to index all this data, and, finally create a search experience on ASP.NET Core for maximum performance.

Our custom lock

You will initially need your Auth0 ClientId, Secret, and Domain, which you can obtain from your Dashboard:
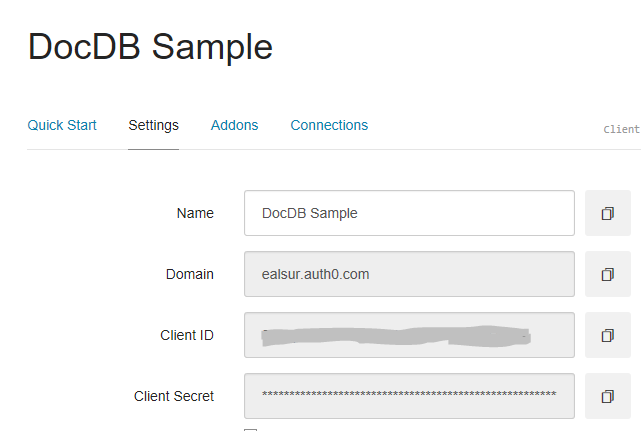
Auth0 ClientId and Secret

Auth0 offers a generous free tier so we can get started with modern authentication.

Authentication will be handled by OpenID Connect, so we will need to configure it first. We need ASP.NET Core’s OpenID Connect package, so we’ll add that to our dependencies:

"dependencies": {
   ...
   "Microsoft.AspNetCore.Authentication.OpenIdConnect": "1.1.0",
   ...
  },

After that, we need to configure and include the service on our ASP.NET Core’s pipeline on our Startup.cs file using the Domain, ClientId, and Secret that we obtained from the Dashboard:

public void ConfigureServices(IServiceCollection services)
{
    services.AddAuthentication(
        options => options.SignInScheme = CookieAuthenticationDefaults.AuthenticationScheme);
    services.Configure<Auth0Settings>(Configuration.GetSection("Auth0"));

    // Configure OIDC
    services.Configure<OpenIdConnectOptions>(options =>
    {
        // Specify Authentication Scheme
        options.AuthenticationScheme = "Auth0";

        // Set the authority to your Auth0 domain
        options.Authority = $"https://{Configuration["auth0:domain"]}";

        // Configure the Auth0 Client ID and Client Secret
        options.ClientId = Configuration["auth0:clientId"];
        options.ClientSecret = Configuration["auth0:clientSecret"];

        // Do not automatically authenticate and challenge
        options.AutomaticAuthenticate = false;
        options.AutomaticChallenge = false;

        // Set response type to code
        options.ResponseType = "code";

        // Set the callback path, so Auth0 will call back to http://localhost:5000/signin-auth0
        // Also ensure that you have added the URL as an Allowed Callback URL in your Auth0 dashboard
        options.CallbackPath = new PathString("/signin-auth0");

        // Configure the Claims Issuer to be Auth0
        options.ClaimsIssuer = "Auth0";
    });

   //Other things like Mvc...
}
public void Configure(IApplicationBuilder app, IHostingEnvironment env, IOptions<OpenIdConnectOptions> oidcOptions)
{


    app.UseCookieAuthentication(new CookieAuthenticationOptions
    {
        AutomaticAuthenticate = true,
        AutomaticChallenge = true
    });
    // Add the OIDC middleware
    app.UseOpenIdConnectAuthentication(oidcOptions.Value);       
    //Other things like Mvc...
}

We can store these settings on an appsettings.json file for programmatic access.

Let’s start customizing our users’ profiles by creating a custom sign-up experience using Auth0’s Lock. We can achieve this by creating an MVC AccountController and a Login view, which will hold the Lock’s code, and use an extension to create the OpenID Connect context information.

The syntax is pretty clear; once we add the Lock javascript library we can proceed to initialize it using the additionalSignUpFields attribute, which is an Array of objects that describe new data fields for our users to fill during sign-up:

additionalSignUpFields: [{
      name: "address",                              
      placeholder: "enter your address",            
      icon: "/images/location.png",
      prefill: "street 123",                        
      validator: function(value) {                  
        // only accept addresses with more than 10 chars
        return value.length > 10;
      }
    },
    {
      type: "select",                                       
      name: "country",                                     
      placeholder: "choose your location",                  
       options: [                                            
        {value: "us", label: "United States"},
        {value: "fr", label: "France"},
        {value: "ar", label: "Argentina"}
      ],
      prefill: "us",  
      icon: "/images/country.png"
}]

This example will prompt for two extra fields: one a text value, the other a restricted option on a selector.

Our Lock (with some other extra fields) will end up looking like this:
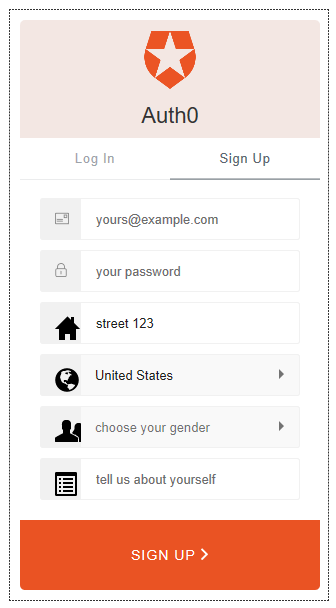
Auth0 customized sign up Lock

All these extra fields get stored on our Azure DocumentDB database inside the user_metadata attribute as part of the JSON user document.
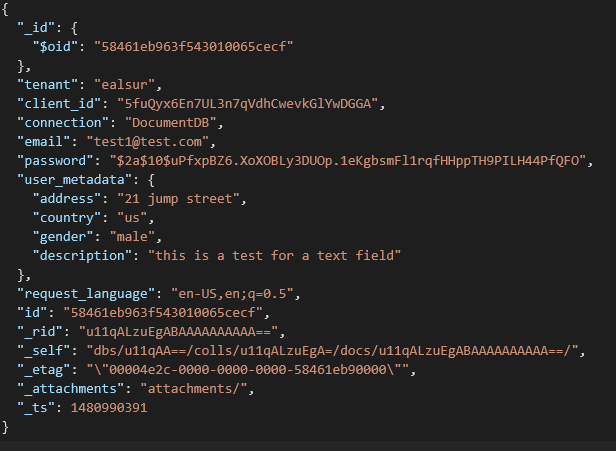
User profile on Azure DocumentDB

Indexing users

If you recall one of the features we mentioned earlier, Azure Search is capable of pulling data with indexers from Azure DocumentDB databases automatically.

We can start by creating an Azure Search account. The service includes a free tier that has all the features of the paid ones with some capacity restrictions (10,000 documents), which are enough for tests and proofs of concept.

Once our account is created, we will need to set up the import pipeline by selecting Import data:

Import data menu item

Next, we’ll search for our Azure DocumentDB database among the available sources:
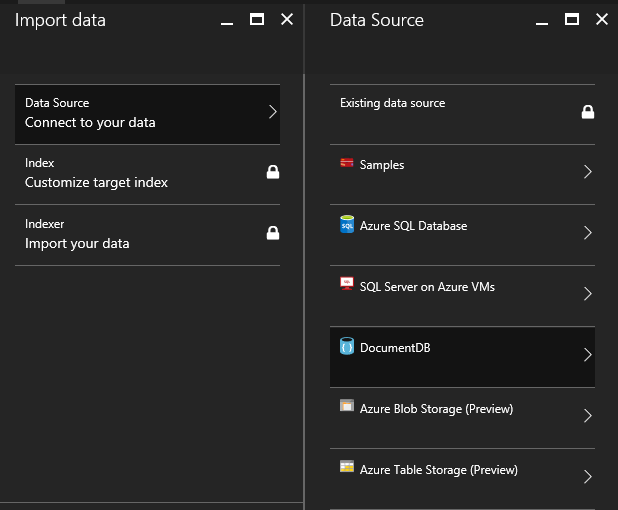
Import data sources

After selecting our database, we can customize the query that obtains our documents, so we will flatten the data generated by Auth0 by configuring this query:
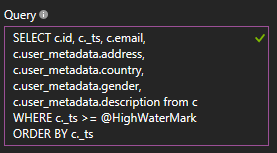
Import query

Keep in mind that the user_metadata attribute will hold your own custom fields (in our case the address, gender, country, and description), so edit this query accordingly.

Once the source is set, Azure Search probes the database for one document and provides us with a suggested index structure:
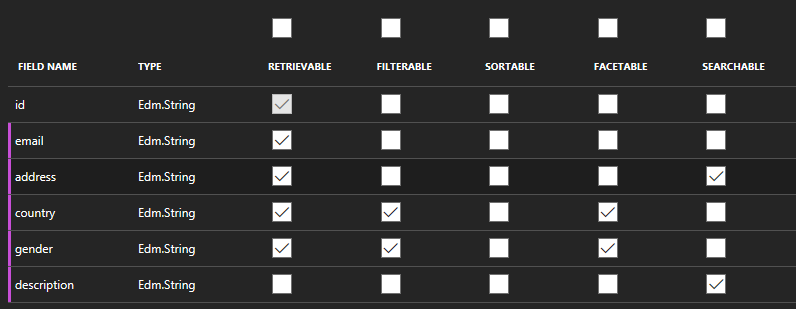
Index structure

We will mark each field’s attributes depending on the search experience we want to provide. Data that comes from closed value lists are good Filterable/Facetable candidates while open text data is probably best suited for Searchable.

Additionally, we will create a Suggester that will use our users’ email to provide an auto-complete experience later on:
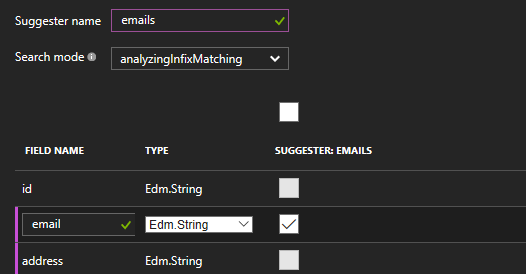
Creating a Suggester

After configuring the index structure, we are left with just the pulling schedule that will define how often our Indexer will look for new information in our database. This includes automatic change tracking and, optionally, deletions tracking by a configurable soft-delete attribute.
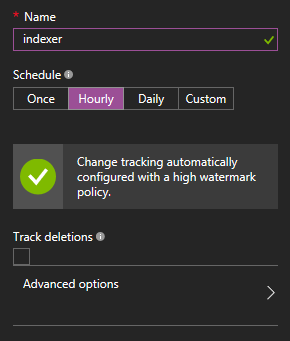
Configuring indexing schedule

The Indexer will run and detect new documents. We can always keep track of every run through the Portal:
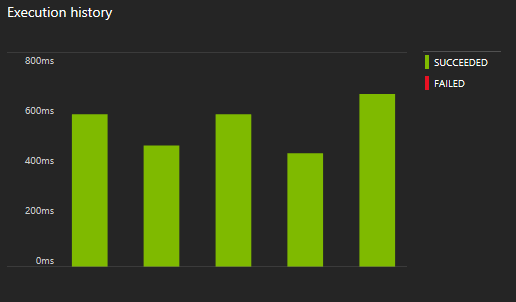
Indexer history

Finally, you will need to write down your access keys so you can use them on the next section:
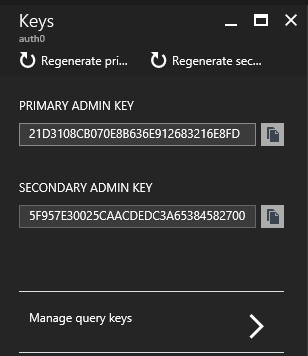
Service access keys

Creating our UX

With our index ready and our Lock configured, we need to add Azure Search’s Nuget package to our project by adding the dependency:

"dependencies": {
    ...
    "Microsoft.Azure.Search": "3.0.1",
    ...
  },

After that, we will use ASP.NET Core’s Dependency Injection to create a singleton service which will act as wrapper over Azure Search. The service’s full code can be viewed on GitHub; it is created, so you can reuse it on your own projects outside of this article and as a stepping stone.

The key part of that service is the in-memory cache of ISearchIndexClients. Each client lets you connect to one index and, internally, it works mostly like an HttpClient. Based on the most common error with HttpClient, it’s in our best interest to reuse each ISearchIndexClient to avoid Socket Exhaustion with a ConcurrentDictionary.aspx)(since our service is injected as a Singleton).

private SearchServiceClient client;
//Maintaining a Dictionary of Index Clients is better-performant
private ConcurrentDictionary<string, ISearchIndexClient> indexClients;
public SearchService(string accountName,string queryKey)
{
    client = new SearchServiceClient(accountName, new SearchCredentials(queryKey));
    indexClients = new ConcurrentDictionary<string, ISearchIndexClient>();
}

/// <summary>
/// Obtains a new IndexClient and avoids Socket Exhaustion by reusing previous clients.
/// </summary>
/// <param name="indexName"></param>
/// <returns></returns>
private ISearchIndexClient GetClient(string indexName)
{
    return indexClients.GetOrAdd(indexName, client.Indexes.GetClient(indexName));
}

Finally, we’ll register our service on our Startup.cs as a singleton by providing our account name and key we obtained from the Portal:

public void ConfigureServices(IServiceCollection services)
{
    //OIDC configuration...

    //Injecting Azure Search service
    services.AddSingleton<ISearchService>(new SearchService(Configuration["search:accountName"],Configuration["search:queryKey"] ));

    //Other things like Mvc
}

This will enable you to inject the service on any controller:

private ISearchService _searchService;
public SearchController(ISearchService searchService)
{
    _searchService = searchService;
}

Using this viewmodel to support client-to-server communications:

public class SearchPayload
{
    public int Page { get; set; }=1;
    public int PageSize { get; set; } = 10;        
    public bool IncludeFacets { get; set; } = false;
    public string Text { get; set; }        
    public Dictionary<string,string> Filters { get; set; } = new Dictionary<string,string>();
    public List<string> Facets { get; set; } = new List<string>();        
    public string OrderBy { get; set; } = "";        
    public string QueryType { get; set; } = "simple";        
    public SearchMode SearchMode { get; set; } = SearchMode.Any;        
    public string ScoringProfile { get; set; }        
}

Once the wiring is done, it’s just a matter of creating interfaces. You can use any client framework of your choice to do so. Using AngularJS for example, we can create a UI that provides for a Faceted/Filterable search experience:

Faceting and Filtering UI

And even an auto-complete experience using the Suggester we created previously:

Suggestions UI

Code samples for each experience are available at the repository.

Conclusion

Azure Search is a scalable and powerful search engine that takes the infrastructure problem out of our hands and provides us with an easy-to-use API and visual tooling in the Azure Portal. Once again, we can see how great services and technologies can be integrated to achieve a better user experience. Azure Search adds an almost-limitless search feature on top of Auth0 and Azure DocumentDB that, paired with ASP.NET Core, yields a cross-plat

Build a Simple .NET Core App on Docker

Sample App Dependencies: ASP.Net Core and Docker Packages

To build an app in Docker, first we need an app to Dockerize. This tutorial uses the ASP.Net Core project from a previous blog post on Adding Login to Your ASP.NET Core MVC App. That blog post shows you how to build a simple .Net Core application that uses Okta for Identity Management. You should work through that blog post, or at very least read it and clone the repo.

You’ll also need:

Build the ASP.NET Core Application

Docker allows you to build an application in pretty much the same way you would create an application to run on your local machine. To get started quickly, clone this git repo:

git clone https://github.com/oktadeveloper/okta-aspnet-mvc-core-sqlite-example.git

Configure Identity Management for Your ASP.NET Core App

First things first, set up an application that will provide us with identity management using the Okta developer console:

  1. Log into The Okta Developer Console
  2. Select Applications from the top menu
  3. Click the Add Application button
  4. Select Web as the platform and click Next
  5. On the Settings page:
    • Name: MyOktaApp
    • Base URIs: https://localhost:5001
    • Login Redirect URIs: https://localhost:5001/authorization-code/callback
  6. Click Done to create the application

Once you’ve created the app, click Edit to change a few settings:

  • Logout redirect URIs: https://localhost:5001/signout-callback-oidc
  • Initiate login URI: https://localhost:5001/authorization-code/callback

At the bottom of the page, you’ll see Client Credentials, including a ClientID and a Client secret. Take note of these for later use.

Update the Settings in the ASP.NET Core App

The sample application you created has identity management configuration stored in appsettings.json, unless you cloned the repo above rather than working through the complete post. In real life, you shouldn’t store this configuration in your source code for security reasons. In this post, we will demonstrate how to reliably pass dynamic configuration to your application, and close this security gap. Start by removing the settings.

Edit appsettings.json to remove:

"Okta": {
    "ClientId": "{OktaClientId}",
    "ClientSecret": "{OktaClientSecret}",
    "Domain": "https://{yourOktaDomain}.okta.com"
},

To test this change:

dotnet run

Should return:

An exception of type 'System.ArgumentNullException' occurred in Okta.AspNet.Abstractions.dll but was not handled in user code: 'Your Okta URL is missing. Okta URLs should look like: https://{yourOktaDomain}. You can copy your domain from the Okta Developer Console.'

Nice work!

Use Docker to Containerize the ASP.NET Core App

Docker is a collection of virtualization technologies wrapped up in an easy to use package. Don’t let “virtualization” trip you up, though. Docker doesn’t deal with virtual machines; instead, it works by sharing a kernel between multiple isolated containers. Each one of these containers operates utterly unaware of other containers that may be sharing the same kernel. Virtual machines, in contrast, run multiple discrete operating systems on top of a virtualized hardware platform that, itself, runs atop the host operating system. Docker is much more lightweight, and many Docker containers can run on a single host machine.

Build the ASP.NET Core App Using Docker

Let’s put Docker to work. The key to Dockerizing an application is the Dockerfile. Add one to the root of your project with the following contents to get started:

FROM mcr.microsoft.com/dotnet/core/sdk:2.2 AS build
WORKDIR /src
COPY ["OktaMvcLogin.csproj", "./"]
RUN dotnet restore "./OktaMvcLogin.csproj"
COPY . .
RUN dotnet build "OktaMvcLogin.csproj" -c Release -o /app

The uppercase words are Docker commands. There aren’t many of them, and you can find the details of them all at Docker’s website.

FROM tells Docker which image you want to use for your container. An image is a compressed file system snapshot. Also, the result of building a Dockerfile is a new image. So, one way to look at a Dockerfile is as a series of transformations that convert one image into another image that includes your application.

  • WORKDIR tells Docker which directory to use for performing subsequent commands.
  • COPY tells Docker to copy a file from your local filesystem into the container image.
  • RUN executes commands within the container image.

So, in plain English - this Dockerfile is based on the dotnet/core/sdk image hosted at mcr.microsoft.com. Docker copies the .csproj file from your local working directory to create your image and dotnet restore restores all the referenced packages. Once that’s done, Docker copies the remaining files from your working directory, then dotnet build creates a Release build at /app.

Manage Dependencies Efficiently with Docker

Reading this, you may be thinking, why bother to copy the project file and run restore before copying the source code and running build? Why not copy everything then build and restore in one step? The answer is caching. Every time a Dockerfile modifies the docker image, Docker creates a snapshot. If you copy a file or run a command to install a package, Docker captures the differences in a new snapshot. Docker then caches and reuses the snapshots if the image hasn’t changed. So, by restoring dependencies as a separate step, the image snapshot can be reused for every build, as long as the dependencies haven’t changed. This process speeds up the build considerably since downloading dependencies can take some time.

Run the ASP.NET Core App in a Docker Container

As mentioned above, a Dockerfile can be considered a series of filesystem transformations. Your current file transforms the Microsoft-provided SDK container into a new container with both the Microsoft SDK and a release build of your application stored at /app.

Try this out::

# Build an image using the Dockerfile in the current directory
docker build --target build -t oktamvclogin .
# Run the image, executing the command 'ls /app'
docker run -it oktamvclogin ls /app

You’ll see that the app folder in your container image contains the Release build output for your project.

Remove ASP.NET Core Development Tools from Your Docker Image

So far, you’ve built your application within a Docker container. Nice work!

However, remember Docker, as a tool, reduces the number of moving parts in your application. To improve reliability by eliminating unnecessary dependencies, we also need to remove development tools, which can cause conflicts and open security risks. The Microsoft-provided SDK image includes development tools, so let’s look at how to get rid of them.

Add the following lines to your Dockerfile:

FROM build AS publish
RUN dotnet publish "OktaMvcLogin.csproj" -c Release -o /app

FROM mcr.microsoft.com/dotnet/core/aspnet:2.2 AS base
WORKDIR /app
EXPOSE 5001

FROM base AS final
WORKDIR /app
COPY --from=publish /app .
ENTRYPOINT ["dotnet", "OktaMvcLogin.dll"]

You will see a few FROM commands, each with an AS clause. This syntax provides multi-stage builds, the key to getting rid of unnecessary dependencies. In plain English, your build process is now:

  1. Use the SDK image to create a release build of the application. Call this stage ‘build’
  2. Use the ‘build’ stage image to publish the application to the ‘app’ folder. Call this stage ‘publish’
  3. Download the Microsoft-provided ASP.NET core image, which has only runtime components. Call this stage ‘base’
  4. Using the ‘base’ stage image, copy the contents of the ‘app’ directory from the ‘publish’ stage. Call this stage ‘final’

So, your Dockerfile now uses the SDK image to build your application, then discards that image and uses a runtime image to run the application.

Run the ASP.NET Core Application in Docker

The ENTRYPOINT command merits special attention. So far you’ve seen how Dockerfiles define a series of filesystem transformations, but more often than not, a Docker container is executable. By that, I mean that you run the container in Docker, and the result is a fully configured, running application. ENTRYPOINT is one of the mechanisms that make that work. When you run a container, Docker executes the command specified by the ENTRYPOINT. In the case of your application, that command is dotnet OktaMVCLogin.dll.

So now…

docker build -t oktamvclogin .
docker run oktamvclogin

… throws the same exception as before:

Unhandled Exception: System.ArgumentNullException: Your Okta URL is missing. Okta URLs should look like: https://{yourOktaDomain}. You can copy your domain from the Okta Developer Console.

Only this time, it’s Dockerized. How’s that for progress?

The application doesn’t work because you removed the sensitive configuration from appsettings.json.

Pass Configuration to Docker

To fix this problem, we need to pass configuration to the Docker container as environment variables. ASP.NET Core picks up all environment variables prefixed with ASPNETCORE_ and converts __ into :. To pass the configuration values for Okta:ClientIdOkta:ClientSecret and Okta:Domain modify your command like this:

docker run -e ASPNETCORE_Okta__ClientId="{yourClientId}" \
-e ASPNETCORE_Okta__ClientSecret="{yourClientSecret}" \
-e ASPNETCORE_Okta__Domain="https://{yourOktaDomain}" \
oktamvclogin

This time the result will be a bit healthier:

Hosting environment: Production
Content root path: /app
Now listening on: 'http://[::]:80'
Application started. Press Ctrl+C to shut down.

NOTE: you may also see a ‘No XML Encryptor’ warning. You can ignore that for this walkthrough.

Configure Docker Networking

From this message, you might think you could go to http://localhost and see your app in all its glory. However, your app runs in a container and listens on port 80 but, by default, your local machine cannot access port 80 on your container. Remember, your container runs in its own little world. That world has its own virtual network, and it’s locked down by default.

Thankfully, you can quickly get access to your container’s virtual network by mapping a port on your local machine to a port on your container.

docker run -e ASPNETCORE_Okta__ClientId="{yourClientId}-" \
-e ASPNETCORE_Okta__ClientSecret="{yourClientSecret}" \
-e ASPNETCORE_Okta__Domain="{yourOktaDomain}" \
-p 5001:80 \
oktamvclogin

Now, if you open a browser and go to http://localhost:5001 (because you mapped port 5001 to port 80 in your container), Et voila!

NOTE: this approach is suitable for development. However, for production workloads, Docker offers a comprehensive set of options designed for managing virtual networks. For more information see the networking overview in Docker’s documentation.

Configure SSL/TLS for Your Docker Image

If you click on the Login link in your application, chances are you’ll get an error from Okta with a message:

Description: The 'redirect_uri' parameter must be an absolute URI that is whitelisted in the client app settings.

This problem happens because when you configured the application in the Okta dashboard, you specified that the redirect URL was HTTPS. Now, since you accessed the site using HTTP, the redirect URL doesn’t match, and you get this error. One solution is to update the redirect URL in the Okta application. While that will work, it’s a bad idea. The redirect contains sensitive information and to prevent it from being read while in transit, it should be protected using a TLS channel.

Create a self-signed certificate

To set up TLS, you’ll need a certificate. In real life, you’d buy one from a reputable provider, but for this walkthrough, a self-signed certificate will do the job.

Generate a certificate:

openssl req -x509 -newkey rsa:4096 -keyout key.pem -out cert.pem -days 365

To use the certificate with Kestrel (the ASP.NET Core webserver), we need to create a pfx file that has both the public and private keys. You can do that using:

openssl pkcs12 -export -out webserver.pfx -inkey key.pem -in cert.pem

As part of the certificate creation process, you’ll be prompted to create an Export password. Be sure to take note of this as you’ll need it later to use the certificate. You’ll also be walked through the configuration process (Country NameState or Province, etc.).

Add the certificate to the Docker image

You’ve created a certificate in your local filesystem. To use it in your Docker container, modify the Dockerfile to copy it into the final image.

Change the `final’ stage to:

FROM base AS final
ENV ASPNETCORE_URLS="https://+"
ENV ASPNETCORE_Kestrel__Certificates__Default__Path="./webserver.pfx"

WORKDIR /app
COPY --from=publish /app .
COPY webserver.pfx .
ENTRYPOINT ["dotnet", "OktaMvcLogin.dll"]

Setting the ASPNETCORE_URLS environment variable to https://+ ensures that the webserver only listens for https requests.

Since you’ve changed the Dockerfile, you can rebuild the image and run it:

docker build -t oktamvclogin .
docker run -e ASPNETCORE_Okta__ClientId="{yourClientId}" \
-e ASPNETCORE_Okta__ClientSecret="{yourClientSecret}" \
-e ASPNETCORE_Okta__Domain="{yourOktaDomain}" \
-e ASPNETCORE_Kestrel__Certificates__Default__Password="{yourExportPassword}" \
-p 5001:443 \
oktamvclogin

Notice the additional environment variable with the certificate export password and also, that the port mapping has changed from port 80 to port 443.

You can now navigate to https://localhost:5001, and this time, you’ll be able to log in and use the sample application correctly.

NOTE: Since you’re using a self-signed certificate, your browser may display a warning page. You can safely ignore this warning.

Not the Best Way to Start Your Docker Container

Converting an application to run in Docker is relatively straightforward and offers significant benefits. However, passing a whole load of configuration to docker run isn’t particularly user-friendly and is error-prone. Thankfully, the good folks at Docker have already come up with a solution to this problem - docker-compose.

Using Docker Compose is pretty straightforward. Create a file named docker-compose.yml in the same folder as your Dockerfile and source code and add the following:

version: "3"
services:
  web:
    build: .
    image: oktamvclogin
    ports:
      - "5001:443"
    environment:
      - ASPNETCORE_Okta__ClientId: "{yourClientId}"
      - ASPNETCORE_Okta__ClientSecret: "{yourClientSecret}"
      - ASPNETCORE_Okta__Domain: "{yourOktaDomain}"
      - ASPNETCORE_Kestrel__Certificates__Default__Password: "{yourExportPassword}"

The docker-compose file contains all values you previously passed to the docker run command.

Now, to run the application:

docker-compose up

And it all just works. Happy days.

Of course, this is barely scratching the surface of what you can do with Docker Compose. To find out more, check out the official overview of Docker Compose

Containerize and configure an ASP.NET Core app with Docker

By working through this post, you’ve learned how to:

  • Containerize an ASP.NET Core application with Docker
  • Pass configuration to a Docker container
  • Configure SSL/TLS for a containerized ASP.NET Core application
  • Use docker-compose to efficiently run a Docker container with a particular configuration

Now, by including a Dockerfile along with your source code, any developer can build your app – reliably. They can build it in any environment, as long as they have Docker installed, and it will work in precisely the same way. Every time, without exception. No dependency issues, no operating system hassles. It will just work. Not only that, but you can deploy the same container directly to production without any further modification.

How Functional Reactive Programming (FRP) is Changing the Face of Web Development


Like when watching a sleight-of-hand magician, Web developers have been distracted by the recent popularity wars between the various front-end frameworks, and we’ve missed a fundamental shift in the nature of these frameworks. Functional Reactive Programming (FRP) has been quietly and steadily showing up in many aspects of the main frameworks of today.


You see this same change happening elsewhere, but as frameworks are the center of the front-end Web world, this is where all these influences come together. Why is this? Before I can answer that, you need to understand a few things about FRP.
What is FRP?

The simple answer to this question is that there is no simple answer. To the more academic side of the industry, FRP is all about values that change over time, sometimes called signals. But to the rest of the industry, FRP is more of an umbrella term that refers less to this esoteric definition, and more to the ancillary constructs and ideas that are generally part of FRP. These ideas and technologies include:
Immutable data
Observables
Pure functions
Static typing
One-way state transitions

Let’s take a quick look at each one of these items.
Immutable Data

Immutable data is a data type that can’t change any value once it is created. Imagine an array that’s created with two integers, 2 and 5. After you create it, you can’t remove or add any elements, or change the values of either of those two elements. At first, this may seem to be unnecessarily limiting. When you need to turn that array into an array with three elements, 2, 5, and 8, you create a new array with those three elements. This may sound extremely non-performant, but in practice, it’s not nearly as expensive as you would think and when used in change detection algorithms that exist in just about every front-end framework, it can lead to amazing performance gains. The most popular library that implements this is immutable.js.

Here’s a simple example of using immutable.js to create a data structure, and then make a modification.
var map1 = Immutable.Map({a:1, b:2, c:3});
var map2 = map1.set('b', 50);
map1.get('b'); // 2
map2.get('b'); // 50


Notice that in the preceding code example, a new object is created when you change just one value. First, a map is created and then one of the values in that map is changed to a new value. This creates an entirely new object. The old object, map1, still has 2 for the value of b, and map2 has 50 for the value of b.
Observables

Observables have existed in the JavaScript world for a long time, although the FRP version of observables usually comes with more than the simplest form of an observable. These observables often have many more features than a typical observable and you can see this in action with libraries such as RxJS and Bacon.js. Like immutable data, observables give significant performance gains in change detection strategies.

Here’s an example from the RxJS library that shows how to subscribe to an async data source, filter and map it, and then print out the results as they become available. This works not only with one piece of return data, but with a stream of data arriving intermittently as stock data does.
var source = getAsyncStockData();
var subscription = source
.filter(function (quote) {
return quote.price > 30;
})
.map(function (quote) {
return quote.price;
})
function (price) {
.subscribe(
console.log('Prices higher than $30: $' + price);
},
function (err) {
console.log('Something went wrong');
});
subscription.dispose();


Pure Functions

Pure functions are perhaps the most vague of these items because "pure" is a very common word. In this case, a pure function has no side effects. You can run the function as many times as you want and the only effect is that it computes its return value. Pure functions are significantly easier to both test and maintain. Using them lowers maintenance costs in applications written in frameworks like React and Mithril.

Here’s a classic example of a non-pure function with side effects:
function getCustomerPrice(customer, item) {
var price;
if(customer.isUnapproved) {
customer.unapprovedAttempts
.push({itemId: item.id})
} else if(customer.isPreferred) {
price = price * .9;
}
return price;
}


Notice how the Customer element is modified if they’re unapproved? This is an example of a side effect. It’s like a byproduct of the main job of the function, which is to simply get the customer price, and is the source of many bugs in programming. That’s why you want pure functions with no side effects. A pure function version of this same code would leave logging the unapproved attempt to another piece of the program and simply return the customer price, as in the following:
function getCustomerPrice(customer, item) {
var price;
if(!customer.isUnapproved &&
customer.isPreferred) {
price = price * .9;
}
return price;
}


In any realistic application, you’ll need state, and you’ll need to modify that state at certain points, like logging the unapproved attempt shown in the first example here. But by drawing a line between areas that modify state, which are non-pure, and the parts that don’t, which are implemented with pure functions, you create a lot of code that’s simpler to build, test, and maintain. Pure functions rely on their inputs and not on any context. That means that they can be moved around and refactored easily. And, as shown in this example, pure functions tend to help you follow the single responsibility principle and keep things simple.
Static Typing

Static typing is the system whereby types of variables are established at compile time. This allows a program to avoid a host of typical run time errors and simple bugs. Many statically typed languages require a fair amount of ceremony to document the types and many programmers find this onerous. Some statically typed languages can infer types based on context, which means that most types don’t need to be declared. You see this in Flow and TypeScript.

Let’s look at an example of using an instance of a class in vanilla JavaScript, and again with TypeScript
class TodoModel{
// class properties

complete() {
// implementation
}
}
// vanilla JS
var todoModel1 = new TodoModel();
todoModel1.finish(); // throws a runtime error
//TypeScript
var todoModel2:TodoModel = new TodoModel();
todoModel2.finish(); // compile time error


The only difference between these two is that you’ve told the compiler that todoModel2 is of type TodoModel, which is a class that you declared. This lets the compiler know that if, later on, someone tries to call the finish method as shown in the snippet, there’s no finish method and the error can be thrown at compile time. This makes the bug much cheaper to fix than waiting until unit tests are written, or even worse, having the error thrown at run time.

Also, notice that an inferred type system can give the same benefits by inferring that the type is TodoModel. That means that you don’t have to declare the type, and the "vanilla JS" version can still act as if typed. Errors like the one discussed can still be caught at compile time. Both Flow and TypeScript support this.
Advertisement

One-Way State Transitions

One-way state transitions are perhaps the most significant of these various technologies. One-way state transitions are an architecture whereby changes to the model all go through a common type of dispatcher, then, when changes to the model are made, these changes are rendered to the screen. Figure 1 illustrates this idea. This is a way of thinking about your program as a simple cycle. Your model passes through a rendering function and becomes viewable elements. Changes (usually represented by user events) update the model, which then triggers a re-rendering of the view. The rendering functionality is ideally implemented as a pure function.
Figure 1: One-Way State Transitions.

This concept deserves its own article to sufficiently explain these ideas, so I’ll just touch on it. This architecture is significantly simpler and easier to learn than typical development because all actions that can change the state of a program are clearly and centrally defined. This makes it easier to look at a program and understand how it behaves. Imagine learning to operate a car without having first spent years in one, and having no guidance. As you explored it, you’d discover that you could lock and unlock the doors, open the hood and if you sat in it, you could turn the steering wheel (which doesn’t seem to do anything useful), but that doesn’t get you anywhere near to driving. You still need to learn that the key goes in the column to start the car, and how the radio and air conditioning work, and how turning the wheel really only matters when you’re in motion, and how the pedals control the movement of the vehicle.

Now instead, imagine a manual that listed every action the car could take, and sent you to a page where you could read exactly what effect that action had. This is the difference between common programming architectures and one-way state transitions.

Using this methodology, it’s cheaper to bring new developers onto a project because they can come up to speed quicker, with less direction, maintenance costs are down because problems are easier to track down, and brittleness is reduced overall. The largest payoff may be that as project sizes grow, velocity doesn’t suffer the typical slow-down. Although the functional programming crowd (Haskell and Erlang programmers, among others) have been touting these very benefits for a long time, mainstream development as a whole hasn’t been listening until now. And many people don’t even realize where all of these ideas came from.
Deja Vu

It’s important to note that most of these ideas are not particularly new, and many of them existed as early as the 80s or even earlier. Each of them can bring benefits to most development projects, but when used together, the total is greater than the sum of its parts. What’s particularly interesting is the fact that these ideas aren’t just suitable for a subset of application types. These same ideas have been used in games, animation, operating systems, and everything in between. For an interesting read on the parallels between React and Windows 1.0, check out this article: http://bitquabit.com/post/the-more-things-change/.
FRP Becomes Mainstream at Last

We are starting to see each of these previously mentioned ideas making their way into the mainstream of the Web development world. This is best recognized by their effect on the two dominant frameworks, React and Angular 2. Although it hasn’t been released yet, due to the dominant market share of Angular 1, Angular 2 is definitely one of the frameworks occupying the attention of most front-end developers.

I’d be remiss if I didn’t mention a third framework that you’ve probably never heard of: Elm. Elm is another front-end framework that makes the audacious move of being written in an entirely new language. Built by Evan Czaplicki while he attended Harvard, it’s an attempt to make FRP more digestible to mainstream programmers. The reason that this is so remarkable is that it’s had a heavy influence on both React and Angular 2.

The main reason that we’re seeing these influences make their way into Web development now is centered on the never-ending quest for more maintainable code. Evan Czaplicki gave a great talk on this topic titled "Let’s be Mainstream" ( HYPERLINK "https://www.youtube.com/watch?v=oYk8CKH7OhE" https://www.youtube.com/watch?v=oYk8CKH7OhE). As front-end applications grow ever larger, the need to make them easier to maintain has become more important. Because of this, we’re seeing new techniques being introduced in an attempt to achieve this goal.

You can see this if you take a brief look at the overall history of front-end Web development. At each stage, the need for maintenance has driven a continual quest for methods to manage the complexity. The first attempt was simpler APIs through libraries like jQuery. Then frameworks came on the scene as a way to organize code into whole applications while still being modular and separating out various concerns. Automated testing quickly became a hot topic at this point. Then, increasingly fully featured frameworks appeared to help developers build bigger and bigger apps. All the while, everyone tried new methods to deal with constantly-expanding code bases.

Another reason we’re seeing these influences now is that the high demand in front-end Web development continues to attract developers from other areas. These developers are bringing with them ideas that worked for them in other environments, and existing developers are looking to other areas for ideas that can help improve code built for the browser.

Changes are popping up all over. Both React and Angular 2 support using observable and immutable data. Both of them use one-way state transitions internally, and React even goes so far as to codify it for developers to follow with libraries such as Flux and the more recent Redux. Redux was directly inspired by Elm. Angular 2 supports using Redux or something similar, although they don’t directly encourage it at this point. Both of them, meanwhile, encourage developers to use static typing with both Flow for React, and TypeScript in the Angular world.
What’s Next

It’s difficult to predict the future in any reasonable way, but there are a few places that you might see these ideas in action.

As FRP becomes mainstream, that could open up the door to widespread adoption of FRP languages like Elm. Combined with the features of Web Assembly, which makes JavaScript a more viable compile target, FRP languages such as Elm or Haskell—or new ones we haven’t seen yet—could possibly make their way into popular Web development.
Advertisement


Another thing we’ll likely see is a near-standardization on architectures using Flux-like one-way data state transitions. The React world seems to be standardizing on Redux, a simpler implementation than Flux, and adaptations of Redux for other frameworks are starting to appear.

Obviously, reading an article is useless unless it gives you actionable knowledge. So here’s my advice to take advantage of the winds of change that are blowing in our industry:
Be Aware. Just knowing what’s going on will put you ahead of the curve.
Learn. Go check out RxJs or Immutable.js or learn React and Angular 2.
Open your mind. Even if these ideas sound strange to you, don’t resist change. Open yourself up to new ideas and new paradigms. This is perhaps the best piece of advice I can give you
.

Free hosting web sites and features -2024

  Interesting  summary about hosting and their offers. I still host my web site https://talash.azurewebsites.net with zero cost on Azure as ...