Saturday, November 20, 2021

Run xUnit Tests inside Docker during an Azure DevOps CI Build


Running your build inside a Docker container has many advantages like platform independence and better testability for developers. These containers also bring more complexity though. In my last post, I showed how to set up the build inside a Docker container. Unfortunately, I didn’t get any test results or code coverage after the build succeeded. Today, I want to show how to get the test results when you run tests inside Docker and how to display them in Azure DevOps.

You can find the code of this demo on Github.

Run Tests inside Docker

Running unit tests inside a Docker container is more or less the same as building a project. First, I copy all my test projects inside the container using the COPY command:

COPY ["Tests/CustomerApi.Test/CustomerApi.Test.csproj", "Tests/CustomerApi.Test/"]
COPY ["Tests/CustomerApi.Service.Test/CustomerApi.Service.Test.csproj", "Tests/CustomerApi.Service.Test/"]
COPY ["Tests/CustomerApi.Data.Test/CustomerApi.Data.Test.csproj", "Tests/CustomerApi.Data.Test/"]

After copying, I execute dotnet restore on all test projects.

RUN dotnet restore "Tests/CustomerApi.Test/CustomerApi.Test.csproj"
RUN dotnet restore "Tests/CustomerApi.Service.Test/CustomerApi.Service.Test.csproj"
RUN dotnet restore "Tests/CustomerApi.Data.Test/CustomerApi.Data.Test.csproj"

Next, I set the label test to the build id. I will need this label later to identify the right layer of the container to copy the test results out of it. Then, I use dotnet test to run the tests in my three test projects. Additionally, I write the test result into the testresults folder and give them different names, e.g. test_results.trx.

FROM build AS test
ARG BuildId
LABEL test=${BuildId}
RUN dotnet test --no-build -c Release --results-directory /testresults --logger "trx;LogFileName=test_results.trx" Tests/CustomerApi.Test/CustomerApi.Test.csproj
RUN dotnet test --no-build -c Release --results-directory /testresults --logger "trx;LogFileName=test_results2.trx" Tests/CustomerApi.Service.Test/CustomerApi.Service.Test.csproj
RUN dotnet test --no-build -c Release --results-directory /testresults --logger "trx;LogFileName=test_results3.trx" Tests/CustomerApi.Data.Test/CustomerApi.Data.Test.csproj

That’s already everything I have to change to run the tests inside the container and generate test results. You don’t have to split up every command as I did but I would recommend doing so. This helps you finding problems and also is better for the caching which will increase the build time of your container. You could also use a hard-coded value for the label but if you have multiple builds running at the same time, the pipeline may publish the wrong test results since all builds have the same label name.

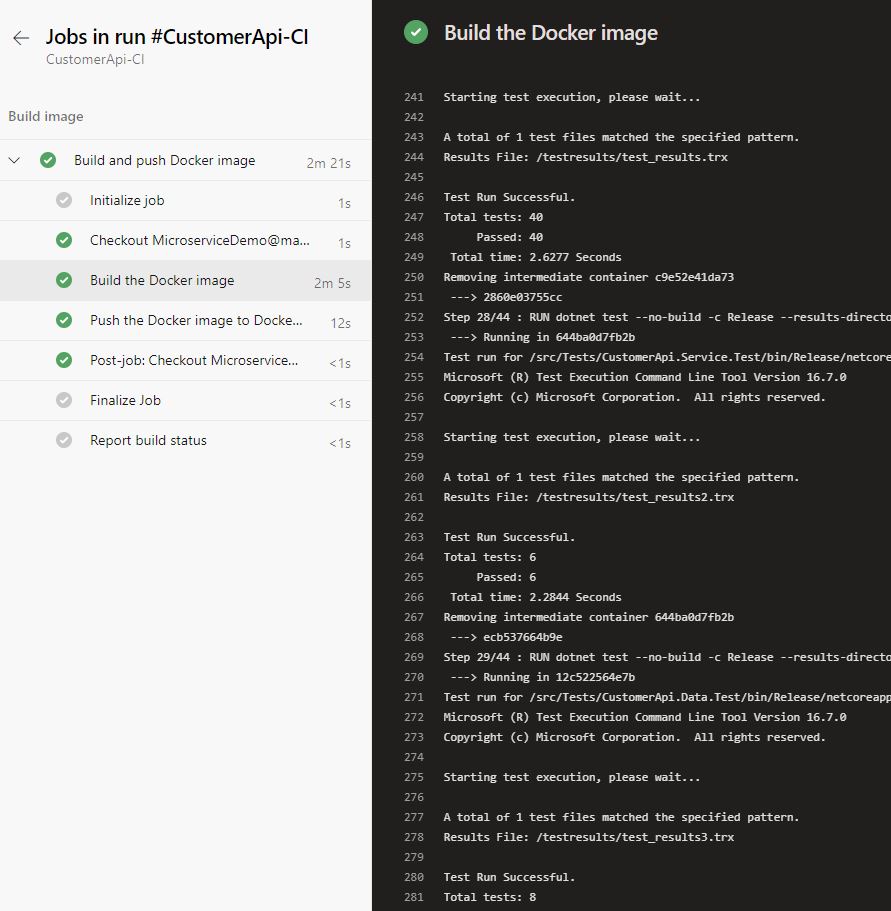
If you run the build, you will see the successful tests in the output of the build step.

The tests ran inside the Docker container

The tests ran inside the Docker container

If you try to look at the Tests tab of the built-in Azure DevOps to see the test results, you won’t see the tab.

The build was successful but not Test Results are showing

The build was successful but not Test Results are showing

The Tests tab is not displayed because Azure DevOps has no test results to display. Since I ran the tests inside the container, the results are also inside the container. To display them, I have to copy them out of the docker container and publish them.

Copy Test Results after you run Tests inside Docker

To copy the test results out of the container, first I have to pass the build id to the dockerfile. To do that, add the following line to the Docker build task:

arguments: '--build-arg BuildId=$(Build.BuildId)'
view rawArguments.yaml hosted with ❤ by GitHub

Next, I use the following PowerShell task in the CI pipeline to create an intermediate container which contains the test results.

- pwsh: |
$id=docker images --filter "label=test=$(Build.BuildId)" -q | Select-Object -First 1
docker create --name testcontainer $id
docker cp testcontainer:/testresults ./testresults
docker rm testcontainer
displayName: 'Copy test results'

Docker creates a new layer for every command in the Dockerfile. I can access the layer (also called intermediate container) through the label I set during the build. The script selects the first intermediate container with the label test=true and then copies the content of the testresults folder to the testresults folder of the WorkingDirectory of the build agent. Then the container is removed. Next, I can take this testresults folder and publish the test results inside it.

Publish the Test Results

To publish the test results, I use the PublishTestResult task of Azure DevOps. I only have to provide the format of the results, what files contain results and, the path to the files. The YAML code looks as follows:

- task: PublishTestResults@2
inputs:
testResultsFormat: 'VSTest'
testResultsFiles: '**/*.trx'
searchFolder: '$(System.DefaultWorkingDirectory)/testresults'
displayName: 'Publish test results'

Run the CI pipeline again and after it is finished, you will see the Tests tab on the summary page. Click on it and you will see that all tests ran successfully. Azure DevOps even gives you a trophy for that.

The Tests tab is shown and you get even a trophy

The Tests tab is shown and you get even a trophy

I did the same for the OrderApi project, except that I replaced CustomerApi with OrderApi in the Dockerfile.

Conclusion

Docker containers are awesome. They can be used to run your application anywhere but also to build your application. This enables you to take your build definition and run it in Azure DevOps, as Github actions, or in Jenkins. You don’t have to change anything because the logic is encapsulated inside the Dockerfile. This flexibility comes with some challenges, for example, to display the test results of the unit tests. This post showed that it is pretty simple to get these results out of the container and display in Azure DevOps.

In my next post, I will show how you can also display the code coverage of your tests. You can find the code of this demo on Github.
Running Jest tests in a Docker container in an Azure Devops pipeline


There are some big advantages to running tests in a container within a CI pipeline, including:

  • Dependencies are within container - no need to install on the build agent
  • Local development envirionment same as build environment
  • Easier to debug build issues by running the container locally

The trick with running tests within a container is getting the test results out of the container and publishing them to the CI tool (in this case, Azure Devops).

Starting with a small JS app with Jest tests, with the following test command defined in the package.json to output the tests as an XML file:

1
2
3
"scripts": {
"test": "jest --reporters=default --reporters=jest-junit"
}

We then create a simple docker file that will build the app and run tests. We define a label so we can pick the correct image later, and also output the status code of the yarn test command so we can verify the tests ran properly later on (credit to this StackOverflow question for this solution).

1
2
3
4
5
6
7
8
9
FROM node:15-buster

ARG BUILD_NUMBER

RUN yarn build
RUN yarn test; echo $? > /npm.exitcode

LABEL buildNumber=${BUILD_NUMBER}

We can then build the container in our pipeline:

1
2
3
4
5
6
7
8
9
10
- task: Docker@2
displayName: Build JS app container image
inputs:
command: 'build'
dockerFile: 'Dockerfile'
buildContext: '.'
arguments: >
--build-arg BUILD_NUMBER=$(Build.BuildNumber)
tags: |
latest

Once built, we need to retrieve the test file from the image. To do this, we need to run the container and copy the file out. The container doesn’t have to be running wheh this happens - we can retrieve it from a container that is no longer running. We use the label we set in the Dockerfile to pick the correct container:

1
2
3
4
5
6
7
8
9
10
11
12
13
- displayName: Copy test results from container
condition: succeededOrFailed()
powershell: |
$imageId = (docker images -a -f "label=buildNumber=$(Build.BuildNumber)" --format "{{.ID}})

$containerId = docker run -d $imageId

# I found that is was sometimes necessary to have a delay before attempting the copy
# A more elegant retry solution would be better
Start-Sleep -Seconds 2

docker cp "$($containerId):/src/junit.xml" $(Pipeline.Workspace)/junit.xml
docker cp "$($containerId):/npm.exitcode" $(Pipeline.Workspace)/npm.exitcode

We then publish the file to Azure Devops, so we can view the testing results in the UI. This step can also fail the build if there are failed tests.

1
2
3
4
5
6
7
8
9
- task: PublishTestResult@2
condition: succeededOrFailed()
inputs:
testResultsFormat: 'JUnit'
testResultsFiles: 'junit.xml'
searchFolder: $(Pipeline.Workspace)
mergeTestResults: true
failTaskOnFailedTests: true
restRunTitle: 'Jest Tests'

Finally, we must check the output of the yarn test command that ran in the container. This is because in some scenarios when the tests don’t run correctly (for example, an error starting any of the tests), the output file can be empty and not include any failures.

1
2
3
4
5
6
7
8
9
10
11
12
13
14
15
- displayName: Verify tests passed
condition: succeededOrFailed()
powershell: |
# Check exitcode file exists
If("$(Test-Path $(Pipeline.Workspace)/npm.exitcode))" -eq "False") {
Write-Host "Exit code for test run not found"
exit 9
}

$exitCode = cat $(Pipeline.Workspace)/npm.exitcode

If($exitCode -ne "0") {
Write-Host "Tests failed"
exit $exitCode
}

And that’s it! For brevity I’ve not included some important aspects of a production-ready pipeline. Be sure to look into multi-stage docker builds to reduce image size and attack surface - they will still work with the approach above - the label will allow you to find the correct image.

Friday, November 19, 2021

Selenium Python Tests & Azure DevOps Integration – Made for each other!


In this article, I am going to show you how to integrate your Python Selenium Tests to Azure DevOps. You will also see how to trigger the tests on a particular time and execute them in parallel.

Pre-requisites

  1. Knowledge on Selenium, Python, pip and PyTest
  2. Working tests using the above tech stack. If you don’t have one, feel free to use mine from here
  3. Azure DevOps free account. Sign up here to get one
  4. GitHub repo to store your codebase

Steps

  1. Once you create a free account, login into Azure DevOps.

2. Create a new project with the details shown below by clicking Create Project button

3. Once your project is created, go to the Pipelines from the left menu tree

4. Now click on Create Pipeline

5. You can create a pipeline using YAML file or follow classic editor which is more a UI driven configuration process. I personally prefer that and we will see that in this article. Click on Use the classic editor link

6. We are going to use GitHub as our source. You can use the repositories mentioned here –

7. Once authorised your GitHub, select the repository and the default branch you need to build –

8. Create a “Empty Job”

9. Create the below listed tasks to your Agent Job –

10. Configure Use Python 3.8 task as follows –

11. Configure Install Plugins Command Line task as follows –

Note: You can also use Requirement.txt file to add the plugins and install directly

12. Add the below Script to Run Python Tests Command Line task –

13. The below code needs to be added to publish the artifacts like reports –

14. This command is to publish the test results into Nunit format –

15. Use “HTML Viewer” task to display your report –

16. Configure the trigger option to run it on daily basis at 8 AM UK Time –

Build Execution

Once all done click on “Save & Queue” button. As configured in Step 8, the tests will be executed in Windows Agent.

Test Report

Conclusion

What you have done till now is the Build Pipeline and there is a Release pipeline you can do as well.

Stay tuned & happy testing!