A step by step guide With an Example Project

There are a lot of deployment strategies when you deploy your Vue.js applications to production and your deployment strategy is entirely depends on your application architecture. For example, If you are using Java or Nodejs with Vue you need to deploy your application on respective environments. If you are serving the Vue static assets with NGINX in that case, you can dockerize the app and put that on Azure AKS.
One way of developing Vue.js applications is to use Azure blob storage for static web hosting. In this post, we will see how we can deploy a Vue static website using Azure DevOps.
- Introduction
- Example Project
- Prerequisites
- Build Pipeline
- Release Pipeline
- Demo
- Summary
- Conclusion
Introduction
As I said earlier, one way of developing Vue.js applications to put the Vue build into Azure blob storage and distribute it with Azure CDN. As shown in the following figure all the Vue.js static assets are uploaded into blob storage and configure Azure CDN to distribute the content across the world. Here is the full article on how to do that with an example project.

We have to build two pipelines to deploy this application using Azure DevOps.
Build Pipeline
This pipeline takes the code from the Azure Repos or any git source and goes through a series of actions such as install, test, build and finally, generate the artifacts ready for the deployments.

Release Pipeline
This pipeline takes the artifact and uploads all the files into Azure blob service. You can have pre-deployment conditions such as approvals, manual only, etc for the release.

Example Project
Here is an example project which we can put in the Azure blob storage for static website hosting. This is a simple profile page with a header and some sections.
// clone the project
git clone https://github.com/bbachi/my-profile-vuejs.git// install dependencies and start the project
npm install
npm run serve
You can clone the project and run it on your machine. Here is the demonstration when you run it on your localhost and the port 8080.

Prerequisites
There are some prerequisites for this article you need to be familiar with the Vue.js application and how it builds and some familiarity with the Azure account.
One way to deploy your Vue static website on Azure is to log in to your portal and upload all the files manually. Check out this article on how we can do it manually.
Build Pipeline
We need to do build pipelines as part of continuous integration first. The way this pipeline works is that the moment you check-in code into Github or Azure Repos, this pipeline builds the project, test it, make the built artifact ready for the deployment. Let’s follow all the steps to build this pipeline.
- Create a Project in Azure DevOps
- Create a Repo and Put your code in Azure Repos
- Create a pipeline that takes it from the source repository.
- Install all dependencies
- Run the tests
- Build the code
- Copy files from source for staging
- Archive all the copied files
- Finally, publish the artifact.
- Enable Continuous Integration with triggers
Let’s create a project in your Azure DevOps account. I named it StaticWebsite with visibility of your choice. You can make it public or private.
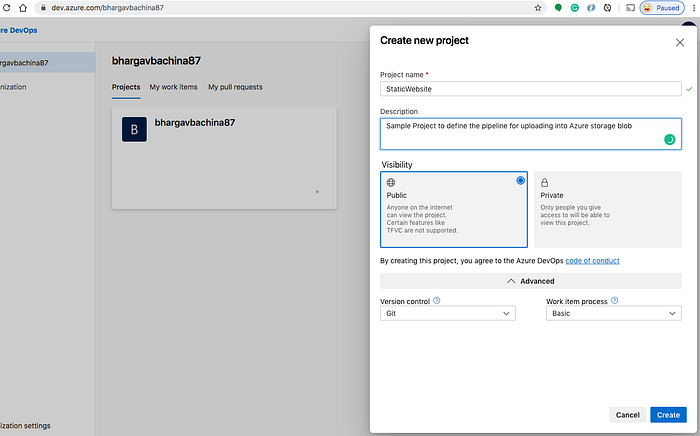
Once you created this project you can see the dashboard which is empty right now.

Put your code in Azure Repos
It’s time to create a repo and place all the code from the example project from above and push your code into this repo. I created a repo called static-vuejs and push all the code into this repo.

You can generate the Git credentials when you click on the clone button on the top right corner. You need these credentials if you want to push the code into this repo later.

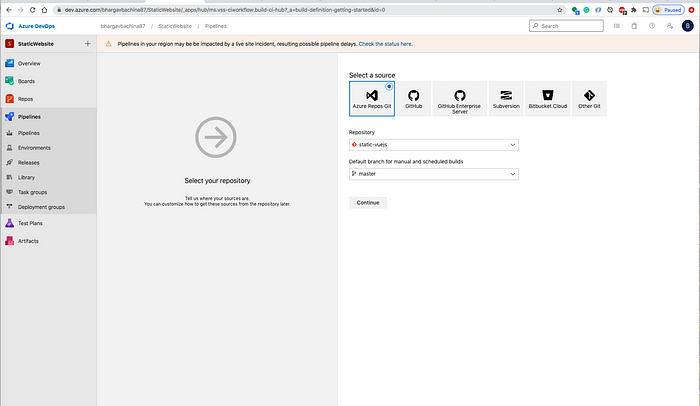
Create a Build Pipeline
Let’s start a pipeline with selecting a source and repository branch and by selecting a classic editor.
On the next page select an Empty job

You need to define all the tasks under this job such as Install dependencies, Run Tests, Build the project, Copy Files, Archive files, Finally publish artifacts.
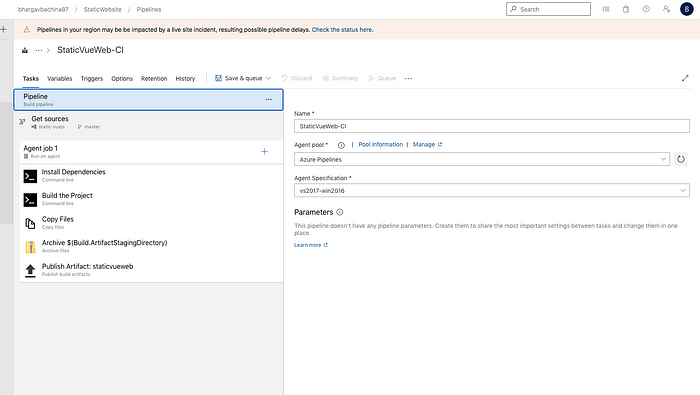
First, you need to click on the + icon on the right side of the Agent job to add tasks. We need to select the Command line task for the first three tasks: install, run tests, and build.

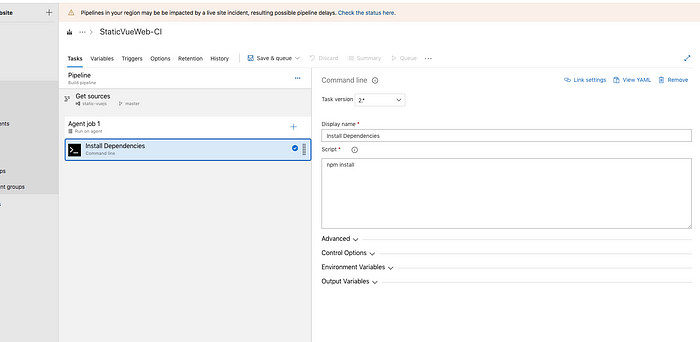
Install dependencies
When you run this pipeline you clone the React project from Azure Repos. This repo doesn’t have any dependencies installed so we need to run npm install as a first task
Build the Project
Once you install the dependencies, we need to build the project for the artifact.

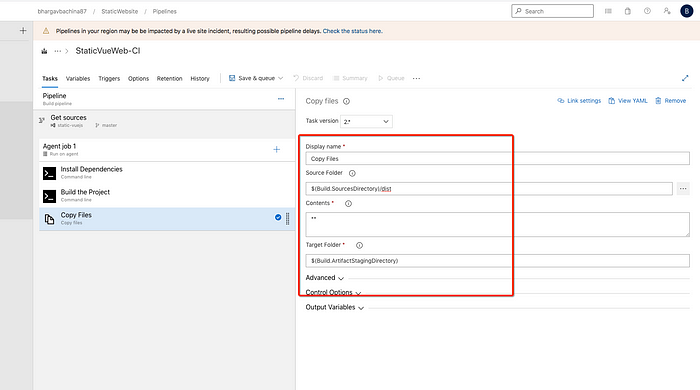
Copy the files
We have the build ready so we need to copy files from the source folder to the target folder to staging. For this, we have to select the Copy Files task. All the code actually resides in this directory Build.SourcesDirectory and we need to move all the source code to stage directory Build.ArtifactStagingDirectory
Archive Files
We have copied all the files to the target folder. It’s time to create an Archive file with the task Archive Files. Select this task and give all the details such as the Root folder, archive type, and an archive file.

Publish Artifact
Use the task called Publish build artifacts to publish the artifact.

Finally, Define the trigger
Let’s define the trigger for this build. Edit the pipeline by clicking on the triggers and enable continuous integration. Any commit to the static-vuejs repo master branch triggers this pipeline.

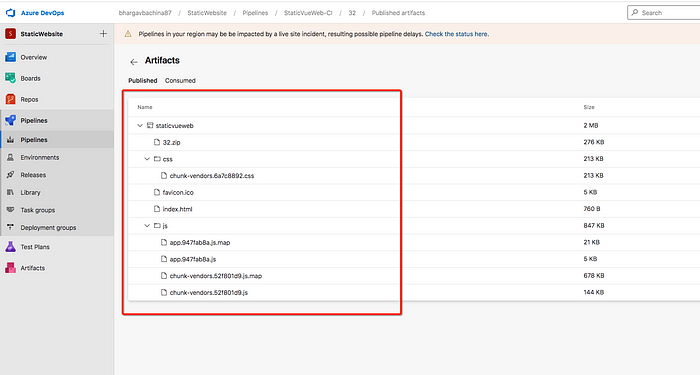
This is how the final artifact looks.
Here is the complete YAML for this build pipeline.
You can get above YAML from this edit pipeline screen.
Release Pipeline
We are done with the Continous integration part and let’s build a release pipeline for continuous delivery. Click on the releases and new release pipeline and follow these steps.
- Define the artifacts such as project, source, default version, etc
- Define a Stage for the deployment
Define the Artifact
The first step is to define the artifact so that it takes that particular artifact after the build pipeline is completed. Make sure you have a trigger placed.
First, we need to add an artifact by selecting the source pipeline

Make sure you have a Continuous deployment trigger enabled by clicking on the lightning icon on the top right corner. This triggers the release pipeline whenever a new artifact is available.

Define a Stage
Let’s define the stage for the release. You can add as many stages as you want. You need to define the tasks for the stage. For simplicity, we are using here only one stage here.

If you click on the 1 job 0 tasks link that will take you to the task details page. We have two tasks for this stage.
- Extract Files
- Azure CLI
Extract Files
This Extract Files task extracts the zip archive from the artifact and puts that in the destination folder. Make sure you have the right Archive FIle Pattern as (**/$(Build.BuildId).zip)

Azure CLI
We have to select the Azure CLI task for uploading files since we are using Azure CLI commands to upload all these files from the Artifact archive.
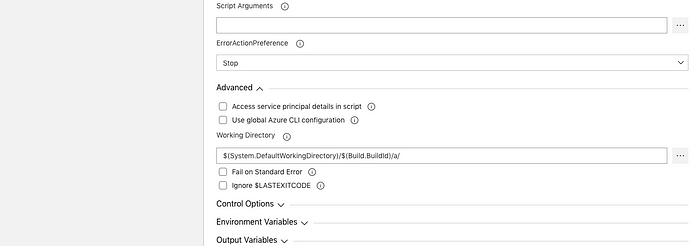
Here is the inline script that we are using to upload all the files. Make sure you have the right subscription selected.

Make sure you should put the correct path in the Working Directory so that you upload only files you need instead of the entire directory path into Blob storage.
We might need to authorize with your subscription.

az storage blob upload-batch -s ./ -d '$web' \
--account-name staticvueweb \
--account-key \ T0EhNSZ7PIqiH0vJ5NOxocH1tE65wyvC9gYvl4A2FtyonI6JmZ2THa8Eao2sSia1C8MSnl4oRAIfF/oa+QHs4Q==
We are uploading to the storage account staticvueweb with the destination $web container from the source ./. We need an account key to upload the files to Azure blob storage. You can get the account key from the following location in the Azure portal under your storage account.

Demo
It’s time for the demo. As soon as you check-in the code to master it triggers build pipeline. Usually, you don’t check in the code directly into master instead you create a pull request. I just used a master here for simplicity.
Build Pipeline Demo

Release Pipeline Demo
As soon as the build is completed and a new artifact will trigger the release pipeline.

Once it is succeeded, you can see that some of the files are updated in the Azure blob storage.

Here is the change deployed to the site

Summary
- One way of developing Vue applications is to use Azure blob storage for static web hosting.
- All the Vue static assets are uploaded into blob storage and configure Azure CDN to distribute the content across the world. Here is the full article on how to do that with an example project.
- We have to build two pipelines to deploy this application using Azure DevOps: Build pipeline and Release pipeline.
- The build pipeline generates the artifact as soon as there is a commit in the source repository.
- The Release pipeline takes the artifact and releases it to the appropriate environment.
- Authentication should be made before you can use pipelines to access your Repos and upload files to the Azure subscription account.
- You can use task groups to put the common tasks at one place across the environments.
- You can use Azure key vaults to store the access keys for your storage account.
- You can make use of Pipeline Variables while creating tasks. It’s a convenient way to get key bits of data into various parts of the pipeline.
Conclusion
This is a basic way of deploying a Vue static website using Azure DevOps. I didn’t use variables, Azure key vault, task groups in these pipelines because we are deploying into one environment. Those are out of scope for this article. I will write a full article on using all these while deploying into different environments.


