Showing posts with label ci/cd. Show all posts

Thursday, August 20, 2020

What’s new with Azure Pipelines


Azure Pipelines, part of the Azure DevOps suite, is our Continuous Integration and Continuous Delivery (CI and CD) platform, used every day by large enterprises, individual developers, and open source projects. Today, we’re thrilled to announce new features for Azure Pipelines, including some much-requested ones:

  • Multi-stage YAML pipelines (for CI and CD)
  • Environments and deployment strategies
  • Kubernetes support

Multi-stage YAML pipelines

One of our biggest customer requests since launching YAML support for Build pipelines (CI) has been to support it for Release pipelines (CD) as well. To accomplish this, we now offer a unified YAML experience, so you can configure each of your pipelines to do CI, CD, or CI and CD together. Defining your pipelines using YAML documents allows you to check the configuration of your CI/CD into source control together with your application’s code, for easy management, versioning, and control.

Multi-stage pipelines view

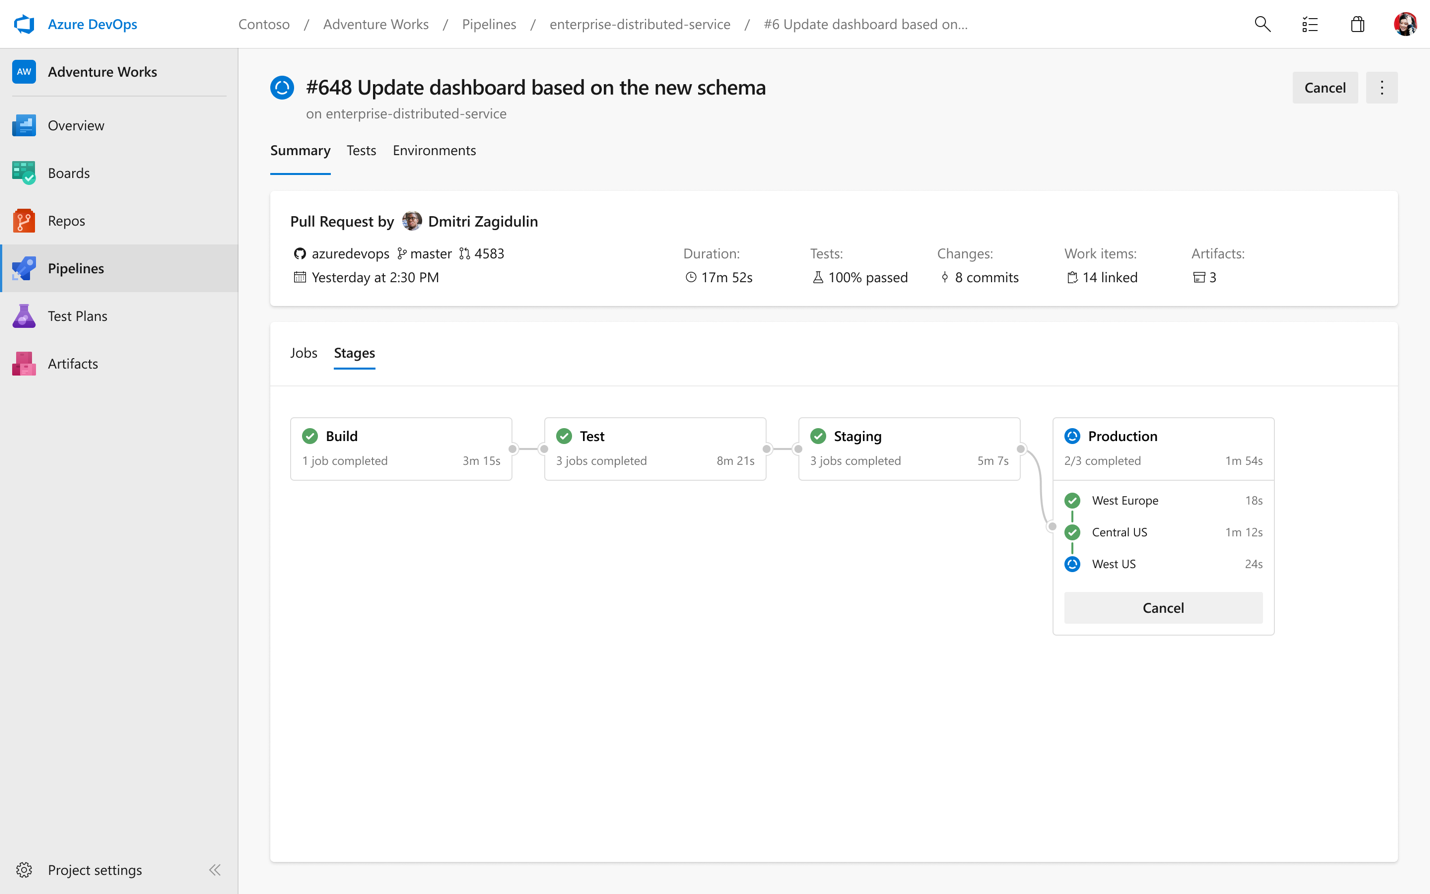
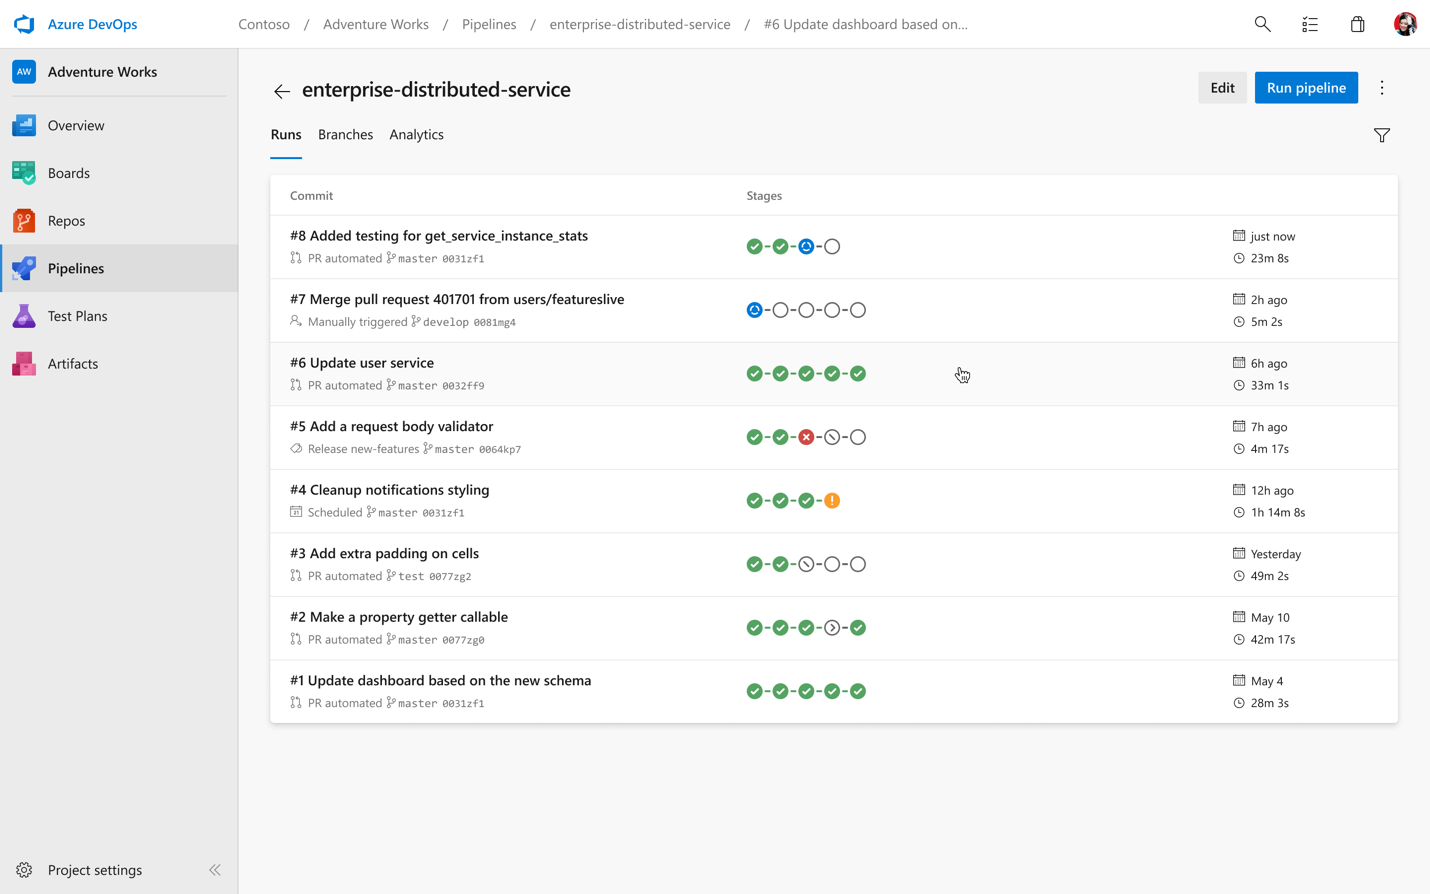
With our new YAML support, we’re also bringing a new UI to help visualize all of your multi-stage pipelines across the product, whether you’re in the run summary view, looking at all your pipeline runs, or browsing logs.

View all runs

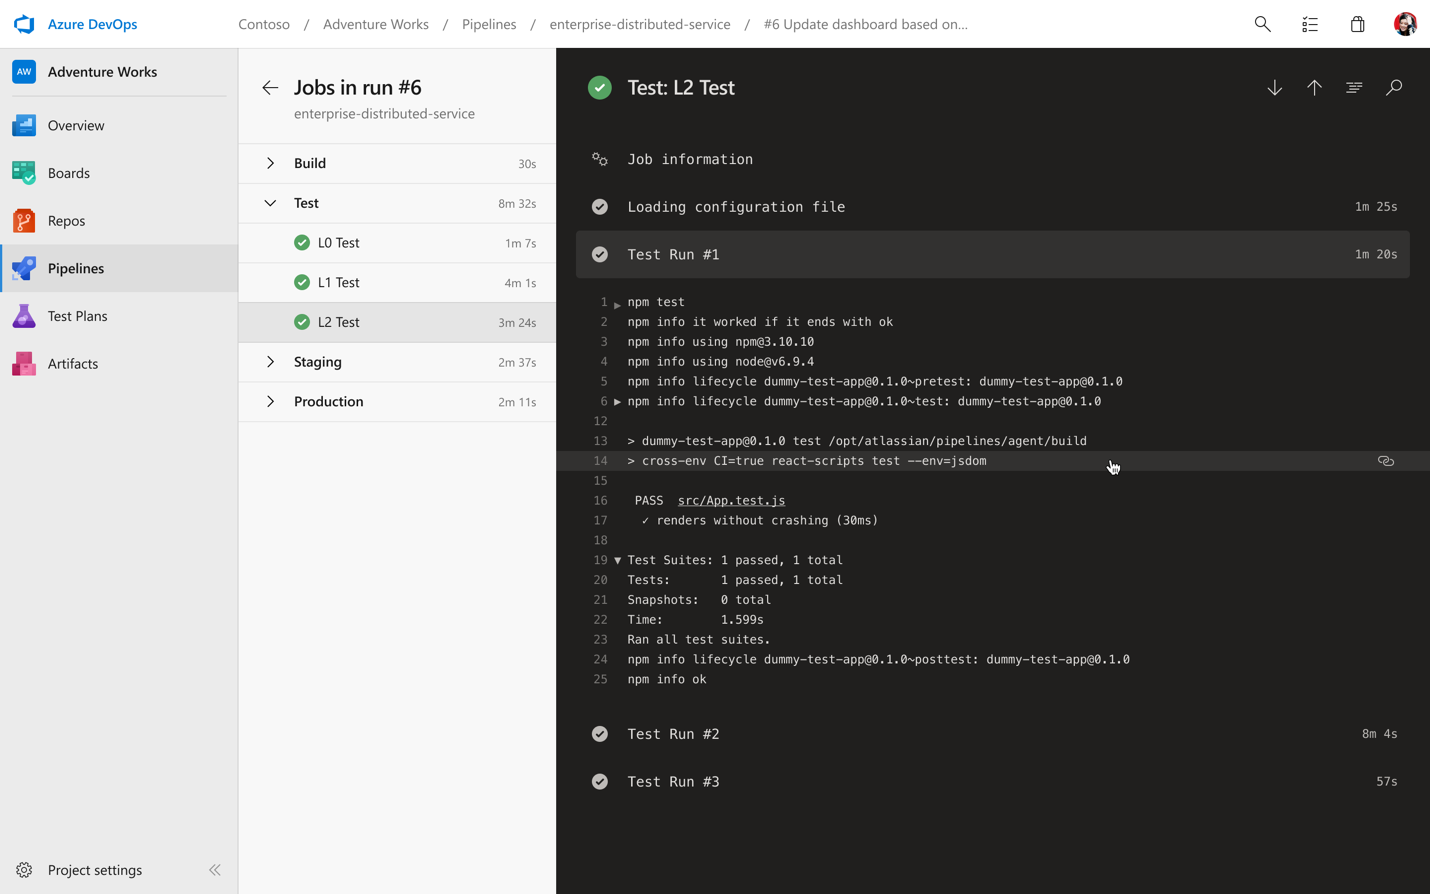
In addition to our new pipelines pages, we have a new log viewing experience as well. This lets you easily jump between stages and jobs along with helping you quickly identify errors and warnings.

New logs view

This feature will be rolled out for all accounts over the next few days. To enable it, go to the preview features page and turn on the toggle for “Multi-stage pipelines”.

Getting going with YAML

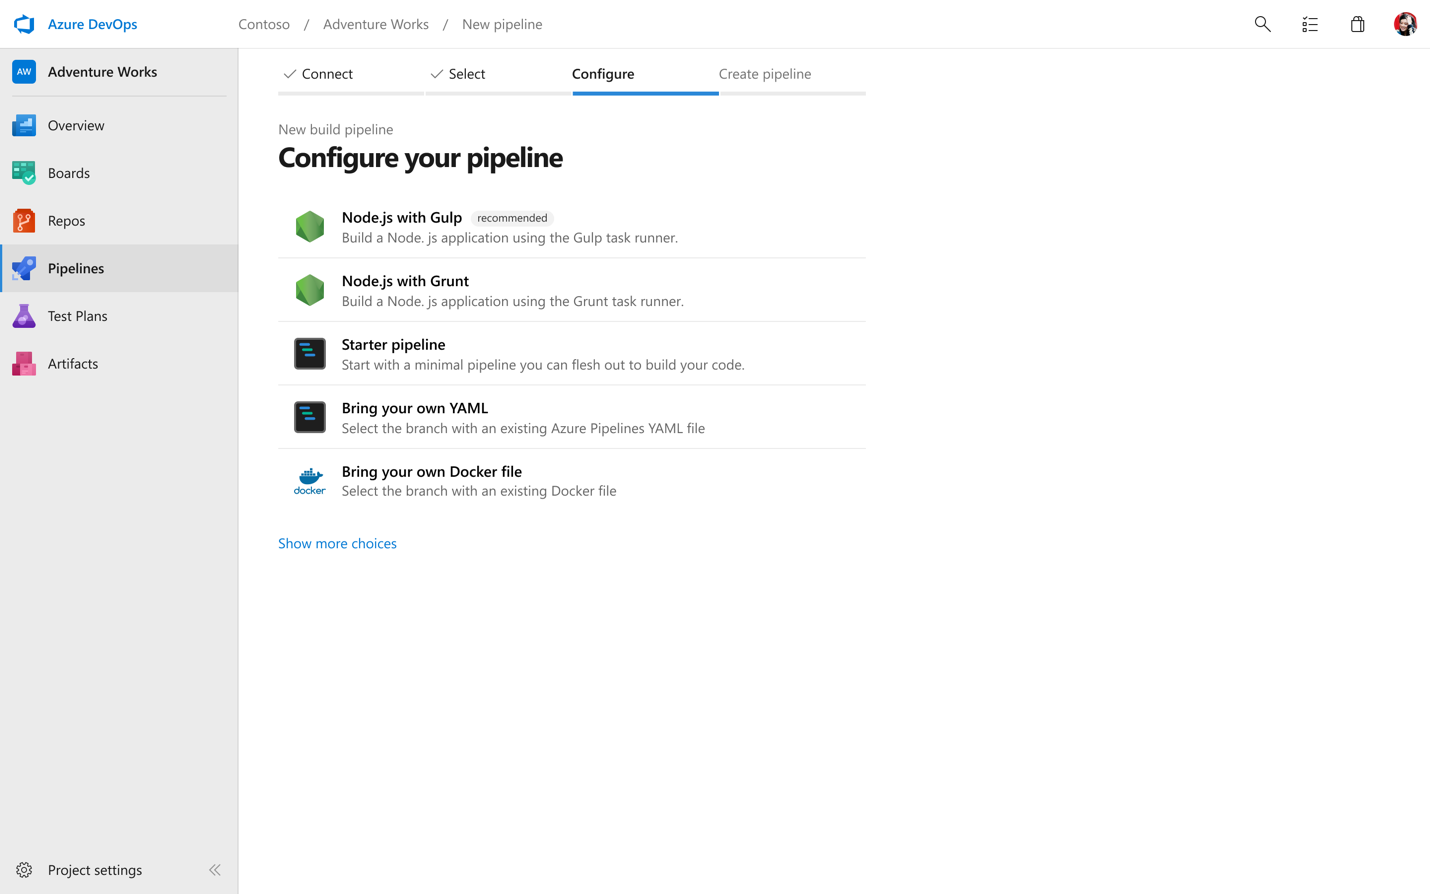
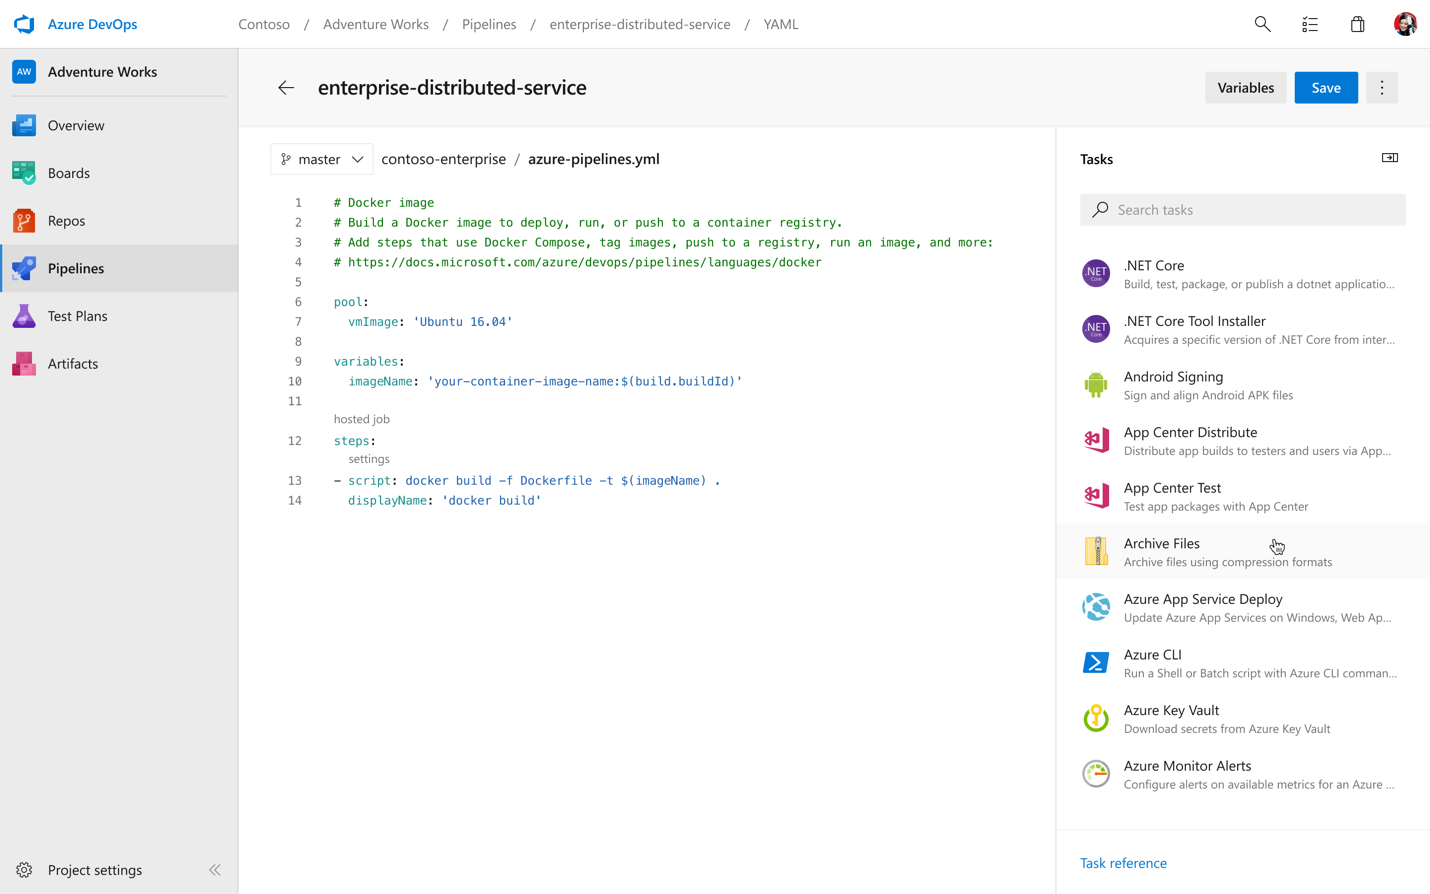
We want you to be able to get going fast wherever your code lives. Once you connect your repo, whether it’s on GitHub, Azure Repos, or your own external Git source, we’ll analyze your code and recommend a YAML template that makes sense for you and gets you up and running quickly.

Configure pipeline from template

While we want to get you running quickly, we know you’re going to want to keep configuring and updating your YAML. To help make it even easier to edit and update your pipeline, we’ve created an in-product editor with IntelliSense smart code completion, and an easy task assistant.

YAML editor with IntelliSense

Building your first multi-stage pipeline with environments

Bringing CD to YAML means a bunch of great additions in terms of commands and functionality. Let’s cover the basics with a simple pipeline that just builds and deploys an app in two stages.

stages:
- stage: Build
  jobs:
  - job: Build
    pool:
      vmImage: 'Ubuntu-16.04'
    continueOnError: true
    steps:
    - script: echo my first build job
- stage: Deploy
  jobs:
    # track deployments on the environment
  - deployment: DeployWeb
    pool:
      vmImage: 'Ubuntu-16.04'
    # creates an environment if it doesn’t exist
    environment: 'smarthotel-dev'
    strategy:
      # default deployment strategy
      runOnce:
        deploy:
          steps:
          - script: echo my first deployment

If we ran this pipeline, it would execute a first stage, Build, followed by a second stage, Deploy. You are free to create as many stages as you wish, for example to deploy to staging and pre-production environments.

You may notice two new interesting concepts in here if you’re familiar with our YAML schema. And if this is the first time you’re seeing our YAML, you can read up on the core concepts here.

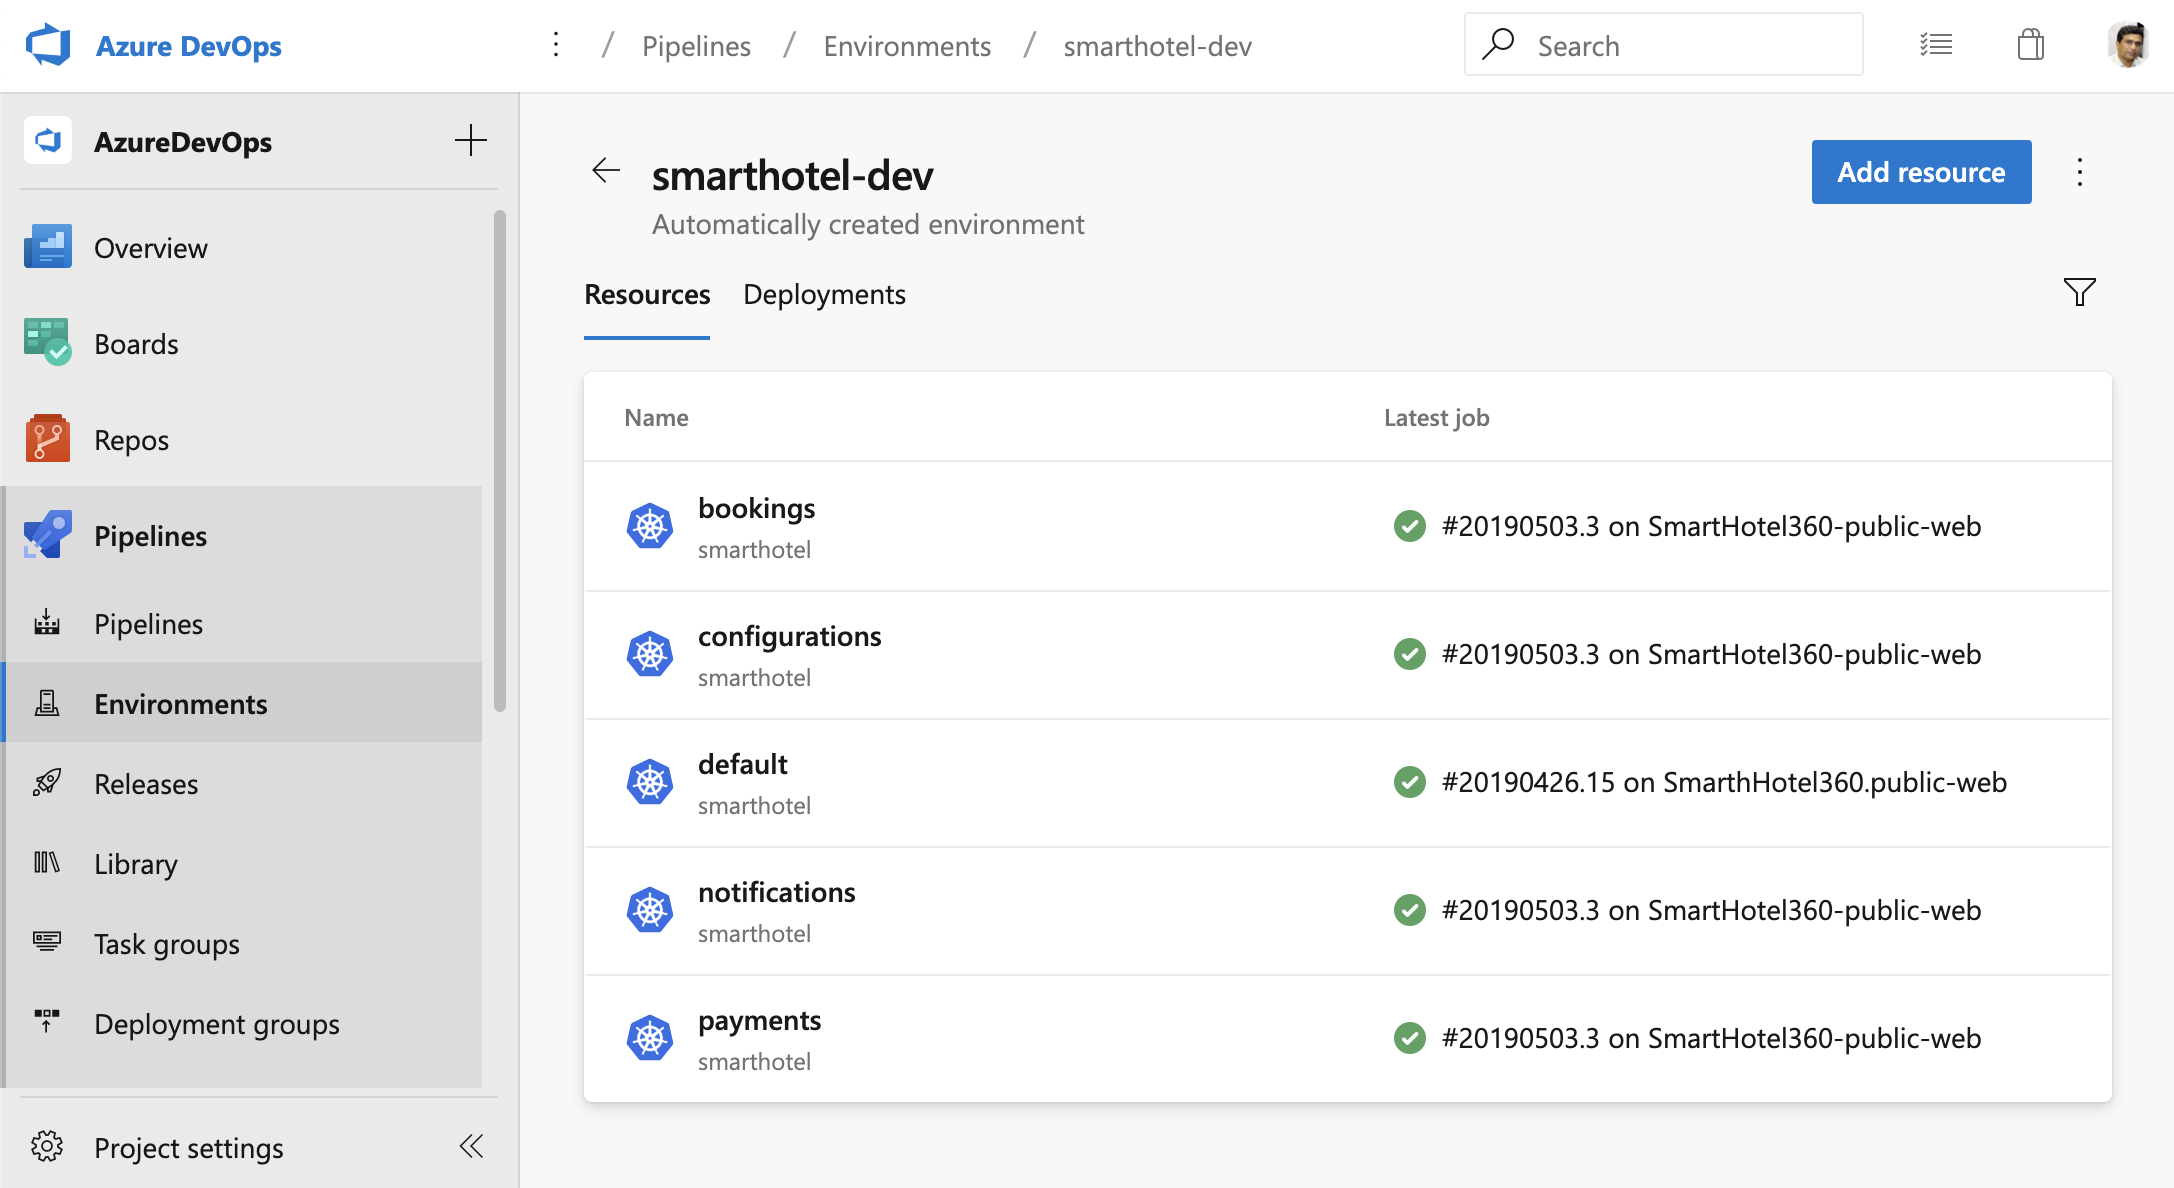
The first new keyword is environment. Environments represent the group of resources targeted by a pipeline, for example, Kubernetes clusters, Azure Web Apps, virtual machines, and databases. Environments are useful to group resources, for example under “development”, “staging”, “production”, etc, and you can define them freely. Defining and using an environment unlocks all kinds of capabilities, for example:

  • Traceability of commits and work items
  • Deployment history down to the individual resource
  • Deeper diagnostics, and (soon) approvals and checks

There’s a lot of great new functionality available today in preview, and even more coming around the corner. You can learn more on environments here

Kubernetes environments

You will also notice the strategy keyword. This impacts the deployment strategy, which defines how your application is rolled out across the cluster. The default strategy is runOnce, but in the future you’ll be able to easily indicate other strategies, such as canary or blue-green.

If you’re ready to start building, check out our documentation for building a multi-stage pipeline with environments. If you want to see some multi-stage pipeline templates to work off of, take a look at out our templates repo. You can even see those sample pipelines in action inside of our samples project.

Kubernetes

If you have an app which has been containerized (ie. there is a Dockerfile in the repository), we want to make it easy for you to setup a pipeline in less than 2 minutes, to build and deploy to a Kubernetes cluster (including Azure Kubernetes Service). Wrapping your head around Kubernetes can be hard, so we’re making it easy to both get started and continue deploying to your Kubernetes clusters. For more details, read our post on Azure Pipelines and Kubernetes.

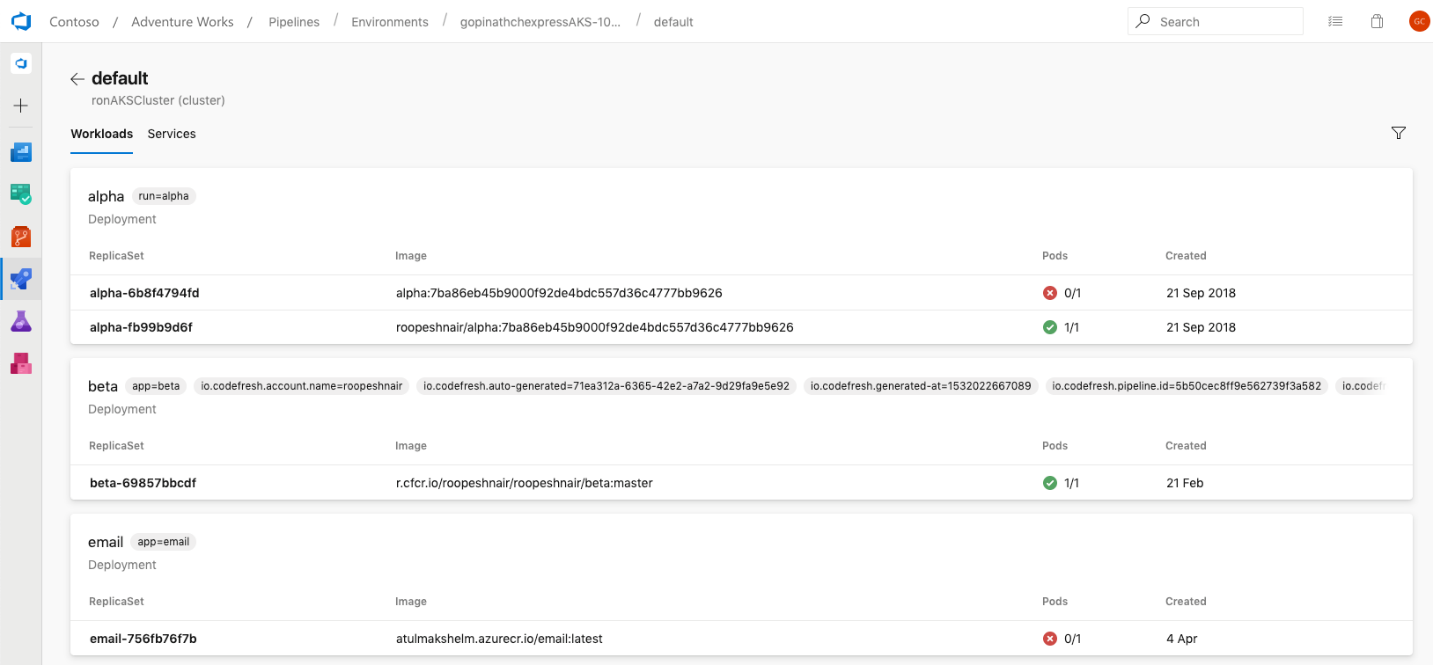
Kubernetes is fully integrated with Azure Pipelines environments too. This lets you view all the deployments, daemonsets, etc, running on Kubernetes in each environment, completed by insights such as readiness and liveness probes of pods. You can use this information and pod-level details (including logs, containers running inside pods, and image metadata) to effectively diagnose and debug any issue, without requiring direct access to the cluster itself.

Kubernetes environments

A look at what’s next

In addition to the preview features that now available, there are so many exciting things just around the corner for Azure Pipelines we want to share:

  • Caching – We’ll be announcing the availability of another much-requested feature very shortly: caching to help your builds run even faster.
  • Checks and approvals – We’re improving multi-stage pipelines with the ability to set approvals on your environments, to help control what gets deployed when and where. We’ll keep iterating here to deliver more experiences with checks to help gating your multi-stage pipelines.
  • Deployment strategies – We’re adding additional deployment strategies as part of the deployment job type, like blue-green, canary and rolling, to better control how your applications are deployed across distributed systems.
  • Environments – We’re adding support for additional resource types in environments, so you can get going quickly with virtual machines (through deployment groups) and Azure Web Apps.
  • Mobile – With our new UX, we’re going to start to enable new mobile views in Q2 to help you view the status of pipelines, quickly jump into logs, and complete approvals.
  • Pipeline analytics – We’re continuing to grow our pipeline analytics experiences to help you get an all-up picture of the health of your pipelines, so you can know where to go in and dig deeper.
  • Tests and code coverage – We’re going to be shipping all new test and code coverage features and UX in the next months.

Thank you

Lastly, we want to thank all of our users who have adopted Azure Pipelines. Since our launch last September, we have seen tremendous growth, and we are particularly excited about the response from the open source developer community. It’s been an honor to see Azure Pipelines badges on so many open sources projects we love and use regularly ourselves. In the first eight months, public repositories have already used over 88 years of build time for Azure Pipelines for free. Check out Martin’s post for some more stats and stories from open source projects. We’ve also received so much great feedback from project maintainers to date and we can’t thank the community enough.

If you’re new to Azure Pipelines, get started for free on our website and learn more about what you can do with Azure Pipelines.

We’ll be posting more deep-dive information in the coming weeks, but as always we’d love to hear your feedback and comments. Feel free to comment on this post or tweet at @AzureDevOps with your thoughts.


Wednesday, August 19, 2020

End-to-end CI/CD automation using Azure DevOps unified Yaml-defined Pipelines - VERY GOOD


Post explains compete automation for CI/CD pipe line. yaml is muti stage which builds and deploys in dev and prod in Azure app services. To execute  code sample follow the few tips given below.

Azure pipeline as a core part of Azure DevOps, it allows for the creation of CI ( Continuous Integration) pipeline in a declarative way using YAML documents, it is also called build pipelines. Since last Build 2019, this capability is also extending to CD ( Continuous Delivery ) Pipelines which is also known as Release Pipelines.  More than expected is now it is possible to define multi-stage pipelines-as-code for both Continuous Integration and Continuous Delivery with the same YAML definition file. 

Since Github can be easily integrated with Azure DevOps nowadays,  you can not only build your CI/CD pipeline based on your source code on Github, but also even Mapping your GitHub repository permissions with Azure DevOps.


Solution Overview

I am writing this blog to explain how to use Azure CI/CD pipelines to provide an end-to-end automation experience to users when deploying an node.js application via Azure DevOps. Our solution will be look like the following diagram: 

End-to-end CI/CD automation using Azure DevOps unified Yaml-defined Pipelines 1
End-toEnd CI/CD architecture diagram

Getting started

Before getting started, you have to prepare a couple of things : 

Step 1: Get an Azure subscription

You need a Azure account : Create an Azure account by browsing to https://azure.microsoft.com/en-us/free/ or claim your MSDN benefits to get a visual studio subscription. 

Step 2: Get an Azure DevOps account and create organisation and project. You can check Quickstart: Create an organization or project collection to know more details.

You’ll need to activate the ‘ multi-stage pipeline’ from the settings of preview feature.

Step 3: Get source from cloudmelon’s Github repository ( using the following URL ), fork it and use your own branch for our lab:

https://github.com/cloudmelon/oss-cicd-devops

Provision infrastructure via ARM template

One of most important part of end-to-end automation start from automate the infrastructure provision process,  by implementing Infrastructure as code (IaC) mindsets, we can use either ARM or Terraform to provision our infrastructure running in Azure.

In this solution, we’re going to provision two App services Plan and host web app on each of them. In enterprise environment, due to budget and performance concerns, usually we deploy Development and Production environment separately. On the top of solution, we can also use full stack monitoring solutions to gain more visibility of Azure resources which we’ll get to later on. 

Where DevOps magic happens : defining service connections

There are so many discussions around automation and DevOps going on over past a few years. From my point of view, one of the most charming feature of DevOps is you can deploy and automate the whole process as long as you have the right permission. In our example, you only need to replace the service connections then you can get this solution up and running in your subscription.  You only need to go to Project settings and add a new service connection as shown in the following : 

End-to-end CI/CD automation using Azure DevOps unified Yaml-defined Pipelines 2
Activate the multi-stage pipelines preview feature

Trigger and variable definition

Basically, Continuous integration (CI) triggers in Azure DevOps will set off a build to run when a push is made to the specified branches ( by setting path filters ) or a specified tag is pushed. Below is an example of trigger defined in Yaml:

trigger:
 - master

In Azure DevOps, you can use variable in Yaml definition or using Variable group and then link up to your CI or CD definition. Below is an example of yaml-defined variables:

variables:
 vmImageName: 'ubuntu-latest'
 demorg: 'melon-cicd-rg'
 subscription: '(please replace it by your own service connection name)'
 webappname: 'meloncicdwebapp'

Define your CI pipeline

In your CI pipeline, you need to define as the following :

stage: Build
 displayName: Build stage
 jobs:
job: Build
 displayName: Build
 pool:
   vmImage: $(vmImageName)
 steps:
 task: AzureCLI@1
   displayName: 'Azure CLI '
   inputs:
     azureSubscription: $(subscription)
     scriptLocation: inlineScript
     inlineScript: 'az group create --location north europe --name $(demure)'
 task: AzureResourceGroupDeployment@2
   displayName: 'Azure Deployment:Create or Update Resource Group action on $(demorg)'
   inputs:
     azureSubscription: $(subscription)
     resourceGroupName: '$(demurg)'
     location: 'North Europe'
     templateLocation: 'Linked artifact'
     csmFile: 'iac/webapp.json'
     csmParametersFile: 'iac/webapp.parameters.json'
     deploymentMode: 'Incremental'
 task: NodeTool@0
   inputs:
     versionSpec: '10.x'
     displayName: 'Install Node.js'
     scripts: |
        npm install
        npm run build --if-present npm run test --if-present
     displayName: 'npm install, build and test'
 task: CopyFiles@2
   displayName: 'Copy Files to: $(Build.ArtifactStagingDirectory)/$(webappname)'
   inputs:
     SourceFolder: '$(system.defaultworkingdirectory)'
     TargetFolder: '$(Build.ArtifactStagingDirectory)/$(webappname)'
 task: ArchiveFiles@2
   displayName: '$(webappname) Archive'
   inputs:
     rootFolderOrFile: '$(Build.ArtifactStagingDirectory)/$(webappname)'
     includeRootFolder: false
     archiveType: zip
     replaceExistingArchive: true
     archiveFile: '$(Build.ArtifactStagingDirectory)/$(webappname).zip'
 task: PublishPipelineArtifact@0
   displayName: 'PublishPipelineArtifact: drop'
   inputs:
     targetPath: '$(Build.ArtifactStagingDirectory)/$(webappname).zip'

Define your CD pipeline

Now yaml-defined multi-stage CD pipeline is also supported in Azure DevOps, if you’re not comfortable with yaml definition, you can also check Define your multi-stage continuous deployment (CD) pipeline to know more about multi-stage pipeline. 

Please make sure you define different stages, dependencies and deployment condition:


Dev stage:

- stage Dev
  displayName: Dev stage
  dependsOn: Build
  condition: succeeded('Build')
  jobs:
- deployment: Dev
  displayName: Dev
  environment: 'development'
  pool:
    vmImage: $(vmImageName)
  strategy:
    runOnce: 
      deploy:
        steps:
          - task: DownloadPipelineArtifact@1
            displayName: 'Download Pipeline Artifact'
            inputs:
              buildType: 'current'
          - task: AzureWebApp@1
            inputs:
              azureSubscription: '$(subscription)'
              appType: 'webApp'
              package: '$(System.ArtifactsDirectory)/drop/$(webappname).zip'
              customWebConfig: '-Handler iisnode -NodeStartFile index.js -appType node'
              deploymentMethod: 'zipDeploy'

Prod stage:

- stage: Prod
  displayName: Prod stage
  dependsOn: Dev
  condition: succeeded('Dev')
  jobs:
    - deployment: Prod
      displayName: Prod
      environment: 'production'
      pool:
        vmImage: $(vmImageName)
          strategy:
            runOnce:
              deploy:
                steps:
                - task: DownloadPipelineArtifact@1
                  displayName: 'Download Pipeline Artifact'
          strategy:
            runOnce:
              deploy:
                steps:
                - task: DownloadPipelineArtifact@1
                  displayName: 'Download Pipeline Artifact'
                  inputs:
                    buildType: 'current'
                - task: AzureWebApp@1
                  inputs:
                    azureSubscription: '$(subscription)'
                    appType: 'webApp'
                    appName: '$(prodwebappname)'
                    package: '$(System.ArtifactsDirectory)/drop/$(webappname).zip'
                    customWebConfig: '-Handler iisnode -NodeStartFile index.js -appType node'
                    deploymentMethod: 'zipDeploy'

Environments

Environment is a new feature of Azure DevOps pipeline, it represents a collection of resources such as namespaces within Kubernetes clusters or Azure Web Apps, basically anything be targeted by deployments from a pipeline. In our example environments include Development and Production environment.

End-to-end CI/CD automation using Azure DevOps unified Yaml-defined Pipelines 3
Environments in Azure DevOps

Art of possible: Full stack, end-to-end visibility Azure unified monitoring solution 

Since end of 2018, Azure Log Analytics and Azure Application Insights were available as integrated features within Azure Monitor,  it is an pretty cool path which shows the possibility to provide administrators and DevOps engineers full stack unified monitoring solution, you can also check End-to-end monitoring solutions in Azure for Apps and Infrastructure to have more details. 

Up & Running

You can check your run history and different stages in Azure DevOps.

End-to-end CI/CD automation using Azure DevOps unified Yaml-defined Pipelines 4
Deploying multi-stage pipelines in Azure DevOps

Perspectives 

The value of end-to-end automation is to cut down time-to-market and to boot your business performance. The scenarios are not only on OSS or .Net application deployment but also make senses on the API economy as well as microservices productivities. However, one of the biggest challenges of this approach is about security and compliance, where DevSecOps comes out, you can find more information about Secure DevOps here.

Tuesday, August 11, 2020

ASP.NET Core CI/CD on Azure Pipelines with Kubernetes and Helm

 Due to the high entry threshold, it is not that easy to start a journey with Cloud Native. Developing apps focused on reliability and performance, and meeting high SLAs can be challenging. Fortunately, there are tools like Istio which simplify our lives. In this article, we guide you through the steps needed to create CI/CD with Azure Pipelines for deploying microservices using Helm Charts to Kubernetes. This example is a good starting point for preparing your development process. After this tutorial, you should have some basic ideas about how Cloud Native apps should be developed and deployed.

Technology stack

  • .NET Core 3.0 (preview)
  • Kubernetes
  • Helm
  • Istio
  • Docker
  • Azure DevOps

Prerequisites

You need a Kubernetes cluster, free Azure DevOps account, and a docker registry. Also, it would be useful to have kubectl and gcloud CLI installed on your machine. Regarding the Kubernetes cluster, we will be using Google Kubernetes Engine from Google Cloud Platform, but you can use a different cloud provider based on your preferences. On GCP you can create a free account and create a Kubernetes cluster with Istio enabled (Enable Istio checkbox). We suggest using a machine with 3 standard nodes.

Connecting the cluster with Azure Pipelines

Once we have the cluster ready, we have to use kubectl to prepare service account which is needed for Azure Pipelines to authenticate. First, authenticate yourself by including necessary settings in kubeconfig. All cloud providers will guide you through this step. Then following commands should be run:

kubectl create serviceaccount azure-pipelines-deploy
kubectl create clusterrolebinding azure-pipelines-deploy    --clusterrole=cluster-admin --serviceaccount=default:azure-pipelines-deploy
kubectl get secret $(kubectl get secrets -o custom-columns=":metadata.name" | grep azure-pipelines-deploy-token) -o yaml

We are creating a service account, to which a cluster role is assigned. The cluster-admin role will allow us to use Helm without restrictions. If you are interested, you can read more about RBAC on Kubernetes website. The last command is supposed to retrieve secret yaml, which is needed to define connection – save that output yaml somewhere.

Now, in Azure DevOps, go to Project Settings -> Service Connections and add a new Kubernetes service connection. Choose service account for authentication and paste the yaml copied from command executed in the previous step.

One more thing we need in here is the cluster IP. It should be available at cluster settings page, or it can be retrieved via command line. In the example, for GCP command should be similar to this:

gcloud container clusters describe --format=value(endpoint) --zone

Another service connection we have to define is for docker registry. For the sake of simplicity, we will use the Docker hub, where all you need is just to create an account (if you don’t have one). Then just supply whatever is needed in the form, and we can carry on with the application part.

Preparing an application

One of the things we should take into account while implementing apps in the Cloud is the Twelve-Factor methodology. We are not going to describe them one by one since they are explained good enough either here or here but few of them will be mentioned throughout the article.

For tutorial purposes, we’ve prepared a sample ASP.NET Core Web Application containing a single controller and database context. It also contains simple dockerfile and helm charts. You can clone/fork sample project from here. Firstly, push it to a git repository (we will use Azure DevOps), because we will need it for CI. You can now add a new pipeline, choosing any of the available YAML definitions. In here we will define our build pipeline (CI) which looks like that:

trigger:
- master
pool:
 vmImage: 'ubuntu-latest'
variables:
 buildConfiguration: 'Release'
steps:
- task: Docker@2
 inputs:
   containerRegistry: 'dockerRegistry'
   repository: '$(dockerRegistry)/$(name)'
   command: 'buildAndPush'
   Dockerfile: '**/Dockerfile'
- task: PublishBuildArtifacts@1
 inputs:
   PathtoPublish: '$(Build.SourcesDirectory)/charts'
   ArtifactName: 'charts'
   publishLocation: 'Container'

Such definition is building a docker image and publishing it into predefined docker registry. There are two custom variables used, which are dockerRegistry (for docker hub replace with your username) and name which is just an image name (exampleApp is our case). The second task is used for publishing artifact with helm chart. These two (docker image & helm chart) will be used for the deployment pipeline.

Helm charts

Kubernetes with Helm

Firstly, take a look at the file structure for our chart. In the main folder, we have Chart.yaml which keeps chart metadata, requirements.yaml with which we can specify dependencies or values.yaml which serves default configuration values. In the templates folder, we can find all Kubernetes objects that will be created along with chart deployment. Then we have nested charts folder, which is a collection of charts added as a dependency in requirements.yaml. All of them will have the same file structure.

Let’s start with a focus on the deployment.yaml – a definition of Deployment controller, which provides declarative updates for Pods and Replica Sets. It is parameterized with helm templates, so you will see a lot of {{ template […] }} in there. Definition of this Deployment itself is quite default, but we are adding a reference for the secret of SQL Server database password. We are hardcoding ‘-mssql-linux-secret’ part cause at the time of writing this article, helm doesn’t provide a straightforward way to access sub-charts properties.

env:
- name: sa_password
  valueFrom:
    secretKeyRef:
      name: {{ template "exampleapp.name" $root }}-mssql-linux-secret
      key: sapassword

As we mentioned previously, we do have SQL Server chart added as a dependency. Definition of that is pretty simple. We have to define the name of the dependency, which will match the folder name in charts subfolder and the version we want to use.

dependencies:
- name: mssql-linux
  repository: https://kubernetes-charts.storage.googleapis.com
  version: 0.8.0
  [...]

For the mssql chart, there is one change that has to be applied in the secret.yaml. Normally, this secret will be created on each deployment (helm upgrade), it will generate a new sapassword – which is not what we want. The simplest way to adjust that is by modifying metadata and adding a hook on pre-install. This will guarantee that this secret will be created just once on installing the release.

metadata:
  annotations:
    "helm.sh/hook": "pre-install"

A deployment pipeline

Let’s focus on deployment now. We will be using Helm to install and upgrade everything that will be needed in Kubernetes. Go to the Releases pipelines on the Azure DevOps, where we will configure continuous delivery. You have to add two artifacts, one for docker image and second for charts artifact. It should look like on the image below.

Deployment pipline - Kubernetes and Helm

On the stages part, we could add a few more environments, which would get deployed in a similar manner, but to a different cluster. As you can see, this approach guarantees Deploy DEV stage is simply responsible for running a helm upgrade command. Before that, we need to install helm, kubectl and run helm init command.

installing helm

For the helm upgrade task, we need to adjust a few things.

  • set Chart Path, where you can browse into Helm charts artifact (should look like: “$(System.DefaultWorkingDirectory)/Helm charts/charts”)
  • paste that “image.tag=$(Build.BuildNumber)” into Set Values
  • and check to Install if release not present or add –install ar argument. This will behave as helm install if release won’t exist (i.e. on a clean cluster)

At this point, we should be able to run the deployment application – you can create a release and run deployment. You should see a green output at this point :).

You can verify if the deployment went fine by running a kubectl get all command.

Making use of basic Istio components

Istio is a great tool, which simplifies services management. It is responsible for handling things like load balancing, traffic behavior, metric & logs, and security. Istio is leveraging Kubernetes sidecar containers, which are added to pods of our applications. You will have to enable this feature by applying an appropriate label on the namespace.

kubectl label namespace default istio-injection=enabled

All pods which will be created now will have an additional container, which is called a sidecar container in Kubernetes terms. That’s a useful feature, cause we don’t have to modify our application.

Two objects that we are using from Istio, which are part of the helm chart, are Gateway and VirtualService. For the first one, we will bring Istio definition, because it’s simple and accurate: “Gateway describes a load balancer operating at the edge of the mesh receiving incoming or outgoing HTTP/TCP connections”. That object is attached to the LoadBalancer object – we will use the one created by Istio by default. After the application is deployed, you will be able to access it using LoadBalancer external IP, which you can retrieve with such command:

kubectl get service/istio-ingressgateway -n istio-system

You can retrieve external IP from the output and verify if http://api/examples url works fine.

Summary

In this article, we have created a basic CI/CD which deploys single service into Kubernetes cluster with the help of Helm. Further adjustments can include different types of deployment, publishing tests coverage from CI or adding more services to mesh and leveraging additional Istio features. We hope you were able to complete the tutorial without any issues. Follow our blog for more in-depth articles around these topics that will be posted in the future.