If you are unfamiliar with Azure DevOps Projects, create right now an Azure Trial account to try this beauty. It is one of the coolest, most amazing features of Azure and many developers are missing out. #FOMO. Because what you really want is commit to production.
If you like this article, please clap for it down below or to the left side.
Commit to Production in a Glance
This is the ability of being able to commit a change to a project on Git or GitHub, and see automated continuous integration, testing, and deployment being triggered automatically.
This article covers exactly how to import, build, deploy, and test two Java applications, one written with Spring Boot Reactive, and another with Eclipse MicroProfile using Payara Micro as the runtime.
Your key take away? You can now scaffold Java projects on Azure extremely easily and fast, and independent from the Cloud.
Before diving in, quick pause.
As you can see above, I posted the content of this article originally as a series of tweets, and someone said I invited "tutorials via Twitter".
I guess I just invented the #Twitorial. :P … Moving on!
Assuming that you by now should already have an Azure Trial account to experiment this, let's dive right in!
The Source Code: Running It Locally
Both projects are hosted on GitHub, and you can clone and run them locally just to see them in action before you push them to you Azure account:
- Spring Boot: https://github.com/azure-samples/springboot-hello-azure
- MicroProfile: https://github.com/azure-samples/microprofile-hello-azure
Clone either project to your computer (or both). They have equal building and running instructions except for which Maven plugin to call, and it should be pretty easy to get done with this, as long you of course have the necessary tools installed (JDK 8, Maven 3+, Docker is optional)
- Run
mvn package - Start your project locally with Maven Plugins: (a) for Spring Boot run
mvn spring-boot:run(b) for MicroProfile runmvn payara-micro:start - You can also run using Docker. Both projects contain a
Dockerfilethat you can use to build a runnable image *after* you have built your Maven project. Rundocker build -t myapp .and thendocker run -ti -p 8080:8080 --rm myapp - Either way (Docker or Maven), access http://localhost:8080/api/hello to see your application up and running
Multi-Stage Docker Images
This is a neat feature in recent versions of Docker and has helped me circumvent some limitations and deliver a developer experience that is equally awesome on your local computer as well on the CI/CD platform.
The basic springboot-hello-azure/Dockerfile contains the following instructions, and it is useful for building/testing the Docker image locally.
Dockerfile:
FROM openjdk:8-jdk-alpine
COPY target/*.jar /usr/src/app/myapp.jar
EXPOSE 8080
CMD [ "/usr/bin/java","-jar","/usr/src/app/myapp.jar" ]Dockerfile.cicd:
FROM maven:3.5-jdk-8-slim as mavenBuild
COPY src /usr/src/myapp/src
COPY pom.xml /usr/src/myapp
RUN mvn -f /usr/src/myapp/pom.xml clean package FROM payara/micro:5.182 as runtime
COPY --from=mavenBuild /usr/src/myapp/target/*.war $DEPLOY_DIR/ROOT.warEXPOSE 8080
The second one above as stated earlier on, has the multi-state build surpport and configuration. This is the version we will use later in this article to import/create Docker image on Azure DevOps project wizard.
Create a DevOps Project on Azure
Go right now to the Azure Portal, and hit Create DevOps Project. If you don't see this tile on your dashboard, search for DevOps on the left menu inside "All Services". You must find "DevOps Projects". Once you open it, you should be able to Add a new project.
The steps below will walk you through the project creation wizard, so stay tuned as we check up to 8 steps.
- Choose bring your own code
- Select which git repository to use (Spring Boot or MicroProfile)
- Indicate it is a Dockerized app
- Select which Azure service to deploy to
- Indicate which exact Dockerfile to use (hint: Dockerfile.cicd)
- Configure Visual Studio Teams Service, and also set the name of your app (must be globally unique).
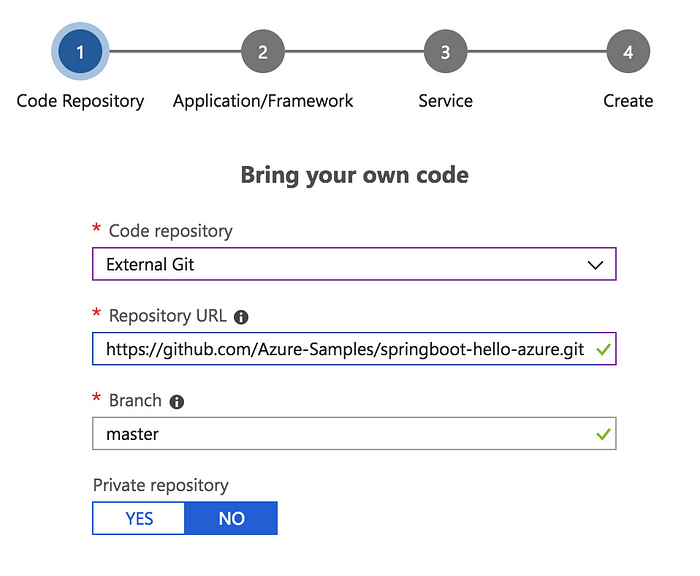
Step 1: New Sample or Existing Code? Bring your own!
Make sure you select Bring your own code


Step 2: Select External Git Repository
Here you have two options again: either go with MicroProfile or Spring Boot. Below the links to the Git repositories to facilitate your copy/paste.
- Spring Boot (Git): https://github.com/Azure-Samples/springboot-hello-azure.git
- MicroProfile (Git): https://github.com/Azure-Samples/microprofile-hello-azure.git

Step 3: Indicate this is a Dockerized application
We will be building and deploying using Docker, so doesn't matter the framework or platform, we will build a Docker image. Therefore, here you select Dockerized application.


Step 4: Select Web App for Containers
Make sure you mark the option that says Web App for Containers.

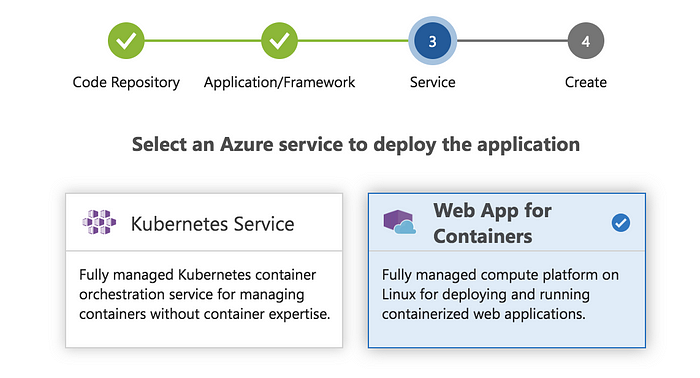
This is a simple service that can spin up dockerized web applications with a load balancer in front and other perks for scaling. It costs less than Kubernetes but of course won't provide the entire feature set of Kubernetes.
I did not test this with AKS (Azure Kubernetes Service), but please feel free to try it out and post in the comments!
Step 5: Indicate which exact Dockerfile to use (Hint: Dockerfile.cicd)
Since this is a Dockerized application, it simplifies things if we also use Docker to run the entire build cycle of this project. For that, we have Dockerfile.cicd for both projects which you can use to compile/package the Maven project, and then right away build a Docker image with the artifact produced by Maven.
This is exactly what we want.


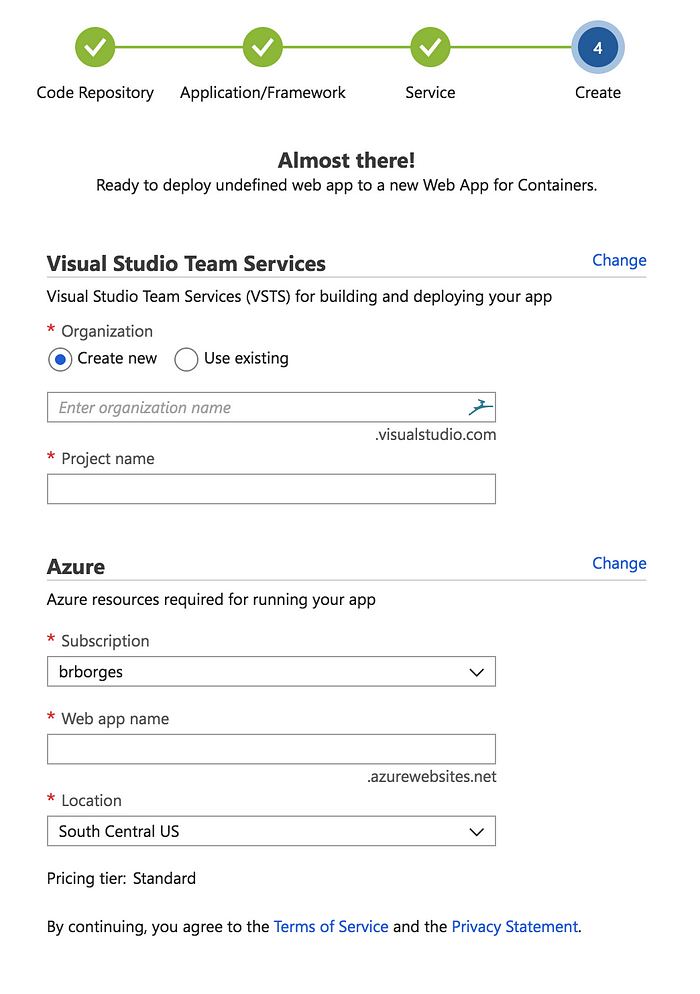
Step 6: Fill the last form to set up your VSTS environment and Azure resources (web app name).

Wait and see…
The deployment will be in progress, so keep an eye and wait for everything to be complete.


Once the deployment is ready, here's the amazing dashboard you will have for your DevOps project, and all of its resources created for you automatically:
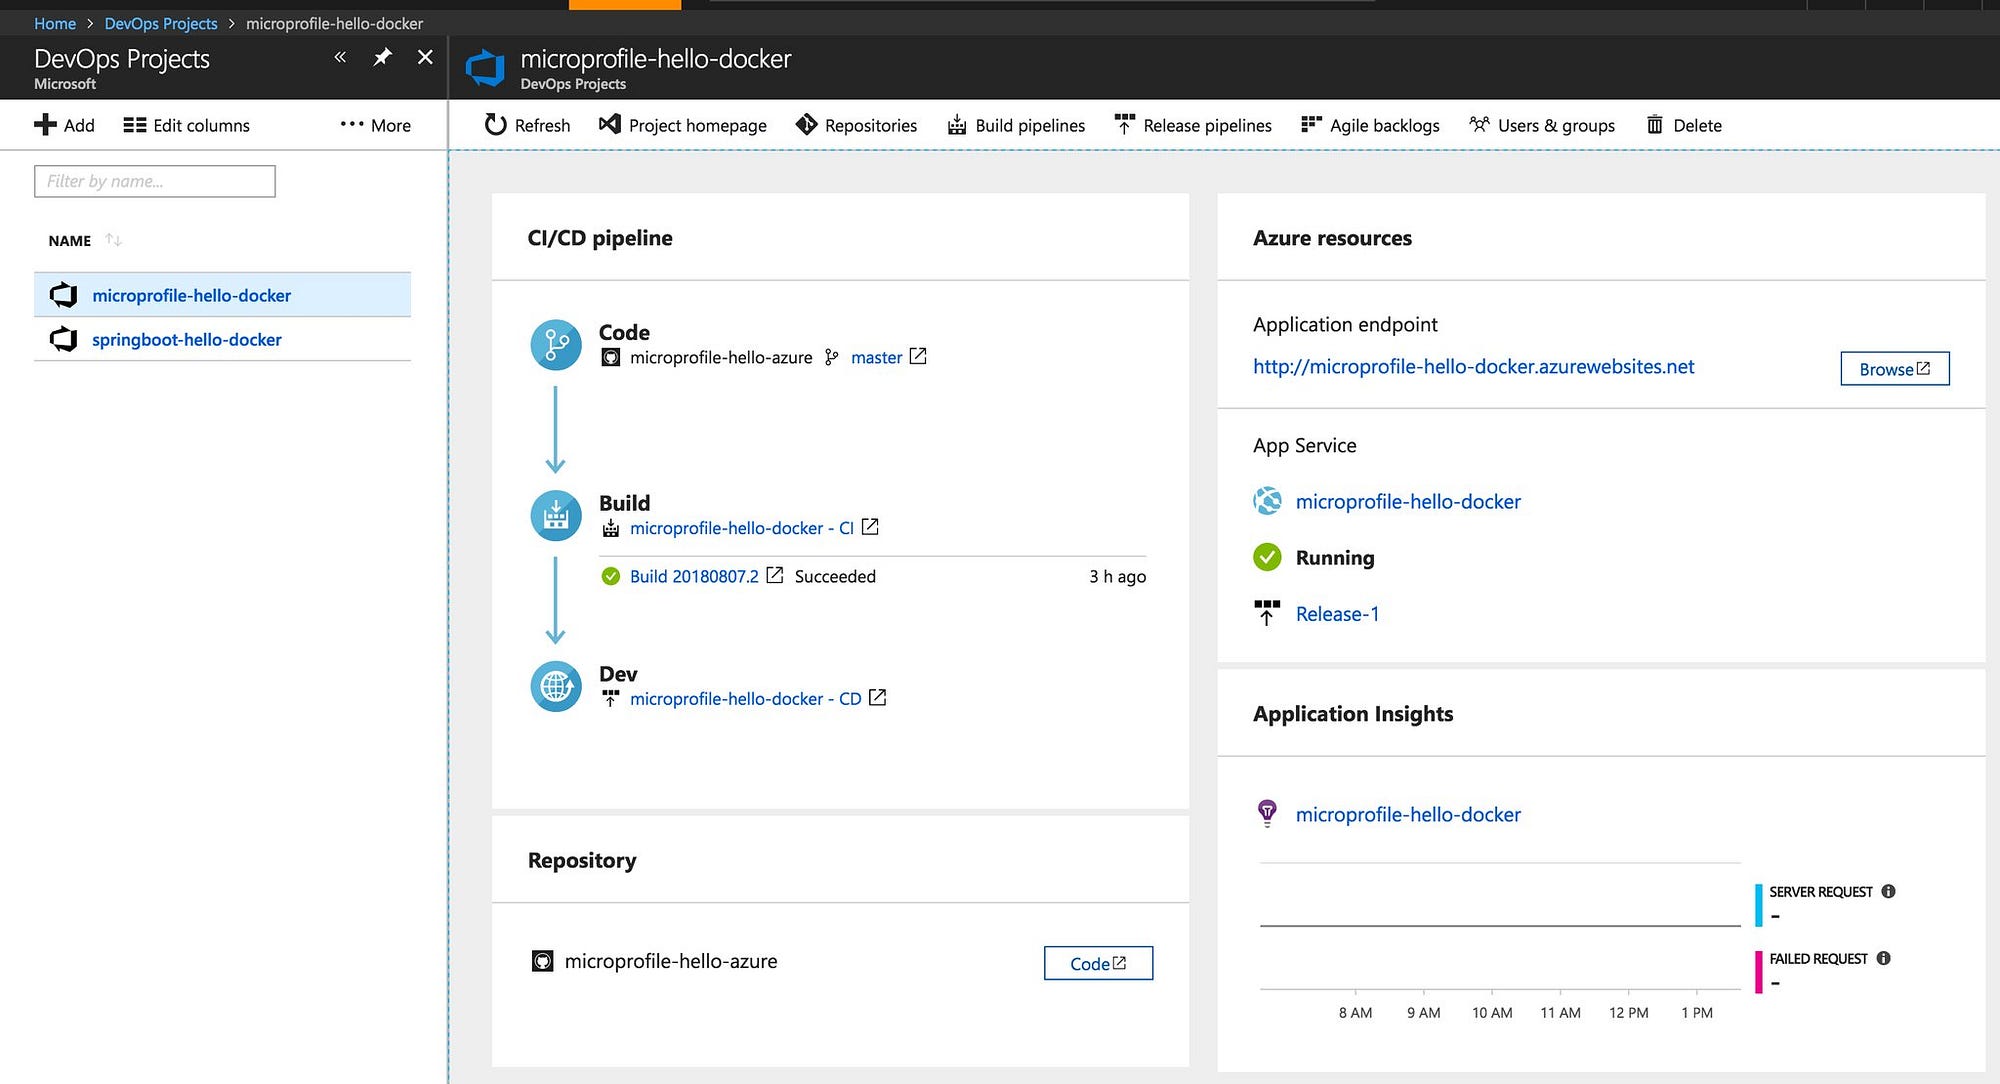
Your application is now running in the Cloud — Microsoft Azure to be more precise! Visit http://<your-app>.azurewebsites.net/api/hello once deployment is done.
Try this now. And please let me know in the comments what you think. And don't forget to clap if you liked it :-)