Thursday, November 27, 2025

Cache Design and patterns

 In this article  we will look at application design and how cache design will be helping to get data from back end quickly.  scope of this article is to look in to general use cases and the best practices available.

There could be lot of specific scenario and good solutions but customization will be based on some standard practices.  Cache at different levels will be starting point for this topic. When data cached at the client side , browser side,  servicer side or even DB side all different scenarios will be suitable for different application/ functionality. 

  • Web server caching frequently requested web pages.
  • Database Query Caching: Caching the results of frequently executed database queries to avoid repetitive database hits.
  • API Response Caching: Caching the responses from external APIs to reduce network round trips and improve response times.
  • Web Server Caching: Web servers like Nginx and Apache can cache static and dynamic content to serve requests faster.
  • Browser Caching: Your web browser caches resources (images, CSS, JS) to speed up subsequent visits to websites.
  • DNS Caching: DNS resolvers cache domain name to IP address mappings to accelerate website lookups.


In this article I will also go though complete details of API caching from graphql  and few other available solutions.

Technologies used in cache design: 

Client-side caching is a technique used to store data locally on the client’s device to improve the performance and efficiency of web applications

Server-side caching is a technique used to store copies of data on the server to improve response times and reduce the load on back-end systems. By keeping frequently accessed data in a cache, servers can quickly serve requests without needing to repeatedly query a database or perform complex computations. 

Lotof legacy systems used Akamai to cheche content and it was very good solution for application of large scale as Akamai has edge network around the world and cache servers are quite powerful. so it all started especially images or some of the key web data akamaized and delivered to web sites lot.

There are many companies made similar products some of them are based on edge network infrastructure and some are cloud based . Here are few examples 


Content Delivery Network (CDN) Caching Techniques

To implement CDN caching, website owners can use the following solutions:

  • Cloud-based CDNs: Services like Amazon CloudFront, Google Cloud CDN, and Cloudflare offer CDN solutions that can be easily integrated with the website.
  • Self-hosted CDNs: Website owners can also set up their own CDN infrastructure using open-source solutions like Varnish Cache or Nginx.

Dynamic Caching Techniques

To implement dynamic caching, website owners can use the following solutions:

  • Varnish Cache: Varnish Cache can be used to cache the output of dynamic scripts and serve them directly from the cache.
  • WordPress Caching Plugins: WordPress has a range of caching plugins, such as WP Rocket, W3 Total Cache, and WP Super Cache, that can help with dynamic caching.
  • Custom Caching Mechanisms: Website owners can also build their own custom caching mechanisms using in-memory data stores like Memcached or Redis.
Above techniques re more depending on third party infrastructure to scale up the application instead of fine tuning application using in build cache techniques.  Again inbuild cache can help to some extent and after that either it should be hardware scaling which is expensive so alternative should be above mentioned third party vendors software solutions.

Some of the use cases just plugging in third party will just solve the performance and scalability. Eg in my web site i do read content i.e images from Choudary. I can still deliver from azure blog and rendering on page. But cloud nary already make sure these images are loaded faster  and easy to adopt. No additional coding required to achieve this.

Technical challenge: 
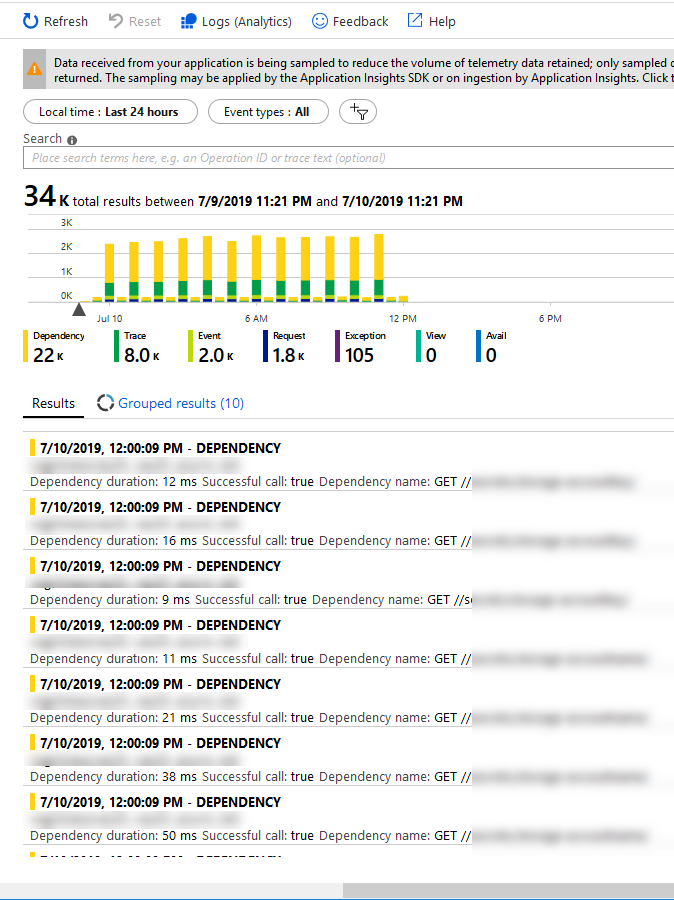
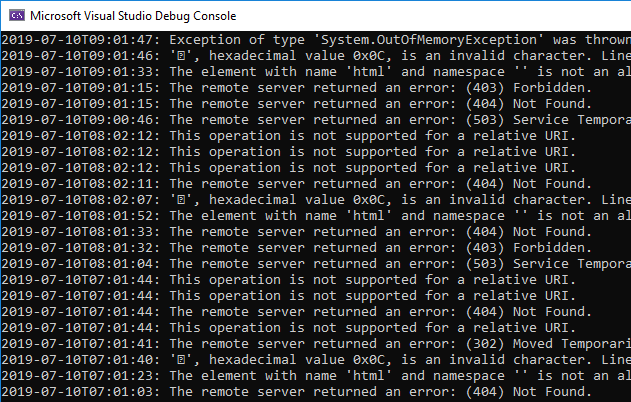
Initial design is get data from azure blob . Which is big slow as www.talash.azurewebsites.net  display 100 images on landing page. These images will change for each request.  API is coming from Graphql end point.
Graphql request cached. But once cache expires it takes 19 seconds to get images urls and get meta data for images like likes, downloads etc. On top of   design should address real time  showing likes for images i.e updating this data  if other users browsing and done some thing like downloaded or commented. so if we request images every time it is 19 sec loading time. If we cache request data and still if we want to show user actions real time make tis design bit tricky.

Solution

1. Signal R solved problem of real time updates. works perfect if two users brow same content and do any user action will reflect on other user pages.

2. Graphql api cached at server level. so fetching time reduced. If it is ne fetch it is 19 sec otherwise it is .5 ms.  Appollo client used at client side to get more control on cache . 

.3 On expansion of tool bars which basically show image information like clicks and download numbers  latest data will be fetched. This section made collapsable so that only if user interested will get latest data otherwise data will be same when page loaded. this will avoid every user click for all images to all concurrent users. 

4. To reduce 19 sec after cache expiry, some work around solution made. As there is over head with "Cold Start" of the some azure resource which is around 5 to 8 sec , implemented an function app which runs every 5 min basically it will reduce the
any latency related to "Cold start" in azure. 

Enhancements:

1. Load images query should get new data in every 5 min and fetch should be cached and also it should avoid " stampede" situation where cache expiration should not cause bad user experience to multiple concurrent users. 

2. "User Query" like data fetching and refetching mechanism to get image information and refetch modified information . It should handle mutation situation carefully.

3. Looking at scalability aspects like if application restarts or latency related to "cold start" with cloud infrastructure and some features of distributed cache using raidis or other external cache systems. 

So finally can get all images with their updated information real time still able to cache content and achieve 20ms loading tie for my landing page. The solution can be further fine tuned. Any mutation can expire meta data and then send to concurrent users as notifications. But above design address lot of performance issues using cache at the same time avoiding any data integrity issues. 

We can look at more Use cases and design and solutions. Above example is to understand different dimensions of caching. Caching support will be different for different languages and technologies. Here are few good examples for Node js,
react and few other technologies.

Node Js:
React:
dotnet:

Angularl:


1. Twitter

  • Caching Strategy: Cache-Aside and In-Memory Caching
  • Problem: Twitter deals with massive amounts of data, with millions of tweets being read and written every second. The need to quickly serve user timelines and handle the high read/write throughput is critical.
  • Solution: Twitter uses Memcached, an in-memory caching system, to store timelines and user sessions. By caching the results of expensive database queries, Twitter can serve user requests more quickly.
  • Benefits: This reduces the load on the primary database, speeds up data retrieval, and enhances the overall user experience.

2. Netflix

  • Caching Strategy: Distributed Caching and Write-Through Caching
  • Problem: Netflix needs to deliver video content to millions of users worldwide with minimal latency and high reliability.
  • Solution: Netflix uses an open-source tool called EVCache, which is based on Memcached, to cache metadata and frequently accessed data. This distributed caching system spans multiple data centers to ensure data availability and quick access.
  • Benefits: This strategy allows Netflix to serve content recommendations, user data, and other API responses quickly, ensuring a seamless viewing experience even during peak times.

3. Amazon

  • Caching Strategy: Content Delivery Network (CDN) Caching and Cache-Aside
  • Problem: Amazon's e-commerce platform handles an immense volume of product queries, user sessions, and transactional data.
  • Solution: Amazon uses Amazon CloudFront, a CDN, to cache static assets like images, videos, and CSS files at edge locations closer to users. Additionally, they employ DynamoDB with DAX (DynamoDB Accelerator) to provide fast in-memory acceleration for read-heavy workloads.
  • Benefits: This reduces latency, speeds up data access, and decreases the load on backend systems, ensuring a fast and reliable shopping experience.


Monday, May 12, 2025

Retrieve logs from Application Insights programmatically with .NET Core (C#)

Ref: Retrieve logs from Application Insights programmatically with .NET Core (C#)


When working with Azure's Application Insights, there's some times where I would've wanted to quickly and programmatically export specific events, search the logs or otherwise pull some data out based on dynamic metrics of applications or monitoring solutions I've set up.

In this post we'll take a look at how easy it is to use the Microsoft.Azure.ApplicationInsights NuGet package to utilize .NET Core to retrieve data programmatically from Application Insights.

For example, in the Azure Portal I can easily see my Application Insights data on demand and search and filter my logs in the intuitive and simplified UI:

Azure Application Insights listing all types of events in the Azure Portal

However, you don't always want to use this view, or Log Analytics or Azure Monitor for the parsing and retreival of data. When you've got any type of requirement to do this programmatically and work with the data in other ways, there's good news...

In the following section, we'll talk about how we can programmatically expose information from App Insights (Exceptions, Custom Events, ...).

Here's an example of listing all exceptions in the last 12 hours and just printing the messages out. For demo purposes, it should be clear how the code works by the end of this post:

Console app in .NET Core which lists Azure Application Insights exceptions from code.

Follow along to learn step by step how to programmatically fetch information from your Application Insights service.

Don't forget to leave a comment in the bottom!

Step 1. Setup a new Azure AD Application

For this to work, we need to prepare a few things:

  • A new Azure AD Application with a new Secret (ClientId, ClientSecret).
  • Assign the required permissions of the new app to your Application Insights service.

This can be done using the Azure CLI, using the Azure Portal or any of the management API's. I'm using the portal in this context - hence the following steps are all relative to your Azure Portal.

1.1. Create an Azure AD Application

Go to Azure Portal - Azure Active Directory - App Registrations and then "+ New registration":

Azure AD application registration in the new Azure Portal experience.

Make note of the App Id (ClientId) from your new application's "Overview" page. You'll need this in the code later:

Get the Application Id (ClientId) for the new Azure AD Application

Click "Certificates & Secrets" and "+ New client secret" in order to create a new secret for this application. Make a note of the secret, as you'll need it in the code later:

Create a Client Secret for your Azure AD application.

Great, we're now prepared for configuring the access rights of our application and allow it to read/contribute/whatever to our Application Insights service.

1.2. Assign Role Based Access Control to App Insights for your Azure AD Application

In order for our new AAD app to access Application Insights, we need to assign the desired role so it can access and read data from App Insights.

Go to your App Insights resource and then "Access control (IAM)" and click "Add" in the "Add a role assignment" box.

Application Insights role based access control with IAM.
Assign RBAC permissions to the application and ensure our new Azure AD application can read data from App Insights.

1.3. Grab the Application Insights API Identifier

For us to access the App Insight from the API, we need to grab the Application ID from "API Access" - "Application ID":

When this is done, we have:

  • A new Azure AD application
  • Created and copied a secret for our app, and copied the ClientId (App Id)
  • Configured RBAC so it can access App Insights
  • Copied the App Insights API Application ID

We are now prepared to programmatically use this app to access App Insights, and can use the SDK's to fetch data.

Step 2. Programmatically reading logs from Application Insights with .NET Core

Okay, we're done with the configuration and preparation phase. We've set up our new Azure AD application and ensured that it has access specifically to the App Insights that I want it to have access to using IAM.

In the demo code below, I haven't used protected secrets - please ensure you take care of your credentials if you use any code below; Don't use plain-text credentials ;)

My demo application is just a Console Application, so following along should be easy.

2.1. Get the required NuGet packages

There's two nuget packages we want in order to reach a working code sample.

2.2. Grab the code!

Since the code itself is very basic, you can just grab it in its demo-shape from below, and start using it as-is and then modify it to fit your own needs.

using System;
using Microsoft.Azure.ApplicationInsights;
using Microsoft.Rest.Azure.Authentication;

namespace Zimmergren.Azure.AppInsightLogFetcher
{
    public class Program
    {
        private static ApplicationInsightsDataClient _applicationInsightsDataClient;
        static void Main(string[] args)
        {
            WireUp();

            WriteExceptionsDemo();
            WriteCustomEventsDemo();
        }

        static void WireUp()
        {
            var activeDirectoryServiceSettings = new ActiveDirectoryServiceSettings
            {
                AuthenticationEndpoint = new Uri("https://login.microsoftonline.com"),
                TokenAudience = new Uri("https://api.applicationinsights.io/"),
                ValidateAuthority = true
            };

            var serviceCredentials = ApplicationTokenProvider.LoginSilentAsync(
                    domain: "<Your Azure AD domain name, or tenant id>",
                    clientId: "<Your Azure AD App Client Id>",
                    secret: "<Your Azure AD App Client Secret>",
                    settings: activeDirectoryServiceSettings)
                .GetAwaiter()
                .GetResult();

            _applicationInsightsDataClient = new ApplicationInsightsDataClient(serviceCredentials)
            {
                AppId = "<Your Application Insights Application ID>"
            };
        }

        private static void WriteCustomEventsDemo()
        {
            var events = _applicationInsightsDataClient.GetCustomEvents();
            foreach (var e in events.Value)
            {
                var name = e.CustomEvent.Name;
                var time = e.Timestamp?.ToString("s") ?? "";
                Console.WriteLine($"{time}: {name}");
            }
        }

        private static void WriteExceptionsDemo()
        {
            var exceptions = _applicationInsightsDataClient.GetExceptionEvents(TimeSpan.FromHours(24));
            
            foreach (var e in exceptions.Value)
            {
                // Just for demo purposes...
                var time = e.Timestamp?.ToString("s") ?? "";
                var exceptionMessage = e.Exception.Message;
                if (string.IsNullOrEmpty(exceptionMessage))
                    exceptionMessage = e.Exception.InnermostMessage;
                if (string.IsNullOrEmpty(exceptionMessage))
                    exceptionMessage = e.Exception.OuterMessage;

                Console.WriteLine($"{time}: {exceptionMessage}");
            }
        }
    }
}

That's it. If you've configured your Azure AD application and App Insight correctly, you can simply grab this code and replace the <...> strings with the values of your own environments.

Security awareness: As always, consider your application configuration and security. Don't put any credentials and secrets in plain text in your source code. Code snippet above is provided as a PoC only and shouldn't be used in this shape if you put it to use in your own software and systems.

Enjoy!


Monday, February 17, 2025

Running Web API with MS SQL Server and Redis in Docker using Docker Compose

 Summary: end to end application- design with web api connecting to DB and building all services with docker compose and complete details related to configuring certificates and other fundamentals and coding standards

Advantages of Docker

Docker simplifies application development by allowing developers to package their applications into portable, lightweight containers. These containers ensure that the application can run consistently across different systems without worrying about underlying infrastructure.

Here are some key advantages:

  • Portability: Docker containers include everything needed to run an application, making them portable across systems that support Docker.
  • Consistency: Containers ensure that applications behave the same way across development, testing, and production environments, eliminating the “works on my machine” problem.
  • Isolation: Each container runs independently, so issues in one container won’t affect others, making maintenance and scaling easier.
  • Scalability: Docker allows for quick scaling of services to handle increased traffic by spawning additional containers.

Why Use Docker Compose for Multiple Services?

Docker Compose is a tool designed for managing multi-container Docker applications, making it ideal for projects that require multiple services, like a Web API, SQL Server, and Redis.

Advantages of Docker Compose include:

  • Simplified Setup: With Docker Compose, you define and run multiple services from a single configuration file.
  • Service Orchestration: Compose ensures services are started in the correct order based on dependencies (e.g., ensuring a database is up before the Web API).

In my project, FashionClothesAndTrends. Docker Compose is used to manage the ASP.NET WebAPI, SQL Server, and Redis services. The setup simplifies running the entire system with a single command, ensuring that all components work seamlessly together.

Detailed Breakdown of Web API Components

Let’s dive deeper into the components of the Web API project. We’ll focus on key elements including the ApplicationDbContext class, caching in the ClothingController, configuration in ApplicationServicesExtensions, and how they are wired together in the Program.cs.

1. ApplicationDbContext Class

The ApplicationDbContext class is the database context for the Web API. It inherits from IdentityDbContext, which is part of the ASP.NET Core Identity framework. This class is responsible for managing the interaction between the Web API and the database.

Here’s a breakdown of the ApplicationDbContext class:

public class ApplicationDbContext : IdentityDbContext<User, AppRole, string,
IdentityUserClaim<string>, AppUserRole, IdentityUserLogin<string>,
IdentityRoleClaim<string>, IdentityUserToken<string>>
{
public ApplicationDbContext(DbContextOptions<ApplicationDbContext> options) : base(options) {}

public DbSet<ClothingItem> ClothingItems { get; set; }
// ... and other entities

protected override void OnModelCreating(ModelBuilder modelBuilder)
{
base.OnModelCreating(modelBuilder);

// Apply configurations using Fluent API
modelBuilder.ApplyConfiguration(new UserConfiguration());
modelBuilder.ApplyConfiguration(new ClothingItemConfiguration());
// ... and other entity configurations

// Seed initial data
SeedDataInitializer.ContextSeed(modelBuilder);
}
}

Key Points:

  • Inherits from IdentityDbContext: This gives the class built-in functionality for handling user authentication, roles, claims, and tokens.
  • DbSets: These properties represent the tables in the database (ClothingItems, etc.).
  • Fluent API Configuration: Uses ApplyConfiguration to apply additional configuration for each entity (UserConfiguration, etc.).
  • Seeding Data: Initial data can be seeded using the SeedDataInitializer.

2. GetClothingItems Method in ClothingController with Caching

In the ClothingController class, we have a method called GetClothingItems. This method is used to retrieve a list of clothing items, and it is cached using a custom [Cached] attribute.

[Cached(60)]
[HttpGet]
public async Task<ActionResult<Pagination<ClothingItemDto>>> GetClothingItems(
[FromQuery] ClothingSpecParams clothingSpecParams)
{
try
{
return Ok(await _clothingItemService.GetClothingItems(clothingSpecParams));
}
catch (Exception ex)
{
return BadRequest(ex.Message);
}
}

Key Points:

  • Cached(60): This custom attribute applies caching to the response of this endpoint. The value 60 represents the cache duration in seconds. This means the response from this method will be stored in the cache for 60 seconds, reducing load on the database for repeated requests within that time frame.
  • Dependency Injection: The method depends on _clothingItemService, which is injected via the constructor. This service contains the business logic for retrieving clothing items.

3. Application Services Configuration in ApplicationServicesExtensions

The ApplicationServicesExtensions class provides a centralized place to configure services for dependency injection. These services include database connection settings, Redis configuration and other essential services required by the application.

public static class ApplicationServicesExtensions
{
public static IServiceCollection AddApplicationServices(this IServiceCollection services,
IConfiguration config
)

{
// Configuring SQL Server connection
services.AddDbContext<ApplicationDbContext>(options =>
{
options.UseSqlServer(config.GetConnectionString("DefaultDockerDbConnection"));
});

// Configuring Redis connection
services.AddSingleton<IConnectionMultiplexer>(c =>
{
var options = ConfigurationOptions.Parse(config.GetConnectionString("Redis"), true);
return ConnectionMultiplexer.Connect(options);
});

// Additional service registrations

return services;
}
}

Key Points:

  • AddDbContext: This method sets up the ApplicationDbContext with a connection to SQL Server using the connection string defined in appsettings.json. In this case, it’s set to use the Docker SQL Server instance.
  • AddSingleton: This registers Redis as a singleton, meaning there will be a single instance of the Redis connection multiplexer shared across the application.

4. Application of AddApplicationServices in Program.cs

In the Program.cs, this extension method is called to register the services at runtime:

builder.Services.AddApplicationServices(builder.Configuration);

Key Points:

  • builder.Services: This represents the service collection used to register all services for dependency injection.
  • builder.Configuration: This provides access to the application’s configuration (e.g., appsettings.json). The connection strings and Redis settings are read from here.

5. Configuration in appsettings.json

The appsettings.json file contains the configuration settings for the application, including connection strings for the database and Redis.

{
"ConnectionStrings": {
"DefaultDockerDbConnection": "Server=sql_server2022,1433;Database=FashionClothesAndTrendsDB;User Id=sa;Password=MyPass@word90_;MultipleActiveResultSets=true;TrustServerCertificate=True",
"Redis": "redis:6379,abortConnect=false",
}
}

Docker Configuration for ASP.NET Core Application

In this section, we will explore the Dockerfile used in the FashionClothesAndTrends.WebAPI, discuss running ASP.NET Core with HTTPS inside Docker, explain how to create a development certificate, and take a detailed look at the docker-compose.debug.yml file.

1. Dockerfile Breakdown

The Dockerfile located at FashionClothesAndTrends.WebAPI/Dockerfile is used to containerize the ASP.NET Core application. Here’s the breakdown of its stages:

FROM mcr.microsoft.com/dotnet/aspnet:8.0 AS base
WORKDIR /app
EXPOSE 80
EXPOSE 443

FROM mcr.microsoft.com/dotnet/sdk:8.0 AS build
ARG BUILD_CONFIGURATION=Release
WORKDIR /src
COPY ["FashionClothesAndTrends.WebAPI/FashionClothesAndTrends.WebAPI.csproj", "FashionClothesAndTrends.WebAPI/"]
COPY ["FashionClothesAndTrends.Application/FashionClothesAndTrends.Application.csproj", "FashionClothesAndTrends.Application/"]
COPY ["FashionClothesAndTrends.Domain/FashionClothesAndTrends.Domain.csproj", "FashionClothesAndTrends.Domain/"]
COPY ["FashionClothesAndTrends.Infrastructure/FashionClothesAndTrends.Infrastructure.csproj", "FashionClothesAndTrends.Infrastructure/"]
RUN dotnet restore "FashionClothesAndTrends.WebAPI/FashionClothesAndTrends.WebAPI.csproj"
COPY . .
WORKDIR "/src/FashionClothesAndTrends.WebAPI"
RUN dotnet build "FashionClothesAndTrends.WebAPI.csproj" -c $BUILD_CONFIGURATION -o /app/build

FROM build AS publish
ARG BUILD_CONFIGURATION=Release
RUN dotnet publish "FashionClothesAndTrends.WebAPI.csproj" -c $BUILD_CONFIGURATION -o /app/publish /p:UseAppHost=false

FROM mcr.microsoft.com/dotnet/sdk:8.0 AS final
WORKDIR /app
COPY --from=publish /app/publish .
RUN dotnet tool install --global dotnet-ef
ENV PATH="${PATH}:/root/.dotnet/tools"
ENTRYPOINT ["dotnet", "FashionClothesAndTrends.WebAPI.dll"]

Main Key Points:

  • EXPOSE 80 and EXPOSE 443: Exposes ports 80 (HTTP) and 443 (HTTPS), allowing the container to serve web traffic.
  • WORKDIR /src: Sets the working directory inside the container where the source code will be placed.
  • COPY: Copies the .csproj files for the WebAPI, Application, Domain, and Infrastructure layers into the container for the build process.
  • WORKDIR “/src/FashionClothesAndTrends.WebAPI”: Sets the working directory to the WebAPI project folder.
  • RUN dotnet tool install — global dotnet-ef: Installs the Entity Framework Core (EF) command-line tool.
  • ENV PATH=”${PATH}:/root/.dotnet/tools”: Updates the environment PATH to include the EF tools for use during runtime.
  • ENTRYPOINT: Defines the command that will be executed when the container starts (dotnet FashionClothesAndTrends.WebAPI.dll).

2. Running ASP.NET Core with HTTPS inside Docker

When running ASP.NET Core inside Docker with HTTPS, it is essential to bind a certificate to the container. This ensures secure connections to the API. Below are the steps to create and use a development certificate for localhost.

Create a Dev Certificate for Localhost On Windows, you can generate and trust a local HTTPS development certificate using the following commands:

dotnet dev-certs https -ep $env:USERPROFILE/.aspnet/https/aspnetapp.pfx -p MyPass@word90_
dotnet dev-certs https --trust

In my project, I’ve executed the dotnet dev-certs https commands at the FashionClothesAndTrends level instead of within the FashionClothesAndTrends.WebAPI directory.

  • dotnet dev-certs https -ep: Exports a self-signed HTTPS certificate to a .pfx file.
  • MyPass@word90_: An example of password to protect the certificate.
  • dotnet dev-certs https — trust: Trusts the certificate on your local machine, allowing it to be used with HTTPS.

The appsettings.json should contain the following Kestrel configuration for HTTPS:

{
"Kestrel": {
"Endpoints": {
"Https": {
"Url": "https://+:443",
"Certificate": {
"Path": "/https/aspnetapp.pfx",
"Password": "MyPass@word90_"
}
}
}
}
}

This configuration specifies that Kestrel should use HTTPS and binds it to port 443. The certificate is loaded from the /https/aspnetapp.pfx file, with the password provided in the docker-compose.debug.yml file.

3. Docker Compose File

The docker-compose.debug.yml file orchestrates the different services used by the application (e.g., the Web API, SQL Server, Redis) into a cohesive environment.

version: "3.9"

services:
webapi:
build:
context: .
dockerfile: ./FashionClothesAndTrends.WebAPI/Dockerfile
restart: always
ports:
- "5000:80"
- "5001:443"
environment:
- ASPNETCORE_ENVIRONMENT=Development
- ASPNETCORE_URLS=https://+;http://+
- ASPNETCORE_HTTPS_PORT=5001
- ASPNETCORE_Kestrel__Certificates__Default__Password=MyPass@word90_
- ASPNETCORE_Kestrel__Certificates__Default__Path=/https/aspnetapp.pfx
- ConnectionStrings__DefaultDockerDbConnection=Server=sql_server2022,1433;Database=FashionClothesAndTrendsDB;User Id=sa;Password=MyPass@word90_;MultipleActiveResultSets=true;TrustServerCertificate=True
- Redis__ConnectionString=redis:6379
links:
- sql
- redis
depends_on:
- sql
- redis
networks:
- app_network
volumes:
- ~/.aspnet/https:/https:ro

redis:
image: redis:latest
ports:
- "6379:6379"
command: ["redis-server", "--appendonly", "yes", "--timeout", "0"]
healthcheck:
test: ["CMD", "redis-cli", "ping"]
interval: 10s
timeout: 5s
retries: 5
networks:
- app_network

sql:
image: mcr.microsoft.com/mssql/server:2022-latest
container_name: sql_server2022
environment:
SA_PASSWORD: "MyPass@word90_"
ACCEPT_EULA: "Y"
ports:
- "1433:1433"
healthcheck:
test: CMD /opt/mssql-tools/bin/sqlcmd -S localhost -U sa -P MyPass@word90_ -Q "SELECT 1" || exit 1
timeout: 20s
retries: 10
start_period: 10s
networks:
- app_network

networks:
app_network:
driver: bridge

Main Key Points:

  • build: Defines how to build the WebAPI service using the Dockerfile.
  • ports: Maps ports 5000 (HTTP) and 5001 (HTTPS) on the host to ports 80 and 443 in the container.
  • environment: Sets environment variables for ASP.NET Core, including HTTPS configuration (ASPNETCORE_HTTPS_PORT, ASPNETCORE_Kestrel__Certificates).
  • links: Connects the webapi service to the sql and redis services.
  • depends_on: Ensures the sql and redis services are up and running before starting the webapi service.
  • volumes: Mounts the HTTPS certificate from the host into the container as read-only.
  • Redis: Uses the official Redis image and is exposed on port 6379. It is configured to run indefinitely (timeout=0).
  • SQL Server: Uses the official SQL Server 2022 image, with a health check to ensure the database is running before the WebAPI service starts.

When the Docker Compose Command Runs

In this section, we will focus on launching the project using the Docker Compose command. The full command you’ll be using is:

docker-compose -f docker-compose.debug.yml up --build

When you run the command docker-compose -f docker-compose.debug.yml up — build, Docker will:

  • Check for the necessary images (SQL Server and Redis).
  • If they aren’t present locally, Docker will download them automatically. Build your WebAPI service as per the Dockerfile in the FashionClothesAndTrends.WebAPI directory.
  • Run the containers: SQL Server, Redis, and your WebAPI will start up in their own isolated containers, and the services will be linked together as defined in the docker-compose.debug.yml file.

By automating this process with Docker Compose, it simplifies the experience for the user, ensuring that everything is pulled and configured without needing to run multiple docker pull commands manually.

Conclusion

Docker greatly simplifies the development and deployment of modern applications by containerizing the necessary services into easily manageable components. With Docker Compose, you can orchestrate multiple services like a WebAPI, SQL Server, and Redis, all from a single configuration file.

In this guide, we demonstrated how to:

  • Leverage Docker to run ASP.NET Core applications, MS SQL Server, and Redis within containers, ensuring consistency across different environments.
  • Use Docker Compose to manage multiple services seamlessly, allowing for the automatic pulling of necessary images like SQL Server and Redis and creating a cohesive network of services.
  • Run ASP.NET Core with HTTPS within Docker, ensuring secure connections through a trusted local development certificate.
  • By utilizing these Docker and Docker Compose capabilities, you can streamline your workflow, automate the configuration of complex environments, and minimize the risk of “it works on my machine” issues.

Cache Design and patterns

 In this article  we will look at application design and how cache design will be helping to get data from back end quickly.  scope of this ...